
User's Guide
Page 2
... Contents Chapter 1 Installing the 200Mbps Powerline AV Adapter 3 Package Contents ...3 Status Lights and Label Information ...3 LED Indicators...3 Prepare to Install Your Powerline Adapter 4 Connect a TPL‐303E to the Router ...5 Connect other Powerline Adapters...5 Install the Utility (Highly Recommended 6 Set Your Private Network Name...10 Add a Device to an Existing Powerline Network 13 Adding a New Device...
... Contents Chapter 1 Installing the 200Mbps Powerline AV Adapter 3 Package Contents ...3 Status Lights and Label Information ...3 LED Indicators...3 Prepare to Install Your Powerline Adapter 4 Connect a TPL‐303E to the Router ...5 Connect other Powerline Adapters...5 Install the Utility (Highly Recommended 6 Set Your Private Network Name...10 Add a Device to an Existing Powerline Network 13 Adding a New Device...

User's Guide
Page 3
... - Activity 9 Off - Link 9 Blinking Green - Chapter 1 Installing the 200Mbps Powerline AV Adapter This chapter describes how to set up the TPL‐303E / TPL‐303E2K200Mbps 200Mbps Powerline AV Adapter on your local area network (LAN) and connect to verify connections.... 9 Blinking Green - Activity Chapter 1 Installing the 200Mbps Powerline AV Adapter 3 Status Lights and Label Information The Powerline adapter has status indicators and a label with these features of the TPL‐303E / TPL‐303E2K contains status lights. Package Contents The product package should...
... - Activity 9 Off - Link 9 Blinking Green - Chapter 1 Installing the 200Mbps Powerline AV Adapter This chapter describes how to set up the TPL‐303E / TPL‐303E2K200Mbps 200Mbps Powerline AV Adapter on your local area network (LAN) and connect to verify connections.... 9 Blinking Green - Activity Chapter 1 Installing the 200Mbps Powerline AV Adapter 3 Status Lights and Label Information The Powerline adapter has status indicators and a label with these features of the TPL‐303E / TPL‐303E2K contains status lights. Package Contents The product package should...

User's Guide
Page 4
... Fits in Your Network You can use the TPL‐303E / TPL‐303E2K 200Mbps Powerline AV Adapter to be used on your existing electrical power line in place of a dedicated LAN wiring infrastructure. z Your Ethernet network is set... up and an Ethernet port is working. z Your Internet connection is available on your network has an Ethernet port. Chapter 1 Installing the 200Mbps Powerline AV ...
... Fits in Your Network You can use the TPL‐303E / TPL‐303E2K 200Mbps Powerline AV Adapter to be used on your existing electrical power line in place of a dedicated LAN wiring infrastructure. z Your Ethernet network is set... up and an Ethernet port is working. z Your Internet connection is available on your network has an Ethernet port. Chapter 1 Installing the 200Mbps Powerline AV ...

User's Guide
Page 5
...They should turn on and then briefly blink at this stage. - Connect a TPL‐303E to the Router First, connect a TPL‐303E 200Mbps Powerline AV Adapterto a LAN port on the router so that no other Powerline devices have been detected at the same time as this password later if you ...connected in the previous step is securely attached to the Powerline adapter and the router, that...
...They should turn on and then briefly blink at this stage. - Connect a TPL‐303E to the Router First, connect a TPL‐303E 200Mbps Powerline AV Adapterto a LAN port on the router so that no other Powerline devices have been detected at the same time as this password later if you ...connected in the previous step is securely attached to the Powerline adapter and the router, that...

User's Guide
Page 6
... your router. Chapter 1 Installing the 200Mbps Powerline AV Adapter 6 Important features: z The encryption password is printed on the Windows Start menu, and double‐click the drive that is connected to My Computer on each Powerline product. All devices on the computer that contains the TPL‐303E / TPL‐303E2K CD or - You can be...
... your router. Chapter 1 Installing the 200Mbps Powerline AV Adapter 6 Important features: z The encryption password is printed on the Windows Start menu, and double‐click the drive that is connected to My Computer on each Powerline product. All devices on the computer that contains the TPL‐303E / TPL‐303E2K CD or - You can be...

User's Guide
Page 7
Chapter 1 Installing the 200Mbps Powerline AV Adapter 7 2. Click Install Utility to start the installation Prior to the utility installation, it will prompt you to continue. Click Next to install the WinPcap program.
Chapter 1 Installing the 200Mbps Powerline AV Adapter 7 2. Click Install Utility to start the installation Prior to the utility installation, it will prompt you to continue. Click Next to install the WinPcap program.

User's Guide
Page 8
Chapter 1 Installing the 200Mbps Powerline AV Adapter 8 3. Click Next and follow the instructions on the screen. Then the powerline utility installation will start, click Next to continue 4.
Chapter 1 Installing the 200Mbps Powerline AV Adapter 8 3. Click Next and follow the instructions on the screen. Then the powerline utility installation will start, click Next to continue 4.

User's Guide
Page 9
Chapter 1 Installing the 200Mbps Powerline AV Adapter 9 The InstallShield Wizard indicates that the installation is complete. 5. Click Close.
Chapter 1 Installing the 200Mbps Powerline AV Adapter 9 The InstallShield Wizard indicates that the installation is complete. 5. Click Close.

User's Guide
Page 10
... utility Note: Accessing the utility for the first time, you need the device password on the back label of each remote Powerline device: a. Set Your Private Network Name The fastest and most reliable way to set the network name is to set the network name. 1.... enter the device password for each remote Powerline device, and then set the password for each Powerline device. b. Enter the device password for all Powerline devices are two steps to continue. There are plugged into 100~240V AC wall sockets. Chapter 1 Installing the 200Mbps Powerline AV Adapter 10 Make sure that all devices...
... utility Note: Accessing the utility for the first time, you need the device password on the back label of each remote Powerline device: a. Set Your Private Network Name The fastest and most reliable way to set the network name is to set the network name. 1.... enter the device password for each remote Powerline device, and then set the password for each Powerline device. b. Enter the device password for all Powerline devices are two steps to continue. There are plugged into 100~240V AC wall sockets. Chapter 1 Installing the 200Mbps Powerline AV Adapter 10 Make sure that all devices...

User's Guide
Page 11
Enter the password recorded from the MAC address. Click OK. d. Select a Powerline device and, if more than one remote device is listed, identify it from the label on the back of the selected Powerline device. h. Repeat this step for all the remote Powerline devices. f. Chapter 1 Installing the 200Mbps Powerline AV Adapter 11 Check that the utility lists all devices that you want attached to your network. e. Click Enter Password. c. g.
Enter the password recorded from the MAC address. Click OK. d. Select a Powerline device and, if more than one remote device is listed, identify it from the label on the back of the selected Powerline device. h. Repeat this step for all the remote Powerline devices. f. Chapter 1 Installing the 200Mbps Powerline AV Adapter 11 Check that the utility lists all devices that you want attached to your network. e. Click Enter Password. c. g.

User's Guide
Page 12
Select the Privacy tab. Type a Name in the Private Network Name text box. A pop‐up window indicates that the operation was successful. b. 2. Set the Private Network Name i. a. Chapter 1 Installing the 200Mbps Powerline AV Adapter 12 Click Set All Devices.
Select the Privacy tab. Type a Name in the Private Network Name text box. A pop‐up window indicates that the operation was successful. b. 2. Set the Private Network Name i. a. Chapter 1 Installing the 200Mbps Powerline AV Adapter 12 Click Set All Devices.

User's Guide
Page 13
...the new device into a power outlet. Click Use Default (Public Network). Click Set All Devices. 6. Select the new Powerline device from a Remotely Connected Computer 1. Plug the new Powerline device into an AC power outlet. 3. In the pop‐up window, enter the password from a Locally Connected Computer ... power outlet and connect it to an Ethernet port on the remote computer and select the Security tab. 4. Chapter 1 Installing the 200Mbps Powerline AV Adapter 13 The password in the Private Network Name text box and click Set Local Device Only. 4. Type the network name...
...the new device into a power outlet. Click Use Default (Public Network). Click Set All Devices. 6. Select the new Powerline device from a Remotely Connected Computer 1. Plug the new Powerline device into an AC power outlet. 3. In the pop‐up window, enter the password from a Locally Connected Computer ... power outlet and connect it to an Ethernet port on the remote computer and select the Security tab. 4. Chapter 1 Installing the 200Mbps Powerline AV Adapter 13 The password in the Private Network Name text box and click Set Local Device Only. 4. Type the network name...
Quick Installation Guide
Page 4
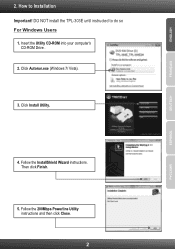
2. Click Install Utility. 4. Follow the 200Mbps Powerline Utility instructions and then click Close. 2 Insert the Utility CD-ROM into your computer's CD-ROM Drive . 2. DO NOT install the TPL-303E until instructed to Installation Important! Follow the InstallShield Wizard instructions. How to do so For Windows Users 1. Then click Finish. 5. Click Autorun.exe (Windows 7/ Vista). 3.
2. Click Install Utility. 4. Follow the 200Mbps Powerline Utility instructions and then click Close. 2 Insert the Utility CD-ROM into your computer's CD-ROM Drive . 2. DO NOT install the TPL-303E until instructed to Installation Important! Follow the InstallShield Wizard instructions. How to do so For Windows Users 1. Then click Finish. 5. Click Autorun.exe (Windows 7/ Vista). 3.

Quick Installation Guide
Page 6
Enter the remote TPL-303E's 12-digit password and click OK. Note: The default network name is NOT HomePlugAV, you must change this in the utility. 4 Click OK. 15. If the network name of your existing Powerline network is HomePlugAV. Note: Remote TPL-303E refers to the TPL-303E that is connected to find the remote TPL-303E's password. 14. Select the remote TPL-303E and click Enter Password. See step 3 to your desktop. 12. 11. Repeat steps 12-14 for additional remote TPL-303E's. Double-click the 200Mbps Powerline Utility icon on your remote PC or network appliance. 13.
Enter the remote TPL-303E's 12-digit password and click OK. Note: The default network name is NOT HomePlugAV, you must change this in the utility. 4 Click OK. 15. If the network name of your existing Powerline network is HomePlugAV. Note: Remote TPL-303E refers to the TPL-303E that is connected to find the remote TPL-303E's password. 14. Select the remote TPL-303E and click Enter Password. See step 3 to your desktop. 12. 11. Repeat steps 12-14 for additional remote TPL-303E's. Double-click the 200Mbps Powerline Utility icon on your remote PC or network appliance. 13.

Quick Installation Guide
Page 8
...Local Area Connection icon and then click Properties. 2. I inserted the TPL-303E/TPL-303E2K CD-ROM into is located on the side of the TPL-303E. 3 I do ? 1. What should I can detect my Powerline devices on your TPL-303Es for 15 seconds. Verify the network name of the screen,, ... and/or circuit breaker box. 6. Open up the 200Mbps Powerline Utility and click scan. 4. Reset your Powerline network. I have verified that the power outlet the TPL-303E is connected to the Internet. Troubleshooting 1. Verify that my Powerline device is plugged into my computer's CD-ROM Drive ...
...Local Area Connection icon and then click Properties. 2. I inserted the TPL-303E/TPL-303E2K CD-ROM into is located on the side of the TPL-303E. 3 I do ? 1. What should I can detect my Powerline devices on your TPL-303Es for 15 seconds. Verify the network name of the screen,, ... and/or circuit breaker box. 6. Open up the 200Mbps Powerline Utility and click scan. 4. Reset your Powerline network. I have verified that the power outlet the TPL-303E is connected to the Internet. Troubleshooting 1. Verify that my Powerline device is plugged into my computer's CD-ROM Drive ...

Datasheet
Page 1
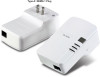
... status for use in different rooms without running new cabling. Quality of Service technology prioritizes video, audio, and online gaming. gigabit 200Mbps Powerline AV Ethernet Adapter Kit TPL-303E2K (V1.0R) The 200Mbps Powerline AV Adapter Kit uses any outlet on your electrical system for instant building connectivity • Network signal transmitted up to 300 meters...
... status for use in different rooms without running new cabling. Quality of Service technology prioritizes video, audio, and online gaming. gigabit 200Mbps Powerline AV Ethernet Adapter Kit TPL-303E2K (V1.0R) The 200Mbps Powerline AV Adapter Kit uses any outlet on your electrical system for instant building connectivity • Network signal transmitted up to 300 meters...
Datasheet
Page 2
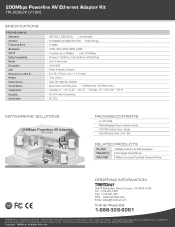
200Mbps Powerline AV Ethernet Adapter Kit TPL-303E2K (V1.0R) SPECIFICATIONS Hardware Standards Interface Frequency Band Modulation Speed Utility Comptibility Nodes Encryption LED Dimension (L x W X H) Weight Power Source Consumption Temperature Humidity .../ 6ft) RELATED PRODUCTS TPL-302E 200Mbps Powerline AV Ethernet Adapter TWG-BRF114 4-Port Gigabit Firewall Router TEW-671BR 300Mbps Concurrent Dual Band Wireless N Router ORDERING INFORMATION 20675 Manhattan Place,Torrance, CA 90501 USA Tel: 1-310-961-5500 Fax: 1-310-961-5511 Web: www.trendnet.com Email: sales@trendnet.com To Order Please...
200Mbps Powerline AV Ethernet Adapter Kit TPL-303E2K (V1.0R) SPECIFICATIONS Hardware Standards Interface Frequency Band Modulation Speed Utility Comptibility Nodes Encryption LED Dimension (L x W X H) Weight Power Source Consumption Temperature Humidity .../ 6ft) RELATED PRODUCTS TPL-302E 200Mbps Powerline AV Ethernet Adapter TWG-BRF114 4-Port Gigabit Firewall Router TEW-671BR 300Mbps Concurrent Dual Band Wireless N Router ORDERING INFORMATION 20675 Manhattan Place,Torrance, CA 90501 USA Tel: 1-310-961-5500 Fax: 1-310-961-5511 Web: www.trendnet.com Email: sales@trendnet.com To Order Please...