
Datasheet
Page 1
... Vista Aero mode) operating systems • 2 year limited warranty TU2-DVIV rev:10.02.2008 medianet USB to DVI/VGA Adapter TU2-DVIV (A1.0R) The USB to DVI / VGA Adapter uses a USB port on your Microsoft Windows desktop or laptop computer. Install the driver and plug the USB 2.0 cable into a LCD or CRT monitor...
... Vista Aero mode) operating systems • 2 year limited warranty TU2-DVIV rev:10.02.2008 medianet USB to DVI/VGA Adapter TU2-DVIV (A1.0R) The USB to DVI / VGA Adapter uses a USB port on your Microsoft Windows desktop or laptop computer. Install the driver and plug the USB 2.0 cable into a LCD or CRT monitor...

Datasheet
Page 2
... angles Rotate 90° right PACKAGE CONTENTS • TU2-DVIV • Multi-Language Quick Installation Guide • CD-ROM (Utility & Drivers) • 1 x VGA to DVI convertor • 1 x USB cable (45cm / 18in) RELATED PRODUCTS TU2-400E TU2-700 4-Port Compact USB Hub 7-Port Hi-Speed USB... time, without notice. All Rights Reserved. Other Brands and product names are trademarks of their respective holders. USB to TRENDnet products and is a registered trademark. Copyright © TRENDnet. VGA (DVI to D-Sub15 VGA adapter) • Bus-power • Up to 6 adapters (7 monitors) &#...
... angles Rotate 90° right PACKAGE CONTENTS • TU2-DVIV • Multi-Language Quick Installation Guide • CD-ROM (Utility & Drivers) • 1 x VGA to DVI convertor • 1 x USB cable (45cm / 18in) RELATED PRODUCTS TU2-400E TU2-700 4-Port Compact USB Hub 7-Port Hi-Speed USB... time, without notice. All Rights Reserved. Other Brands and product names are trademarks of their respective holders. USB to TRENDnet products and is a registered trademark. Copyright © TRENDnet. VGA (DVI to D-Sub15 VGA adapter) • Bus-power • Up to 6 adapters (7 monitors) &#...
User's Guide
Page 4
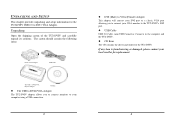
UNPACKING AND SETUP This chapter provides unpacking and setup information for the TU2-DVIV USB 2.0 to the computer and the TU2-DVIV. Connects to DVI / VGA Adapter. Unpacking Open the shipping carton of the TU2-DVIV and carefully unpack its contents. z CD Rom The CD contains the driver and utility for replacement. 4 z USB Cable USB 2.0 Cable, mini USB...
UNPACKING AND SETUP This chapter provides unpacking and setup information for the TU2-DVIV USB 2.0 to the computer and the TU2-DVIV. Connects to DVI / VGA Adapter. Unpacking Open the shipping carton of the TU2-DVIV and carefully unpack its contents. z CD Rom The CD contains the driver and utility for replacement. 4 z USB Cable USB 2.0 Cable, mini USB...

User's Guide
Page 5
... your PC and if ask for the process to continue then the Autorun wizard will start. 5 5. Insert the CD-ROM in the TU2-DVIV and a message will display on Install Utility & Driver button to install the control software to your PC as shown. 6 Windows Vista Install 1. Click Continue to go to reboot. 7. Wait...
... your PC and if ask for the process to continue then the Autorun wizard will start. 5 5. Insert the CD-ROM in the TU2-DVIV and a message will display on Install Utility & Driver button to install the control software to your PC as shown. 6 Windows Vista Install 1. Click Continue to go to reboot. 7. Wait...
User's Guide
Page 6
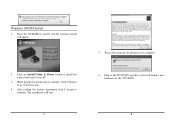
When prompt for the process to complete. 6. Windows 2000/XP Install 1. Wait a few moments for permission to continue. Click Continue to go to your PC and the Autorun wizard will appear. 2. The installation will found a new hardware of the TU2-DVIV. 8 Click on Install Utility & Driver button to install the control software to the next step. 4. Plug in your PC 3. Insert the CD-ROM in the TU2-DVIV and the system will start. 7 5. After reading the License Agreement click I Accept to continue.
When prompt for the process to complete. 6. Windows 2000/XP Install 1. Wait a few moments for permission to continue. Click Continue to go to your PC and the Autorun wizard will appear. 2. The installation will found a new hardware of the TU2-DVIV. 8 Click on Install Utility & Driver button to install the control software to the next step. 4. Plug in your PC 3. Insert the CD-ROM in the TU2-DVIV and the system will start. 7 5. After reading the License Agreement click I Accept to continue.

Quick Installation Guide
Page 5
Click Install Utility & Driver. 4. Click Yes to restart your computer until instructed to your computer (Windows 2000/Vista only). 3 English How to Install Note: Do not connect the TU2-DVIV to do so. 1. Choose the desired language, read the Software End User License Agreement and then click I Accept. 5. 2. Insert the Driver CD-ROM into your CD-ROM Drive. 2. Click Run autorun.exe (Windows Vista only). 3.
Click Install Utility & Driver. 4. Click Yes to restart your computer until instructed to your computer (Windows 2000/Vista only). 3 English How to Install Note: Do not connect the TU2-DVIV to do so. 1. Choose the desired language, read the Software End User License Agreement and then click I Accept. 5. 2. Insert the Driver CD-ROM into your CD-ROM Drive. 2. Click Run autorun.exe (Windows Vista only). 3.
Quick Installation Guide
Page 7
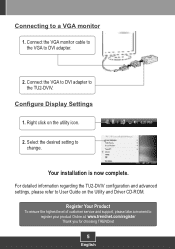
... the TU2-DVIV. Right click on the Utility and Driver CD-ROM. Your installation is now complete. Connect the VGA to DVI adapter to a VGA monitor 1. Select the desired setting to register your product Online at: www.trendnet.com/register Thank you for choosing TRENDnet 5 ...English Register Your Product To ensure the highest level of customer service and support, please take a moment to change. For detailed information regarding the TU2-DVIV configuration and advanced settings, please refer...
... the TU2-DVIV. Right click on the Utility and Driver CD-ROM. Your installation is now complete. Connect the VGA to DVI adapter to a VGA monitor 1. Select the desired setting to register your product Online at: www.trendnet.com/register Thank you for choosing TRENDnet 5 ...English Register Your Product To ensure the highest level of customer service and support, please take a moment to change. For detailed information regarding the TU2-DVIV configuration and advanced settings, please refer...

Quick Installation Guide
Page 8
Troubleshooting Q1: Can I do? A1: Yes, you still encounter problems or have any questions regarding the TU2-DVIV, please refer to recognize my hardware. A2: First, make sure your computer meets the minimum requirements as specified in Section 1 of this Quick...adapter into a different USB port. If you can connect or disconnect TU2-DVIV while the computer is unable to the User's Guide included on the Driver CD-ROM or contact TRENDnet's Technical Support Department. 6 What should I connect or disconnect TU2-DVIV while the computer is on because the USB interface is Plug-and-Play...
Troubleshooting Q1: Can I do? A1: Yes, you still encounter problems or have any questions regarding the TU2-DVIV, please refer to recognize my hardware. A2: First, make sure your computer meets the minimum requirements as specified in Section 1 of this Quick...adapter into a different USB port. If you can connect or disconnect TU2-DVIV while the computer is unable to the User's Guide included on the Driver CD-ROM or contact TRENDnet's Technical Support Department. 6 What should I connect or disconnect TU2-DVIV while the computer is on because the USB interface is Plug-and-Play...


