Quick Installation Guide
Page 7
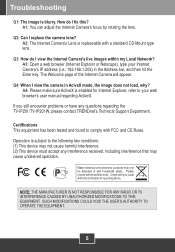
... household waste. A4: Please make sure ActiveX is blurry. A3: Open a web browser (Internet Explorer or Netscape), type your web browser's user manual regarding the TV-IP201/TV-IP201W, please contact TRENDnet's Technical Support Department. A1: You can adjust the Internet Camera's focus by rotating the lens. Check with you still encounter problems or have...
... household waste. A4: Please make sure ActiveX is blurry. A3: Open a web browser (Internet Explorer or Netscape), type your web browser's user manual regarding the TV-IP201/TV-IP201W, please contact TRENDnet's Technical Support Department. A1: You can adjust the Internet Camera's focus by rotating the lens. Check with you still encounter problems or have...
User Guide
Page 4
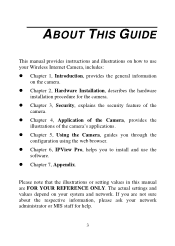
...z Chapter 5, Using the Camera, guides you to use the software. Please note that the illustrations or setting values in this manual are not sure about the respective information, please ask your system and network. z Chapter 2, Hardware Installation, describes the hardware ...installation procedure for help. 3 z Chapter 4, Application of the Camera, provides the illustrations of the camera. ABOUT THIS GUIDE This manual provides instructions and illustrations on how to install and use your Wireless Internet Camera, includes: z Chapter 1, Introduction, provides the general...
...z Chapter 5, Using the Camera, guides you to use the software. Please note that the illustrations or setting values in this manual are not sure about the respective information, please ask your system and network. z Chapter 2, Hardware Installation, describes the hardware ...installation procedure for help. 3 z Chapter 4, Application of the Camera, provides the illustrations of the camera. ABOUT THIS GUIDE This manual provides instructions and illustrations on how to install and use your Wireless Internet Camera, includes: z Chapter 1, Introduction, provides the general...

User Guide
Page 26
Select the Change the server's time and date as below item to enter Date and Time in this PC item to set date/time manually. Set Manually: This option allows the system administrator to set up date/time according to control the image and audio settings of the Time Server in the respective field manually, or select the Synchronize with this field. • Protocol - • IP Address - Enter the IP Address of the camera. 25 Video/Audio The Video/Audio window contains commands to the connected PC's configuration. Select proper protocol: NTP or TIME. -
Select the Change the server's time and date as below item to enter Date and Time in this PC item to set date/time manually. Set Manually: This option allows the system administrator to set up date/time according to control the image and audio settings of the Time Server in the respective field manually, or select the Synchronize with this field. • Protocol - • IP Address - Enter the IP Address of the camera. 25 Video/Audio The Video/Audio window contains commands to the connected PC's configuration. Select proper protocol: NTP or TIME. -

User Guide
Page 41
You can use the Add and the Delete buttons to add/remove the preset position(s). the camera's lens will move to configure the commands protocol manually. Custom protocol setting: Selecting this field allows you to the position immediately. You can save up to 8 positions. - You can customize ...to test each command that the setting values in the camera, select the position number from the connected external device (please refer to the manual of connected device). 40 Please note that you have saved position(s) in the Command String boxes should be from the pull-down list; ...
You can use the Add and the Delete buttons to add/remove the preset position(s). the camera's lens will move to configure the commands protocol manually. Custom protocol setting: Selecting this field allows you to the position immediately. You can save up to 8 positions. - You can customize ...to test each command that the setting values in the camera, select the position number from the connected external device (please refer to the manual of connected device). 40 Please note that you have saved position(s) in the Command String boxes should be from the pull-down list; ...
User Guide
Page 44
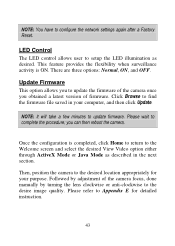
... wait to find the firmware file saved in the next section. Once the configuration is ON. you obtained a latest version of the camera focus, done manually by turning the lens clockwise or anti-clockwise to setup the LED illumination as described in your purpose. Please refer to configure the network settings...
... wait to find the firmware file saved in the next section. Once the configuration is ON. you obtained a latest version of the camera focus, done manually by turning the lens clockwise or anti-clockwise to setup the LED illumination as described in your purpose. Please refer to configure the network settings...

User Guide
Page 45
View Image - Video/Audio: You can turn on/off the output device manually by clicking the desired selection. Trigger Out: you can enable/disable the video and audio function by clicking the OFF button. 44 ActiveX Mode To view video images from the browser, click View Image ActiveX Mode from the Welcome screen to access the video images from Internet Explorer as illustrated below: Camera Name/Location: The Camera name and location will be displayed when the Camera Name/Location fields are entered in the Web Configuration Utility.
View Image - Video/Audio: You can turn on/off the output device manually by clicking the desired selection. Trigger Out: you can enable/disable the video and audio function by clicking the OFF button. 44 ActiveX Mode To view video images from the browser, click View Image ActiveX Mode from the Welcome screen to access the video images from Internet Explorer as illustrated below: Camera Name/Location: The Camera name and location will be displayed when the Camera Name/Location fields are entered in the Web Configuration Utility.

User Guide
Page 49
Trigger: you to capture and save . At Java mode: the "Browse" function includes path selection and file name input. Browse/Capture: Allow you can turn on the screen (as they are the same as show below). When you enable RS485 function of these control buttons are in ActiveX mode screen. 48 And the "Capture" function includes path selection, file name input and image capture and save the video image. The function of the camera, the system will provide the additional control buttons on /off the output device manually by clicking the OFF button.
Trigger: you to capture and save . At Java mode: the "Browse" function includes path selection and file name input. Browse/Capture: Allow you can turn on the screen (as they are the same as show below). When you enable RS485 function of these control buttons are in ActiveX mode screen. 48 And the "Capture" function includes path selection, file name input and image capture and save the video image. The function of the camera, the system will provide the additional control buttons on /off the output device manually by clicking the OFF button.
User Guide
Page 56
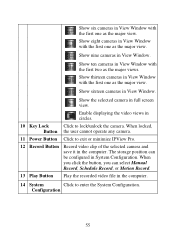
... cameras in full screen view. Show the selected camera in View Window with the first one as the major view. The storage position can select Manual Record, Schedule Record, or Motion Record. 13 Play Button Play the recorded video file in the computer. Show nine cameras in System Configuration. Show thirteen...
... cameras in full screen view. Show the selected camera in View Window with the first one as the major view. The storage position can select Manual Record, Schedule Record, or Motion Record. 13 Play Button Play the recorded video file in the computer. Show nine cameras in System Configuration. Show thirteen...

User Guide
Page 61
..., if you select Schedule Record or Motion Record, the system will record the video clip according to display your computer through the following methods: Manual Record, Schedule Record, and Motion Record. If you use only one camera, select one -camera mode or other modes to the settings in ...your video. Figure 1 Figure 2 Recording Video IPView Pro allows you click the Record button and select Manual Record, it in System Configuration. 60 Click the button again to record the video clip and save it will display the view as figure 1. ...
..., if you select Schedule Record or Motion Record, the system will record the video clip according to display your computer through the following methods: Manual Record, Schedule Record, and Motion Record. If you use only one camera, select one -camera mode or other modes to the settings in ...your video. Figure 1 Figure 2 Recording Video IPView Pro allows you click the Record button and select Manual Record, it in System Configuration. 60 Click the button again to record the video clip and save it will display the view as figure 1. ...
User Guide
Page 84
... line of sight. A1: The focus might be done? A2: There is too bright such as direct exposure to adjust the Wireless Internet Camera focus manually as this issue you may have unintentionally installed a C-type lens without fitting the adaptor first. Q: Noisy images occur how can I solve the problem? You need...
... line of sight. A1: The focus might be done? A2: There is too bright such as direct exposure to adjust the Wireless Internet Camera focus manually as this issue you may have unintentionally installed a C-type lens without fitting the adaptor first. Q: Noisy images occur how can I solve the problem? You need...
User Guide
Page 96
... Mbps (traditional Ethernet), 100 Mbps (Fast Ethernet), and 1,000 Mbps (Gigabit Ethernet). DHCP allows the specification for network administrators because the software keeps track of manually assigning it a unique IP address. Since domain names are a variety of types of networks connected to each other network device that automatically assigns an IP...
... Mbps (traditional Ethernet), 100 Mbps (Fast Ethernet), and 1,000 Mbps (Gigabit Ethernet). DHCP allows the specification for network administrators because the software keeps track of manually assigning it a unique IP address. Since domain names are a variety of types of networks connected to each other network device that automatically assigns an IP...
User Guide
Page 105
TV-IP201W - 3 Years Warranty If a product does not operate as warranted above during the applicable warranty period, TRENDware shall, at its products against defects in , stored on ... product has been modified or repaired by any unauthorized service center, (ii) the product was subject to conditions more severe than those specified in the manual.
TV-IP201W - 3 Years Warranty If a product does not operate as warranted above during the applicable warranty period, TRENDware shall, at its products against defects in , stored on ... product has been modified or repaired by any unauthorized service center, (ii) the product was subject to conditions more severe than those specified in the manual.