
Quick Installation Guide
Page 4
Connect a RJ-45 network cable from a Switch/Router to the metal stand. 2. Mount the Internet Camera to the LAN port of the Internet Camera. 4. Connect the AC Power Adapter to the Internet Camera and then to Connect 1. How to a power outlet. 2 English Attach the Antenna. (TV-IP201W) 3. 2.
Connect a RJ-45 network cable from a Switch/Router to the metal stand. 2. Mount the Internet Camera to the LAN port of the Internet Camera. 4. Connect the AC Power Adapter to the Internet Camera and then to Connect 1. How to a power outlet. 2 English Attach the Antenna. (TV-IP201W) 3. 2.
Quick Installation Guide
Page 5
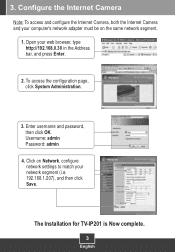
.... 3. Username: admin Password: admin 4. The Installation for TV-IP201 is Now complete. 3 English Open your network segment (i.e. 192.168.1.207), and then click Save. Configure the Internet Camera Note: To access and configure the Internet Camera, both the Internet Camera and your computer's network adapter must be on Network, configure network settings to match your web browser, type...
.... 3. Username: admin Password: admin 4. The Installation for TV-IP201 is Now complete. 3 English Open your network segment (i.e. 192.168.1.207), and then click Save. Configure the Internet Camera Note: To access and configure the Internet Camera, both the Internet Camera and your computer's network adapter must be on Network, configure network settings to match your web browser, type...

Quick Installation Guide
Page 6
The Installation for TV-IP201W is encrypted) 3. Enter the ESSID to Wireless Interface section. 2. 4. Click on Network and scroll down to match your wireless access point and click Save. (Enable/Enter the WEP information when your wireless network is Now complete. For detailed information regarding the TV-IP201/TV-IP201W configuration and advanced settings, please refer to the User's Guide CD-ROM or TRENDnet's website at www.trendnet.com. 4 English Disconnect the RJ-45 cable from the camera. Using the Internet Camera Wirelessly (TV-IP201W only) 1.
The Installation for TV-IP201W is encrypted) 3. Enter the ESSID to Wireless Interface section. 2. 4. Click on Network and scroll down to match your wireless access point and click Save. (Enable/Enter the WEP information when your wireless network is Now complete. For detailed information regarding the TV-IP201/TV-IP201W configuration and advanced settings, please refer to the User's Guide CD-ROM or TRENDnet's website at www.trendnet.com. 4 English Disconnect the RJ-45 cable from the camera. Using the Internet Camera Wirelessly (TV-IP201W only) 1.
Quick Installation Guide
Page 7
...web browser's user manual regarding the TV-IP201/TV-IP201W, please contact TRENDnet's Technical Support Department. Q4: When I replace the camera lens? Including interference that may not cause harmful interference. (2) This device must not be disposed of the Internet Camera will appear. A4: Please make .... A1: You can adjust the Internet Camera's focus by rotating the lens. Q3: How do I view the Internet Camera's live images within my Local Network? NOTE: THE MANUFACTURER IS NOT RESPONSIBLE FOR ANY RADIO OR TV INTERFERENCE CAUSED BY UNAUTHORIZED MODIFICATIONS TO THIS ...
...web browser's user manual regarding the TV-IP201/TV-IP201W, please contact TRENDnet's Technical Support Department. Q4: When I replace the camera lens? Including interference that may not cause harmful interference. (2) This device must not be disposed of the Internet Camera will appear. A4: Please make .... A1: You can adjust the Internet Camera's focus by rotating the lens. Q3: How do I view the Internet Camera's live images within my Local Network? NOTE: THE MANUFACTURER IS NOT RESPONSIBLE FOR ANY RADIO OR TV INTERFERENCE CAUSED BY UNAUTHORIZED MODIFICATIONS TO THIS ...
Data Sheet
Page 1
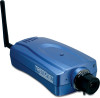
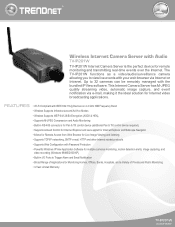
...; Allows for Remote Access from Web Browser for Live Image Viewing and listening • Supports TCP/IP networking, SMTP e-mail, HTTP and other Internet related protocols • Supports Web Configuration with Audio TV-IP201W TV-IP201W Internet Camera Server is the perfect device for remote monitoring and transmitting real-time events over the Internet. medianet Wireless...
...; Allows for Remote Access from Web Browser for Live Image Viewing and listening • Supports TCP/IP networking, SMTP e-mail, HTTP and other Internet related protocols • Supports Web Configuration with Audio TV-IP201W TV-IP201W Internet Camera Server is the perfect device for remote monitoring and transmitting real-time events over the Internet. medianet Wireless...
Data Sheet
Page 3
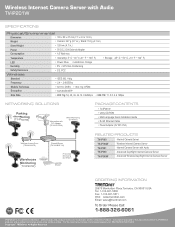
...; 128 mm (4.7 in .) Weight • Camera: 247 g (8.7 oz.); For the most recent product information please visit http://www.trendnet.com. Temperature • Operating: 5° ... 1Mbps NETWORKING SOLUTIONS Parking Monitoring (TV-IP201W) Workstation with PCI Adapter (TE100-PCIWN) Office Monitoring (TV-IP201) PACKAGE CONTENTS • TV-IP201W •...TV-IP201W) Internet Front Gate Monitoring (TV-IP201) Cable/DSL Modem RELATED PRODUCTS TV-IP100 TV-IP100W TV-IP201 TV-IP300 TV-IP300W Internet Camera Server Wireless Internet Camera Server Internet Camera Server with Audio TV-IP201W...
...; 128 mm (4.7 in .) Weight • Camera: 247 g (8.7 oz.); For the most recent product information please visit http://www.trendnet.com. Temperature • Operating: 5° ... 1Mbps NETWORKING SOLUTIONS Parking Monitoring (TV-IP201W) Workstation with PCI Adapter (TE100-PCIWN) Office Monitoring (TV-IP201) PACKAGE CONTENTS • TV-IP201W •...TV-IP201W) Internet Front Gate Monitoring (TV-IP201) Cable/DSL Modem RELATED PRODUCTS TV-IP100 TV-IP100W TV-IP201 TV-IP300 TV-IP300W Internet Camera Server Wireless Internet Camera Server Internet Camera Server with Audio TV-IP201W...
User Guide
Page 4
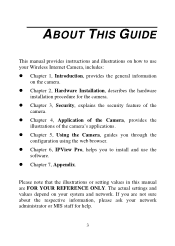
... the software. The actual settings and values depend on your Wireless Internet Camera, includes: z Chapter 1, Introduction, provides the general information on how to install and use your system and network. z Chapter 7, Appendix. Please note that the illustrations or setting values... in this manual are not sure about the respective information, please ask your network administrator or MIS staff for the camera. z Chapter 6, IPView Pro, helps you through the configuration using the web browser. z Chapter 2, Hardware Installation...
... the software. The actual settings and values depend on your Wireless Internet Camera, includes: z Chapter 1, Introduction, provides the general information on how to install and use your system and network. z Chapter 7, Appendix. Please note that the illustrations or setting values... in this manual are not sure about the respective information, please ask your network administrator or MIS staff for the camera. z Chapter 6, IPView Pro, helps you through the configuration using the web browser. z Chapter 2, Hardware Installation...
User Guide
Page 5
... you to an Ethernet or Fast Ethernet network and also supported by the wireless transmission based on the IEEE 802.11g standard. The simple installation procedures and web-based interface allow you for purchasing the Wireless Internet Camera, a camera device that can be connected directly to integrate... video images and sounds for remote monitor, high quality, and high performance video images. 4 Compared to the conventional PC Camera, the Wireless Internet Camera features a built-in CPU and web-based solutions that can be managed remotely, accessed and controlled from any PC/Notebook ...
... you to an Ethernet or Fast Ethernet network and also supported by the wireless transmission based on the IEEE 802.11g standard. The simple installation procedures and web-based interface allow you for purchasing the Wireless Internet Camera, a camera device that can be connected directly to integrate... video images and sounds for remote monitor, high quality, and high performance video images. 4 Compared to the conventional PC Camera, the Wireless Internet Camera features a built-in CPU and web-based solutions that can be managed remotely, accessed and controlled from any PC/Notebook ...
User Guide
Page 6
...CPU requiring no special hardware or software such as Internet Explorer 5.0 or above or Netscape 6.0 or above. The Wireless Internet Camera supports both ActiveX mode (for Internet Explorer users) and Java mode (for Internet Explorer and Netscape Navigator users). Web Configuration...applications. Support Variety of Platforms The Wireless Internet Camera supports TCP/IP networking, SMTP e-mail, HTTP and other Internet related protocols, and can configure and manage the Wireless Internet Camera directly from your Wireless Internet Camera with privilege setting controlled by the administrator. ...
...CPU requiring no special hardware or software such as Internet Explorer 5.0 or above or Netscape 6.0 or above. The Wireless Internet Camera supports both ActiveX mode (for Internet Explorer users) and Java mode (for Internet Explorer and Netscape Navigator users). Web Configuration...applications. Support Variety of Platforms The Wireless Internet Camera supports TCP/IP networking, SMTP e-mail, HTTP and other Internet related protocols, and can configure and manage the Wireless Internet Camera directly from your Wireless Internet Camera with privilege setting controlled by the administrator. ...
User Guide
Page 7
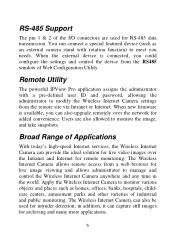
... IPView Pro application assigns the administrator with rotation function) to meet you needs. Apply the Wireless Internet Camera to monitor various objects and places such as an external camera stand with a pre-defined user ID and password, allowing the administrator to modify the Wireless Internet..., you could configure the settings and control the device from a web browser for live video images over the network for intruder detection; The Wireless Internet Camera can also upgrade remotely over the Intranet and Internet for RS-485 data transmission. in the world. Broad Range...
... IPView Pro application assigns the administrator with rotation function) to meet you needs. Apply the Wireless Internet Camera to monitor various objects and places such as an external camera stand with a pre-defined user ID and password, allowing the administrator to modify the Wireless Internet..., you could configure the settings and control the device from a web browser for live video images over the network for intruder detection; The Wireless Internet Camera can also upgrade remotely over the Intranet and Internet for RS-485 data transmission. in the world. Broad Range...

User Guide
Page 9
Wireless Local Area Network: „ IEEE 802.11g Wireless LAN. Accessing the Camera For Web Browser Users „ Operating System: Microsoft® Windows® 98SE/ME/2000/ XP „ CPU: Intel Celeron 1.1GHz or above (Intel Pentium 4 is .... „ CPU: Intel Celeron 1.1GHz or above (Intel Pentium 4 is preferred) „ Memory Size: 128 MB or above „ Resolution: 800x600 or above 8 System Requirement Networking Local Area Network: „ 10Base-T Ethernet or 100Base-TX Fast Ethernet.
Wireless Local Area Network: „ IEEE 802.11g Wireless LAN. Accessing the Camera For Web Browser Users „ Operating System: Microsoft® Windows® 98SE/ME/2000/ XP „ CPU: Intel Celeron 1.1GHz or above (Intel Pentium 4 is .... „ CPU: Intel Celeron 1.1GHz or above (Intel Pentium 4 is preferred) „ Memory Size: 128 MB or above „ Resolution: 800x600 or above 8 System Requirement Networking Local Area Network: „ 10Base-T Ethernet or 100Base-TX Fast Ethernet.

User Guide
Page 11
Dependent on the data traffic the LED will begin to flash to the network. 2. Internal MIC The built-in omni-directional microphone allows the camera to LAN connectivity. A steady BLUE light confirms that the Wireless Internet Camera is receiving/sending data from/to indicate that the camera has good connection to receive sound and voice. 10 A steady ORANGE light confirms that the Wireless Internet Camera is powered on the right side of the Wireless Internet Camera's lens while facing the Wireless Internet Camera. Power LED The Power LED is positioned on . 3.
Dependent on the data traffic the LED will begin to flash to the network. 2. Internal MIC The built-in omni-directional microphone allows the camera to LAN connectivity. A steady BLUE light confirms that the Wireless Internet Camera is receiving/sending data from/to indicate that the camera has good connection to receive sound and voice. 10 A steady ORANGE light confirms that the Wireless Internet Camera is powered on the right side of the Wireless Internet Camera's lens while facing the Wireless Internet Camera. Power LED The Power LED is positioned on . 3.
User Guide
Page 12
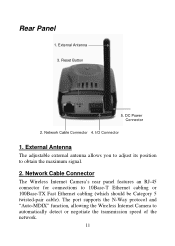
... 10Base-T Ethernet cabling or 100Base-TX Fast Ethernet cabling (which should be Category 5 twisted-pair cable). Network Cable Connector The Wireless Internet Camera's rear panel features an RJ-45 connector for connections to obtain the maximum signal. 2. Network Cable Connector 4. The port supports the N-Way protocol and "Auto-MDIX" function, allowing the Wireless...
... 10Base-T Ethernet cabling or 100Base-TX Fast Ethernet cabling (which should be Category 5 twisted-pair cable). Network Cable Connector The Wireless Internet Camera's rear panel features an RJ-45 connector for connections to obtain the maximum signal. 2. Network Cable Connector 4. The port supports the N-Way protocol and "Auto-MDIX" function, allowing the Wireless...
User Guide
Page 13
... default setting will be set to default on the Wireless Internet Camera's rear panel, and is changing to Appendix F, I /O connectors on the infrastructure network). When factory reset is connected to the Wireless Internet Camera. The IP address will be generated when the power supply is... completed, the Wireless Internet Camera will also return to ANY access point on the rear panel...
... default setting will be set to default on the Wireless Internet Camera's rear panel, and is changing to Appendix F, I /O connectors on the infrastructure network). When factory reset is connected to the Wireless Internet Camera. The IP address will be generated when the power supply is... completed, the Wireless Internet Camera will also return to ANY access point on the rear panel...
User Guide
Page 16
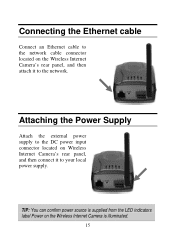
TIP: You can confirm power source is supplied from the LED indicators label Power on Wireless Internet Camera's rear panel, and then connect it to your local power supply. Connecting the Ethernet cable Connect an Ethernet cable to the network cable connector located on the Wireless Internet Camera's rear panel, and then attach it to the network. Attaching the Power Supply Attach the external power supply to the DC power input connector located on the Wireless Internet Camera is illuminated. 15
TIP: You can confirm power source is supplied from the LED indicators label Power on Wireless Internet Camera's rear panel, and then connect it to your local power supply. Connecting the Ethernet cable Connect an Ethernet cable to the network cable connector located on the Wireless Internet Camera's rear panel, and then attach it to the network. Attaching the Power Supply Attach the external power supply to the DC power input connector located on the Wireless Internet Camera is illuminated. 15

User Guide
Page 23
... in the left menu bar, including: Home, System, Date/Time, Video/Audio, Network, Users, Trigger, Upload, RS485, Information, and Tools TIP: Once you return to reload the status. System The System window contains the settings for identifying the camera, including Camera Name and Location. 22 System Administration The Configuration Utility contains eleven options...
... in the left menu bar, including: Home, System, Date/Time, Video/Audio, Network, Users, Trigger, Upload, RS485, Information, and Tools TIP: Once you return to reload the status. System The System window contains the settings for identifying the camera, including Camera Name and Location. 22 System Administration The Configuration Utility contains eleven options...

User Guide
Page 27
... to display the image in a vertical mirror mode. 26 Select Vertical to the installation location of the camera. Frame Rate Select the optimal setting depending on your network. The higher compression rate can obtain better quality; however, it will provide poorer image quality. however, ...it will use more resource within your network status. Compression Rate Select the desired compression rate from three formats: 176x144, 320x240, and 640x480. The higher setting can obtain...
... to display the image in a vertical mirror mode. 26 Select Vertical to the installation location of the camera. Frame Rate Select the optimal setting depending on your network. The higher compression rate can obtain better quality; however, it will provide poorer image quality. however, ...it will use more resource within your network status. Compression Rate Select the desired compression rate from three formats: 176x144, 320x240, and 640x480. The higher setting can obtain...

User Guide
Page 29
Network The Network window contains commands that allow you to set up networking configuration of the camera. 28
Network The Network window contains commands that allow you to set up networking configuration of the camera. 28
User Guide
Page 30
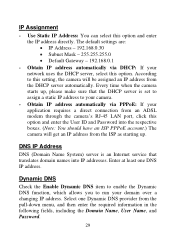
...the DHCP server is an Internet service that translates domain names into the respective boxes. (Note: You should have an ISP PPPoE account.) The camera will be assigned an IP address from the ISP as starting up. According to this option and enter the IP address directly. Enter at least...45 LAN port, click this option. Obtain IP address automatically via DHCP: If your camera. - IP Assignment - Dynamic DNS Check the Enable Dynamic DNS item to enable the Dynamic DNS function, which allows you to your network uses the DHCP server, select this option and enter the User ID and Password ...
...the DHCP server is an Internet service that translates domain names into the respective boxes. (Note: You should have an ISP PPPoE account.) The camera will be assigned an IP address from the ISP as starting up. According to this option and enter the IP address directly. Enter at least...45 LAN port, click this option. Obtain IP address automatically via DHCP: If your camera. - IP Assignment - Dynamic DNS Check the Enable Dynamic DNS item to enable the Dynamic DNS function, which allows you to your network uses the DHCP server, select this option and enter the User ID and Password ...
User Guide
Page 31
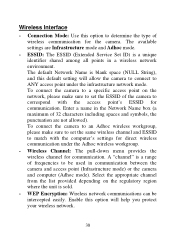
... and Adhoc mode. - WEP Encryption: Wireless network communications can be used in communication between the camera and access point (Infrastructure mode) or the camera and computer (Adhoc mode). Enable this default setting will allow the camera to connect to a specific access point on ...frequencies to match with the access point's ESSID for direct wireless communication under the infrastructure network mode. Wireless Channel: The pull-down menu provides the wireless channel for the camera. ESSID: The ESSID (Extended Service Set ID) is a range of wireless communication for...
... and Adhoc mode. - WEP Encryption: Wireless network communications can be used in communication between the camera and access point (Infrastructure mode) or the camera and computer (Adhoc mode). Enable this default setting will allow the camera to connect to a specific access point on ...frequencies to match with the access point's ESSID for direct wireless communication under the infrastructure network mode. Wireless Channel: The pull-down menu provides the wireless channel for the camera. ESSID: The ESSID (Extended Service Set ID) is a range of wireless communication for...


