
Datasheet
Page 1
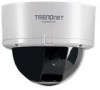
... enterprise class security surveillance applications. internet cameras SecurView PoE Dome Internet Camera TV-IP252P (B1.0R) The SecurView PoE Dome Internet Camera (model TV-IP252P) is included and the off-white IP camera housing blends into most environments. Manage up to 30 frames per second • Up to VGA, 640 x 480 pixel resolution • Supports TCP/IP networking, SMTP Email, HTTP, Samba and other Internet protocols • 62 degree...
... enterprise class security surveillance applications. internet cameras SecurView PoE Dome Internet Camera TV-IP252P (B1.0R) The SecurView PoE Dome Internet Camera (model TV-IP252P) is included and the off-white IP camera housing blends into most environments. Manage up to 30 frames per second • Up to VGA, 640 x 480 pixel resolution • Supports TCP/IP networking, SMTP Email, HTTP, Samba and other Internet protocols • 62 degree...

Datasheet
Page 2
...out; SecurView PoE Dome Internet Camera TV-IP252P (A1.0R) SPECIFICATIONS Camera General Audio Image & Video Frequency Manual Pan/Tilt/Rotate GPIO TV-out Hardware Network LED Reset Button Power Consumption Power Dimension Weight Temperature Certifications Requirements To View To Run Software SecurView™ Software Network Protocols ...176;C ~ 60°C (14°F ~ 140°F) • CE, FCC • Internet Explorer 6.0 or above • Windows 2000, XP, Vista • Channel: Supports up to 16 cameras • Record/playback/motion detection/audio • TCP/IP, UDP, ICMP • DHCP ...
...out; SecurView PoE Dome Internet Camera TV-IP252P (A1.0R) SPECIFICATIONS Camera General Audio Image & Video Frequency Manual Pan/Tilt/Rotate GPIO TV-out Hardware Network LED Reset Button Power Consumption Power Dimension Weight Temperature Certifications Requirements To View To Run Software SecurView™ Software Network Protocols ...176;C ~ 60°C (14°F ~ 140°F) • CE, FCC • Internet Explorer 6.0 or above • Windows 2000, XP, Vista • Channel: Supports up to 16 cameras • Record/playback/motion detection/audio • TCP/IP, UDP, ICMP • DHCP ...
Datasheet
Page 3
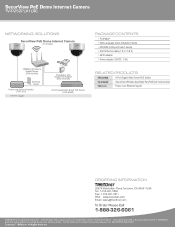
... provided in this document pertain to change at any time, without notice. For the most recent product information please visit http://www.trendnet.com. All Rights Reserved. SecurView PoE Dome Internet Camera TV-IP252P (A1.0R) NETWORKING SOLUTIONS SecurView PoE Dome Internet Camera (TV-IP252P) 300Mbps Wireless N Gigabit Router (TEW-639GR) Electrical Outlet Power over Ethernet Injector (TPE-101I) Gigabit Workstation with Gigabit PCI Adapter (TEG...
... provided in this document pertain to change at any time, without notice. For the most recent product information please visit http://www.trendnet.com. All Rights Reserved. SecurView PoE Dome Internet Camera TV-IP252P (A1.0R) NETWORKING SOLUTIONS SecurView PoE Dome Internet Camera (TV-IP252P) 300Mbps Wireless N Gigabit Router (TEW-639GR) Electrical Outlet Power over Ethernet Injector (TPE-101I) Gigabit Workstation with Gigabit PCI Adapter (TEG...
User's Guide
Page 2
... demanding surveillance and remote monitoring applications. - 1 - With comprehensive applications supported, the camera is your network environment easily. The camera features the latest Motion JPEG and MPEG-4 image technology, advanced management functionality, and GPIO connectors (e.g. PREFACE Thank you for purchasing the TV-IP252 SecurView PoE Dome Internet Camera, a standalone system that can be managed remotely, so that can provide a costeffective...
... demanding surveillance and remote monitoring applications. - 1 - With comprehensive applications supported, the camera is your network environment easily. The camera features the latest Motion JPEG and MPEG-4 image technology, advanced management functionality, and GPIO connectors (e.g. PREFACE Thank you for purchasing the TV-IP252 SecurView PoE Dome Internet Camera, a standalone system that can be managed remotely, so that can provide a costeffective...
User's Guide
Page 3
Chapter 3 Accessing the Camera lets you start using your camera without any where you want. Chapter 5 Using SecurView™ shows you the detail instructions on operating SecurView™ software. Chapter 4 Configuring the Camera guides you through the configuration of the camera using the Web browser on your practical application of the camera and some useful information for reference...
Chapter 3 Accessing the Camera lets you start using your camera without any where you want. Chapter 5 Using SecurView™ shows you the detail instructions on operating SecurView™ software. Chapter 4 Configuring the Camera guides you through the configuration of the camera using the Web browser on your practical application of the camera and some useful information for reference...

User's Guide
Page 4
... HARDWARE INSTALLATION 12 2.1 APPLICATIONS OF THE CAMERA 12 2.2 INSTALLING THE CAMERA 13 ACCESSING THE CAMERA 17 3.1 USING IPSETUP 17 3.2 ACCESSING TO THE CAMERA 22 3.3 CONFIGURING THE IP ADDRESS OF THE PC 26 CHAPTER 4 27 CONFIGURING THE CAMERA 27 4.1 USING THE WEB CONFIGURATION 27 4.2 USING SMART WIZARD 28 4.3 BASIC SETUP 31 4.4 NETWORK SETTINGS 35 4.5 SETTING UP VIDEO...
... HARDWARE INSTALLATION 12 2.1 APPLICATIONS OF THE CAMERA 12 2.2 INSTALLING THE CAMERA 13 ACCESSING THE CAMERA 17 3.1 USING IPSETUP 17 3.2 ACCESSING TO THE CAMERA 22 3.3 CONFIGURING THE IP ADDRESS OF THE PC 26 CHAPTER 4 27 CONFIGURING THE CAMERA 27 4.1 USING THE WEB CONFIGURATION 27 4.2 USING SMART WIZARD 28 4.3 BASIC SETUP 31 4.4 NETWORK SETTINGS 35 4.5 SETTING UP VIDEO...

User's Guide
Page 7
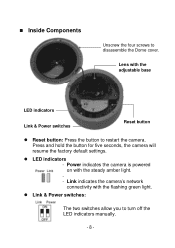
1.2 Getting to Know Your Camera Physical Components Connectors Dome cover Connectors Power: Connects the power adapter to supply power to the device. - 6 - Before connecting the external device for GPIO function, you have to attach the provided external GPIO connectors to the camera. GPIO: Connects the external device that features additional controlling function, such as motion detection, event triggering, alarm notification, and a variety of external control functions.
1.2 Getting to Know Your Camera Physical Components Connectors Dome cover Connectors Power: Connects the power adapter to supply power to the device. - 6 - Before connecting the external device for GPIO function, you have to attach the provided external GPIO connectors to the camera. GPIO: Connects the external device that features additional controlling function, such as motion detection, event triggering, alarm notification, and a variety of external control functions.
User's Guide
Page 8
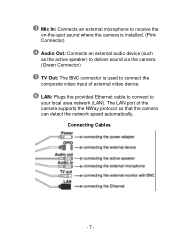
... Connector) Audio Out: Connects an external audio device (such as the active speaker) to deliver sound via the camera. (Green Connector) TV Out: The BNC connector is used to your local area network (LAN). The LAN port of external video device. LAN: Plugs the provided Ethernet cable to connect to...
... Connector) Audio Out: Connects an external audio device (such as the active speaker) to deliver sound via the camera. (Green Connector) TV Out: The BNC connector is used to your local area network (LAN). The LAN port of external video device. LAN: Plugs the provided Ethernet cable to connect to...
User's Guide
Page 9
Link indicates the camera's network connectivity with the flashing green light. Link & Power switches: The two switches allow you to restart the camera. Lens with the steady amber light. - Press and hold the button for five seconds, the camera will resume the factory default settings. LED indicators - Power indicates the camera is powered on...
Link indicates the camera's network connectivity with the flashing green light. Link & Power switches: The two switches allow you to restart the camera. Lens with the steady amber light. - Press and hold the button for five seconds, the camera will resume the factory default settings. LED indicators - Power indicates the camera is powered on...
User's Guide
Page 10
...site voice. The users are also allowed to monitor the image and take snapshots via the Internet, allowing you to speak through the camera (supporting mono audio only). Supports RTSP The camera supports RTSP (Real Time Streaming Protocol), which is available. In addition, you can be upgraded...image on your computer, open the Web browser and enter the RTSP link: rtsp://(IP address of the camera via the network. You can easily change the configuration of the camera)/mpeg4. Remote Control Supported By using a standard Web browser or the bundled Ultra View software ...
...site voice. The users are also allowed to monitor the image and take snapshots via the Internet, allowing you to speak through the camera (supporting mono audio only). Supports RTSP The camera supports RTSP (Real Time Streaming Protocol), which is available. In addition, you can be upgraded...image on your computer, open the Web browser and enter the RTSP link: rtsp://(IP address of the camera via the network. You can easily change the configuration of the camera)/mpeg4. Remote Control Supported By using a standard Web browser or the bundled Ultra View software ...
User's Guide
Page 11
... a variety of Web Configuration. Multiple Platforms Supported The camera supports multiple network protocols, including TCP/IP, SMTP e-mail, HTTP, and other Internet related protocols. For example, babies at any time. - 10 - The camera can capture both still images and video clips, so that you can separately set up different image settings (such as...
... a variety of Web Configuration. Multiple Platforms Supported The camera supports multiple network protocols, including TCP/IP, SMTP e-mail, HTTP, and other Internet related protocols. For example, babies at any time. - 10 - The camera can capture both still images and video clips, so that you can separately set up different image settings (such as...

User's Guide
Page 12
... SecurView™ - Resolution: 800x600 or above Hardware Requirement - User Interface: Microsoft® Internet Explorer 6.0 or above - LAN: 10Base-T Ethernet or 100Base-TX Fast Ethernet. Accessing the Camera using Web Browser - RAM: 128MB - Platform: Microsoft® Windows® 2000/XP/Vista - Resolution: 1024x768 or above - 1.4 System Requirement Networking - CPU: Intel Pentium III...
... SecurView™ - Resolution: 800x600 or above Hardware Requirement - User Interface: Microsoft® Internet Explorer 6.0 or above - LAN: 10Base-T Ethernet or 100Base-TX Fast Ethernet. Accessing the Camera using Web Browser - RAM: 128MB - Platform: Microsoft® Windows® 2000/XP/Vista - Resolution: 1024x768 or above - 1.4 System Requirement Networking - CPU: Intel Pentium III...
User's Guide
Page 13
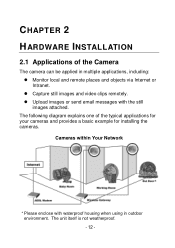
Cameras within Your Network * Please enclose with the still images attached. The unit itself is not weatherproof. - 12 - The following diagram explains one of the Camera The camera can be applied in multiple applications, including: Monitor local and remote places and objects via Internet or Intranet. Capture still images and video clips remotely. ...
Cameras within Your Network * Please enclose with the still images attached. The unit itself is not weatherproof. - 12 - The following diagram explains one of the Camera The camera can be applied in multiple applications, including: Monitor local and remote places and objects via Internet or Intranet. Capture still images and video clips remotely. ...

User's Guide
Page 14
Drill three pilot holes into the ceiling and hammer the plastic anchors into the holes. Put the drill template on the location where you want to install the camera, and then drill the pilot holes according to the ceiling surface directly by unscrewing four screws. 2. Remove the Dome cover by the following steps: 1. 2.2 Installing the Camera Basic Installation (Surface) The camera can easily and precisely drill the three pilot holes with the provided drill template. TIP You can be mounted to the marked screw position on the drill template. - 13 -
Drill three pilot holes into the ceiling and hammer the plastic anchors into the holes. Put the drill template on the location where you want to install the camera, and then drill the pilot holes according to the ceiling surface directly by unscrewing four screws. 2. Remove the Dome cover by the following steps: 1. 2.2 Installing the Camera Basic Installation (Surface) The camera can easily and precisely drill the three pilot holes with the provided drill template. TIP You can be mounted to the marked screw position on the drill template. - 13 -

User's Guide
Page 15
Install the camera to the ceiling with three screws. - 14 - 3.
Install the camera to the ceiling with three screws. - 14 - 3.

User's Guide
Page 16
Replace the Dome cover and secure with four screws. - 15 - If the image quality is poor, you complete the installation. Pan/tilt the camera lens to adjust the lens focus until the desired image appears clearly. 6. NOTE You can review the image quality from the Web browser when you have to disassemble the Dome cover to a proper position by using the adjustable base, and adjust the lens focus by turning the lens ring slowly in either clockwise or anti-clockwise direction. Make connections according to your needs (refer to the illustration of connecting cables on page 6). 5. 4.
Replace the Dome cover and secure with four screws. - 15 - If the image quality is poor, you complete the installation. Pan/tilt the camera lens to adjust the lens focus until the desired image appears clearly. 6. NOTE You can review the image quality from the Web browser when you have to disassemble the Dome cover to a proper position by using the adjustable base, and adjust the lens focus by turning the lens ring slowly in either clockwise or anti-clockwise direction. Make connections according to your needs (refer to the illustration of connecting cables on page 6). 5. 4.

User's Guide
Page 18
Click Next when the Welcome to search the camera(s) on your computer's CDROM drive to initiate the Auto-Run program. 2. CHAPTER 3 ACCESSING THE CAMERA 3.1 Using IPSetup The camera comes with a convenient utility, IPSetup, which is included in the Installation CD-ROM, allowing you to the IPSetup Wizard appears. - 17 - Then the IPSetup Wizard will appear. Insert the Installation CD-ROM into your network easily. 1. Click the IPSetup from the Auto-run menu screen.
Click Next when the Welcome to search the camera(s) on your computer's CDROM drive to initiate the Auto-Run program. 2. CHAPTER 3 ACCESSING THE CAMERA 3.1 Using IPSetup The camera comes with a convenient utility, IPSetup, which is included in the Installation CD-ROM, allowing you to the IPSetup Wizard appears. - 17 - Then the IPSetup Wizard will appear. Insert the Installation CD-ROM into your network easily. 1. Click the IPSetup from the Auto-run menu screen.
User's Guide
Page 21
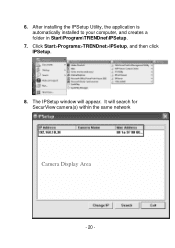
It will appear. 6. The IPSetup window will search for SecurView camera(s) within the same network Camera Display Area - 20 - After installing the IPSetup Utility, the application is automatically installed to your computer, and creates a folder in Start\Program\TRENDnet\IPSetup. 7. Click Start>Programs>TRENDnet>IPSetup, and then click IPSetup. 8.
It will appear. 6. The IPSetup window will search for SecurView camera(s) within the same network Camera Display Area - 20 - After installing the IPSetup Utility, the application is automatically installed to your computer, and creates a folder in Start\Program\TRENDnet\IPSetup. 7. Click Start>Programs>TRENDnet>IPSetup, and then click IPSetup. 8.
User's Guide
Page 22
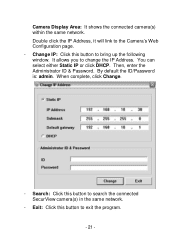
Double click the IP Address, it will link to exit the program. - 21 - Then, enter the Administrator ID & Password. Exit: Click this button to the Camera's Web Configuration page. - You can select either Static IP or click DHCP. Change IP: Click this button to search the connected SecurView camera(s) in the same network. - It allows you to bring up the following window. Search: Click this button to change the IP Address. When complete, click Change. - By default the ID/Password is: admin. Camera Display Area: It shows the connected camera(s) within the same network.
Double click the IP Address, it will link to exit the program. - 21 - Then, enter the Administrator ID & Password. Exit: Click this button to the Camera's Web Configuration page. - You can select either Static IP or click DHCP. Change IP: Click this button to search the connected SecurView camera(s) in the same network. - It allows you to bring up the following window. Search: Click this button to change the IP Address. When complete, click Change. - By default the ID/Password is: admin. Camera Display Area: It shows the connected camera(s) within the same network.
User's Guide
Page 23
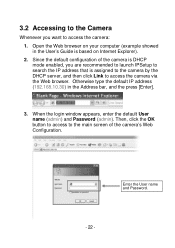
... (admin) and Password (admin). Then, click the OK button to access to the main screen of the camera is DHCP mode enabled, you want to access the camera via the Web browser. 3.2 Accessing to the Camera Whenever you are recommended to launch IPSetup to search the IP address that is based on your... computer (example showed in the Address bar, and the press [Enter]. 3. Enter the User name and Password. - 22 - Since the default configuration of the camera's Web Configuration. Otherwise type the default IP address (192.168.10.30) in the User's Guide is assigned to the...
... (admin) and Password (admin). Then, click the OK button to access to the main screen of the camera is DHCP mode enabled, you want to access the camera via the Web browser. 3.2 Accessing to the Camera Whenever you are recommended to launch IPSetup to search the IP address that is based on your... computer (example showed in the Address bar, and the press [Enter]. 3. Enter the User name and Password. - 22 - Since the default configuration of the camera's Web Configuration. Otherwise type the default IP address (192.168.10.30) in the User's Guide is assigned to the...


