
Datasheet
Page 1
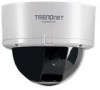
View and manage the tamper resistant dome IP camera from any Internet connection. Manually pan the camera side-to-side 350 degrees and tilt it up to 16 TRENDnet cameras with the included complimentary camera management software. Manage up -and-down ...connector. internet cameras SecurView PoE Dome Internet Camera TV-IP252P (B1.0R) The SecurView PoE Dome Internet Camera (model TV-IP252P) is included and the off-white IP camera housing blends into most environments. No need to install this camera near a power source, power and data are received through your computer or network storage ...
View and manage the tamper resistant dome IP camera from any Internet connection. Manually pan the camera side-to-side 350 degrees and tilt it up to 16 TRENDnet cameras with the included complimentary camera management software. Manage up -and-down ...connector. internet cameras SecurView PoE Dome Internet Camera TV-IP252P (B1.0R) The SecurView PoE Dome Internet Camera (model TV-IP252P) is included and the off-white IP camera housing blends into most environments. No need to install this camera near a power source, power and data are received through your computer or network storage ...

Datasheet
Page 2
...out; SecurView PoE Dome Internet Camera TV-IP252P (A1.0R) SPECIFICATIONS Camera General Audio Image & Video Frequency Manual Pan/Tilt/Rotate GPIO TV-out Hardware Network LED Reset Button Power Consumption Power Dimension Weight Temperature Certifications Requirements To View To Run Software SecurView™ Software Network Protocols ...176;C ~ 60°C (14°F ~ 140°F) • CE, FCC • Internet Explorer 6.0 or above • Windows 2000, XP, Vista • Channel: Supports up to 16 cameras • Record/playback/motion detection/audio • TCP/IP, UDP, ICMP • DHCP ...
...out; SecurView PoE Dome Internet Camera TV-IP252P (A1.0R) SPECIFICATIONS Camera General Audio Image & Video Frequency Manual Pan/Tilt/Rotate GPIO TV-out Hardware Network LED Reset Button Power Consumption Power Dimension Weight Temperature Certifications Requirements To View To Run Software SecurView™ Software Network Protocols ...176;C ~ 60°C (14°F ~ 140°F) • CE, FCC • Internet Explorer 6.0 or above • Windows 2000, XP, Vista • Channel: Supports up to 16 cameras • Record/playback/motion detection/audio • TCP/IP, UDP, ICMP • DHCP ...
Datasheet
Page 3
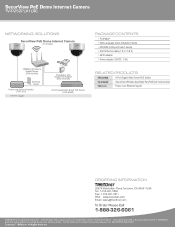
For the most recent product information please visit http://www.trendnet.com. All Rights Reserved. Other Brands and product names are trademarks of their respective holders. Information provided in this document pertain to change at any time, without notice. SecurView PoE Dome Internet Camera TV-IP252P (A1.0R) NETWORKING SOLUTIONS SecurView PoE Dome Internet Camera (TV-IP252P) 300Mbps Wireless N Gigabit Router (TEW-639GR) Electrical Outlet Power over...
For the most recent product information please visit http://www.trendnet.com. All Rights Reserved. Other Brands and product names are trademarks of their respective holders. Information provided in this document pertain to change at any time, without notice. SecurView PoE Dome Internet Camera TV-IP252P (A1.0R) NETWORKING SOLUTIONS SecurView PoE Dome Internet Camera (TV-IP252P) 300Mbps Wireless N Gigabit Router (TEW-639GR) Electrical Outlet Power over...
User's Guide
Page 2
... Thank you for purchasing the TV-IP252 SecurView PoE Dome Internet Camera, a standalone system that you to deliver/receive sound to access and control it into your best solution for security. The camera can be connected directly to record streaming video (Motion JPEG or MPEG4 ), enable motion detection, and setup automated FTP/Email/ Network Storage service for demanding...
... Thank you for purchasing the TV-IP252 SecurView PoE Dome Internet Camera, a standalone system that you to deliver/receive sound to access and control it into your best solution for security. The camera can be connected directly to record streaming video (Motion JPEG or MPEG4 ), enable motion detection, and setup automated FTP/Email/ Network Storage service for demanding...
User's Guide
Page 3
... The illustrations and configuration values in this camera at home, at work within your network environment instantly. Chapter 4 Configuring the Camera guides you start using your practical application of the camera. Chapter 5 Using SecurView™ shows you install the camera according to Your Camera describes the features of the camera and some useful information for reference only. You...
... The illustrations and configuration values in this camera at home, at work within your network environment instantly. Chapter 4 Configuring the Camera guides you start using your practical application of the camera. Chapter 5 Using SecurView™ shows you install the camera according to Your Camera describes the features of the camera and some useful information for reference only. You...

User's Guide
Page 12
...® 2000/XP/Vista - 1.4 System Requirement Networking - User Interface: Microsoft® Internet Explorer 6.0 or above - 1 camera: Intel Pentium III 800MHz; 512MB RAM - 2 ~ 4 cameras: Intel Pentium 4 1.3GHz; 512MB RAM - 5 ~ 8 cameras: Intel Pentium 4 2.4GHz; 1GB RAM - 9 ~ 16 cameras: Intel Pentium 4 3.4GHz; 2GB RAM NOTE If you connect multiple cameras within the network to monitor various places simultaneously, you are...
...® 2000/XP/Vista - 1.4 System Requirement Networking - User Interface: Microsoft® Internet Explorer 6.0 or above - 1 camera: Intel Pentium III 800MHz; 512MB RAM - 2 ~ 4 cameras: Intel Pentium 4 1.3GHz; 512MB RAM - 5 ~ 8 cameras: Intel Pentium 4 2.4GHz; 1GB RAM - 9 ~ 16 cameras: Intel Pentium 4 3.4GHz; 2GB RAM NOTE If you connect multiple cameras within the network to monitor various places simultaneously, you are...
User's Guide
Page 21
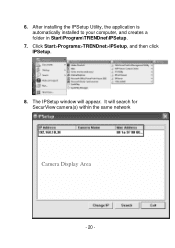
6. It will appear. Click Start>Programs>TRENDnet>IPSetup, and then click IPSetup. 8. After installing the IPSetup Utility, the application is automatically installed to your computer, and creates a folder in Start\Program\TRENDnet\IPSetup. 7. The IPSetup window will search for SecurView camera(s) within the same network Camera Display Area - 20 -
6. It will appear. Click Start>Programs>TRENDnet>IPSetup, and then click IPSetup. 8. After installing the IPSetup Utility, the application is automatically installed to your computer, and creates a folder in Start\Program\TRENDnet\IPSetup. 7. The IPSetup window will search for SecurView camera(s) within the same network Camera Display Area - 20 -
User's Guide
Page 22
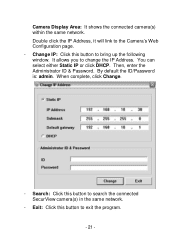
By default the ID/Password is: admin. Camera Display Area: It shows the connected camera(s) within the same network. Then, enter the Administrator ID & Password. Exit: Click this button to change the IP Address. You can select either Static IP or click DHCP. When complete, click Change. - It allows you to exit the program. - 21 - Search: Click this button to search the connected SecurView camera(s) in the same network. - Change IP: Click this button to bring up the following window. Double click the IP Address, it will link to the Camera's Web Configuration page. -
By default the ID/Password is: admin. Camera Display Area: It shows the connected camera(s) within the same network. Then, enter the Administrator ID & Password. Exit: Click this button to change the IP Address. You can select either Static IP or click DHCP. When complete, click Change. - It allows you to exit the program. - 21 - Search: Click this button to search the connected SecurView camera(s) in the same network. - Change IP: Click this button to bring up the following window. Double click the IP Address, it will link to the Camera's Web Configuration page. -
User's Guide
Page 28
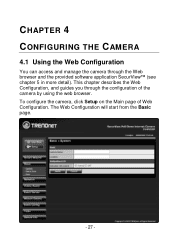
This chapter describes the Web Configuration, and guides you through the Web browser and the provided software application SecurView™ (see chapter 5 in more detail). The Web Configuration will start from the Basic page. - 27 - To configure the camera, click Setup on the Main page of the camera by using the web browser. CHAPTER 4 CONFIGURING THE CAMERA 4.1 Using the Web Configuration You can access and manage the camera through the configuration of Web Configuration.
This chapter describes the Web Configuration, and guides you through the Web browser and the provided software application SecurView™ (see chapter 5 in more detail). The Web Configuration will start from the Basic page. - 27 - To configure the camera, click Setup on the Main page of the camera by using the web browser. CHAPTER 4 CONFIGURING THE CAMERA 4.1 Using the Web Configuration You can access and manage the camera through the configuration of Web Configuration.
User's Guide
Page 64
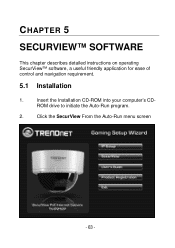
CHAPTER 5 SECURVIEW™ SOFTWARE This chapter describes detailed instructions on operating SecurView™ software, a useful friendly application for ease of control and navigation requirement. 5.1 Installation 1. Insert the Installation CD-ROM into your computer's CD- ROM drive to initiate the Auto-Run program. 2. Click the SecurView From the Auto-Run menu screen - 63 -
CHAPTER 5 SECURVIEW™ SOFTWARE This chapter describes detailed instructions on operating SecurView™ software, a useful friendly application for ease of control and navigation requirement. 5.1 Installation 1. Insert the Installation CD-ROM into your computer's CD- ROM drive to initiate the Auto-Run program. 2. Click the SecurView From the Auto-Run menu screen - 63 -
User's Guide
Page 65
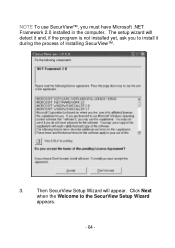
Click Next when the Welcome to install it during the process of installing SecurView™. 3. Then SecurView Setup Wizard will detect it and, if the program is not installed yet, ask you must have Microsoft .NET Framework 2.0 installed in the computer. NOTE To use SecurView™, you to the SecurView Setup Wizard appears. - 64 - The setup wizard will appear.
Click Next when the Welcome to install it during the process of installing SecurView™. 3. Then SecurView Setup Wizard will detect it and, if the program is not installed yet, ask you must have Microsoft .NET Framework 2.0 installed in the computer. NOTE To use SecurView™, you to the SecurView Setup Wizard appears. - 64 - The setup wizard will appear.
User's Guide
Page 66
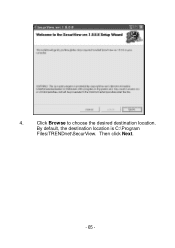
Then click Next. - 65 - By default, the destination location is C:\Program Files\TRENDnet\SecurView. 4. Click Browse to choose the desired destination location.
Then click Next. - 65 - By default, the destination location is C:\Program Files\TRENDnet\SecurView. 4. Click Browse to choose the desired destination location.
User's Guide
Page 67
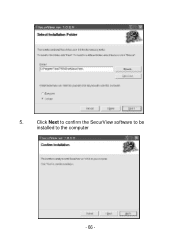
5. Click Next to confirm the SecurView software to be installed to the computer - 66 -
5. Click Next to confirm the SecurView software to be installed to the computer - 66 -
User's Guide
Page 68
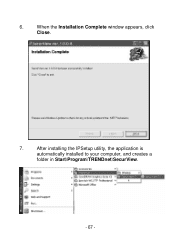
When the Installation Complete window appears, click Close. 7. 6. After installing the IPSetup utility, the application is automatically installed to your computer, and creates a folder in Start\Program\TRENDnet\SecurView. - 67 -
When the Installation Complete window appears, click Close. 7. 6. After installing the IPSetup utility, the application is automatically installed to your computer, and creates a folder in Start\Program\TRENDnet\SecurView. - 67 -
User's Guide
Page 69
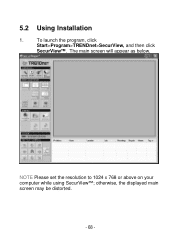
The main screen will appear as below. 5.2 Using Installation 1. otherwise, the displayed main screen may be distorted. - 68 - NOTE Please set the resolution to 1024 x 768 or above on your computer while using SecurView™; To launch the program, click Start>Program>TRENDnet>SecurView, and then click SecurView™.
The main screen will appear as below. 5.2 Using Installation 1. otherwise, the displayed main screen may be distorted. - 68 - NOTE Please set the resolution to 1024 x 768 or above on your computer while using SecurView™; To launch the program, click Start>Program>TRENDnet>SecurView, and then click SecurView™.
User's Guide
Page 70
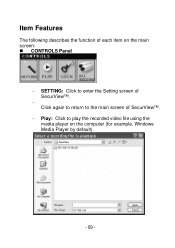
Item Features The following describes the function of each item on the computer (for example, Windows Media Player by default). - 69 - Click again to return to enter the Setting screen of SecurView™. - SETTING: Click to the main screen of SecurView™. Play: Click to play the recorded video file using the media player on the main screen: CONTROLS Panel -
Item Features The following describes the function of each item on the computer (for example, Windows Media Player by default). - 69 - Click again to return to enter the Setting screen of SecurView™. - SETTING: Click to the main screen of SecurView™. Play: Click to play the recorded video file using the media player on the main screen: CONTROLS Panel -
User's Guide
Page 71
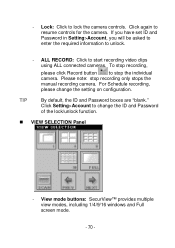
... the required information to start recording video clips using ALL connected cameras. ALL RECORD: Click to unlock. - Lock: Click to resume controls for the camera. Click again to lock the camera controls. To stop recording, please click Record button to change ...the setting on configuration. Please note: stop the individual camera. Click Setting>Account to stop recording only stops the manual recording camera. View mode buttons: SecurView™ provides multiple view modes, including 1/4/9/16 windows and Full screen mode. - 70...
... the required information to start recording video clips using ALL connected cameras. ALL RECORD: Click to unlock. - Lock: Click to resume controls for the camera. Click again to lock the camera controls. To stop recording, please click Record button to change ...the setting on configuration. Please note: stop the individual camera. Click Setting>Account to stop recording only stops the manual recording camera. View mode buttons: SecurView™ provides multiple view modes, including 1/4/9/16 windows and Full screen mode. - 70...
User's Guide
Page 79
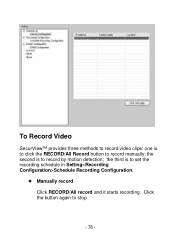
the third is to stop - 78 - Click the button again to set the recording schedule in Setting>Recording Configuration>Schedule Recording Configuration. Manually record Click RECORD/All record and it starts recording. To Record Video SecurView™ provides three methods to record video clips: one is to click the RECORD/All Record button to record by motion detection; the second is to record manually;
the third is to stop - 78 - Click the button again to set the recording schedule in Setting>Recording Configuration>Schedule Recording Configuration. Manually record Click RECORD/All record and it starts recording. To Record Video SecurView™ provides three methods to record video clips: one is to click the RECORD/All Record button to record by motion detection; the second is to record manually;

User's Guide
Page 89
- Subject: Enter a subject for the notification email. Trigger Out: If the selected camera supports Trigger Out connector, select this option to lock & unlock the main screen of the SecurView. Account Click SETTING>Account to setup the username & password to enable the Trigger out function. Other Click SETTING>Other to login the mail server. - Password: Enter the password to setup the scanning time between 2 ~ 20 seconds. - 88 - You can set the interval time between cameras. The default setting is 2 seconds.
- Subject: Enter a subject for the notification email. Trigger Out: If the selected camera supports Trigger Out connector, select this option to lock & unlock the main screen of the SecurView. Account Click SETTING>Account to setup the username & password to enable the Trigger out function. Other Click SETTING>Other to login the mail server. - Password: Enter the password to setup the scanning time between 2 ~ 20 seconds. - 88 - You can set the interval time between cameras. The default setting is 2 seconds.
User's Guide
Page 92
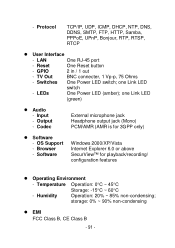
LEDs One Power LED (amber); OS Support - Browser - Software Windows 2000/XP/Vista Internet Explorer 6.0 or above SecurView™ for 3GPP only) Software - Input - Codec External microphone jack Headphone output jack (Mono) PCM/AMR (AMR ... switch; Protocol TCP/IP, UDP, ICMP, DHCP, NTP, DNS, DDNS, SMTP, FTP, HTTP, Samba, PPPoE, UPnP, Bonjour, RTP, RTSP, RTCP User Interface - TV Out BNC connecter, 1 Vp-p, 75 Ohms - Temperature Operation: 0C ~ 45C Storage: -15C ~ 60C - Humidity Operation: 20% ~ 85% non-condensing...
LEDs One Power LED (amber); OS Support - Browser - Software Windows 2000/XP/Vista Internet Explorer 6.0 or above SecurView™ for 3GPP only) Software - Input - Codec External microphone jack Headphone output jack (Mono) PCM/AMR (AMR ... switch; Protocol TCP/IP, UDP, ICMP, DHCP, NTP, DNS, DDNS, SMTP, FTP, HTTP, Samba, PPPoE, UPnP, Bonjour, RTP, RTSP, RTCP User Interface - TV Out BNC connecter, 1 Vp-p, 75 Ohms - Temperature Operation: 0C ~ 45C Storage: -15C ~ 60C - Humidity Operation: 20% ~ 85% non-condensing...
