User's Guide
Page 4
4.8 EVENT CONFIG 42 4.9 TOOLS 46 4.10 USB 48 4.11 DEVICE INFO 50 CHAPTER 5 52 SECURVIEW™ PRO SOFTWARE 52 5.1 INSTALLATION 53 5.2 USING SECURVIEW™ PRO 56 CHAPTER 6 87 HOW TO ACCESS THE CAMERA BEHIND A ROUTER .........87 A P P E N D I X 93 A.1 SPECIFICATION 93 A.2 GLOSSARY OF TERMS 96 -3-
4.8 EVENT CONFIG 42 4.9 TOOLS 46 4.10 USB 48 4.11 DEVICE INFO 50 CHAPTER 5 52 SECURVIEW™ PRO SOFTWARE 52 5.1 INSTALLATION 53 5.2 USING SECURVIEW™ PRO 56 CHAPTER 6 87 HOW TO ACCESS THE CAMERA BEHIND A ROUTER .........87 A P P E N D I X 93 A.1 SPECIFICATION 93 A.2 GLOSSARY OF TERMS 96 -3-

User's Guide
Page 9
„ Remote Control Supported By using a standard Web browser or the bundled SecurView Pro software application, the administrator can easily change the configuration of external devices, such as Windows Vista and Windows 7. „ Multiple Applications Supported Through the ...
„ Remote Control Supported By using a standard Web browser or the bundled SecurView Pro software application, the administrator can easily change the configuration of external devices, such as Windows Vista and Windows 7. „ Multiple Applications Supported Through the ...
User's Guide
Page 10
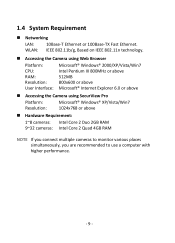
...; 2000/XP/Vista/Win7 Intel Pentium III 800MHz or above 512MB 800x600 or above Microsoft® Internet Explorer 6.0 or above „ Accessing the Camera using SecurView Pro Platform: Resolution: Microsoft® Windows® XP/Vista/Win7 1024x768 or above „ Hardware Requirement: 1~8 cameras: Intel Core 2 Duo 2GB RAM 9~32 cameras: Intel...
...; 2000/XP/Vista/Win7 Intel Pentium III 800MHz or above 512MB 800x600 or above Microsoft® Internet Explorer 6.0 or above „ Accessing the Camera using SecurView Pro Platform: Resolution: Microsoft® Windows® XP/Vista/Win7 1024x768 or above „ Hardware Requirement: 1~8 cameras: Intel Core 2 Duo 2GB RAM 9~32 cameras: Intel...
User's Guide
Page 14
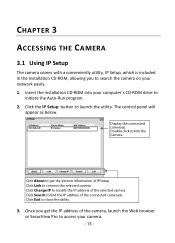
... click to modify the IP address of the selected camera. Click About to get the IP address of the camera, launch the Web browser or SecurView Pro to access your camera. - 13 - Click Change IP to link the Camera. CHAPTER 3 ACCESSING THE CAMERA 3.1 Using IP Setup The camera comes with a conveniently...
... click to modify the IP address of the selected camera. Click About to get the IP address of the camera, launch the Web browser or SecurView Pro to access your camera. - 13 - Click Change IP to link the Camera. CHAPTER 3 ACCESSING THE CAMERA 3.1 Using IP Setup The camera comes with a conveniently...
User's Guide
Page 19
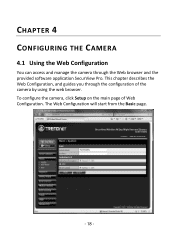
This chapter describes the Web Configuration, and guides you through the Web browser and the provided software application SecurView Pro. The Web Configuration will start from the Basic page. - 18 - To configure the camera, click Setup on the main page of the camera by using the web browser. CHAPTER 4 CONFIGURING THE CAMERA 4.1 Using the Web Configuration You can access and manage the camera through the configuration of Web Configuration.
This chapter describes the Web Configuration, and guides you through the Web browser and the provided software application SecurView Pro. The Web Configuration will start from the Basic page. - 18 - To configure the camera, click Setup on the main page of the camera by using the web browser. CHAPTER 4 CONFIGURING THE CAMERA 4.1 Using the Web Configuration You can access and manage the camera through the configuration of Web Configuration.
User's Guide
Page 53
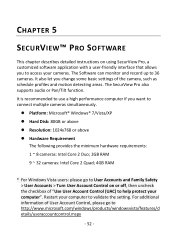
... of User Account Control, please go to User Accounts and Family Safety > User Accounts > Turn User Account Control on using SecurView Pro, a customized software application with a user‐friendly interface that allows you want to http://www.microsoft.com/windows/products/windowsvista... 2GB RAM 9 ~ 32 cameras: Intel Core 2 Quad; 4GB RAM * For Windows Vista users: please go to connect multiple cameras simultaneously. The SecurView Pro also supports audio or Pan/Tilt function. It is recommended to use a high performance computer if you to access your computer to 36 cameras...
... of User Account Control, please go to User Accounts and Family Safety > User Accounts > Turn User Account Control on using SecurView Pro, a customized software application with a user‐friendly interface that allows you want to http://www.microsoft.com/windows/products/windowsvista... 2GB RAM 9 ~ 32 cameras: Intel Core 2 Quad; 4GB RAM * For Windows Vista users: please go to connect multiple cameras simultaneously. The SecurView Pro also supports audio or Pan/Tilt function. It is recommended to use a high performance computer if you to access your computer to 36 cameras...

User's Guide
Page 54
5.1 Installation 1. Insert the Installation CD‐ROM into your computer's CD‐ROM drive to install SecurView Pro. Click the SecurView Pro from the Auto‐Run menu screen. For more information of installing SecurView™ Pro. NOTE: To use SecurView™ Pro, you to install it and, if the program is a required component to...
5.1 Installation 1. Insert the Installation CD‐ROM into your computer's CD‐ROM drive to install SecurView Pro. Click the SecurView Pro from the Auto‐Run menu screen. For more information of installing SecurView™ Pro. NOTE: To use SecurView™ Pro, you to install it and, if the program is a required component to...
User's Guide
Page 55
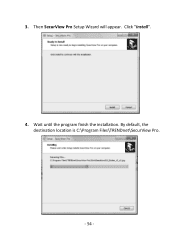
Click "Install". 4. 3. Wait until the program finish the installation. Then SecurView Pro Setup Wizard will appear. By default, the destination location is C:\Program Files\TRENDnet\SecurView Pro. - 54 -
Click "Install". 4. 3. Wait until the program finish the installation. Then SecurView Pro Setup Wizard will appear. By default, the destination location is C:\Program Files\TRENDnet\SecurView Pro. - 54 -

User's Guide
Page 56
Click "Finish" to your computer, and creates a folder in " Start \Program\TRENDnet\SecurView Pro ". - 55 - 5. After installing the SecurView Pro, the application is automatically installed to finish the installation. 6.
Click "Finish" to your computer, and creates a folder in " Start \Program\TRENDnet\SecurView Pro ". - 55 - 5. After installing the SecurView Pro, the application is automatically installed to finish the installation. 6.
User's Guide
Page 57
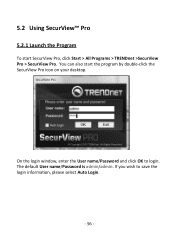
5.2 Using SecurView™ Pro 5.2.1 Launch the Program To start the program by double‐click the SecurView Pro icon on your desktop. The default User name/Password is admin/admin. If you wish to login. You can also start SecurView Pro, click Start > All Programs > TRENDnet >SecurView Pro > SecurView Pro. On the login window, enter the User name/Password and click OK to save the login information, please select Auto Login. - 56 -
5.2 Using SecurView™ Pro 5.2.1 Launch the Program To start the program by double‐click the SecurView Pro icon on your desktop. The default User name/Password is admin/admin. If you wish to login. You can also start SecurView Pro, click Start > All Programs > TRENDnet >SecurView Pro > SecurView Pro. On the login window, enter the User name/Password and click OK to save the login information, please select Auto Login. - 56 -
User's Guide
Page 58
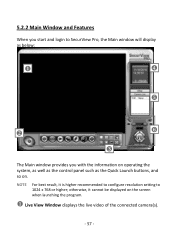
5.2.2 Main Window and Features When you with the information on operating the system, as well as the control panel such as the Quick Launch buttons, and so on the screen when launching the program. X Live View Window displays the live video of the connected camera(s). - 57 - NOTE For best result, it cannot be displayed on . otherwise, it is higher recommended to configure resolution setting to SecurView Pro, the Main window will display as below: X [ \ Y ] Z The Main window provides you start and login to 1024 x 768 or higher;
5.2.2 Main Window and Features When you with the information on operating the system, as well as the control panel such as the Quick Launch buttons, and so on the screen when launching the program. X Live View Window displays the live video of the connected camera(s). - 57 - NOTE For best result, it cannot be displayed on . otherwise, it is higher recommended to configure resolution setting to SecurView Pro, the Main window will display as below: X [ \ Y ] Z The Main window provides you start and login to 1024 x 768 or higher;
User's Guide
Page 59
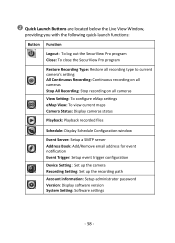
... located below the Live View Window, providing you with the following quick‐launch functions: Button Function Logout : To log out the SecurView Pro program Close: To close the SecurView Pro program Restore Recording Type: Restore all recording type to current camera's setting All Continuous Recording: Continuous recording on all cameras Stop...
... located below the Live View Window, providing you with the following quick‐launch functions: Button Function Logout : To log out the SecurView Pro program Close: To close the SecurView Pro program Restore Recording Type: Restore all recording type to current camera's setting All Continuous Recording: Continuous recording on all cameras Stop...

User's Guide
Page 74
5.2.4 eMap Setup & Camera Status „ Manage eMap Click the button and select View Setting to the geography and device scope in the SecurView Pro, which visually presents the devices in your security system. It uses a background of the area (e.g. a picture or a map) as the interface for monitoring. To add an eMap 1. eMap refers to manage eMap. On the View Setting window, click New. - 73 -
5.2.4 eMap Setup & Camera Status „ Manage eMap Click the button and select View Setting to the geography and device scope in the SecurView Pro, which visually presents the devices in your security system. It uses a background of the area (e.g. a picture or a map) as the interface for monitoring. To add an eMap 1. eMap refers to manage eMap. On the View Setting window, click New. - 73 -
User's Guide
Page 95
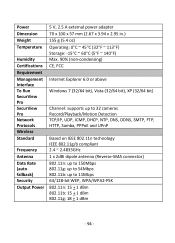
Power Dimension Weight Temperature Humidity Certifications Requirement Management Interface To Run SecurView Pro SecurView Pro Network Protocols Wireless Standard Frequency Antenna Data Rate (auto fallback) Security Output Power 5 V, 2.5 A external power adapter 70 x 100 x 57 mm (2.67 x 3.94 x 2.95 in.) ...
Power Dimension Weight Temperature Humidity Certifications Requirement Management Interface To Run SecurView Pro SecurView Pro Network Protocols Wireless Standard Frequency Antenna Data Rate (auto fallback) Security Output Power 5 V, 2.5 A external power adapter 70 x 100 x 57 mm (2.67 x 3.94 x 2.95 in.) ...

Quick Installation Guide
Page 3
routers usually have a built-in DHCP server SecurView Pro Requirements 1-8 Cameras 9-32 Cameras Supported Operating Systems CPU Memory CPU Memory Windows 7 (32/64-bit) Intel Core 2 2GB RAM Intel Core 2 4GB RAM Duo ... or above ŸWeb Browser: Internet Explorer (6.0 or higher) ŸWireless Router (e.g. TEW-690AP) ŸAn available DHCP Server - Before You Start Package Contents ŸTV-IP312WN ŸCD-ROM (Utility and User's Guide) ŸMulti-Language Quick Installation Guide ŸNetwork Cable (1.5m / 5ft) Ÿ1 x 2dBi Detachable Antenna ŸMounting Kit...
routers usually have a built-in DHCP server SecurView Pro Requirements 1-8 Cameras 9-32 Cameras Supported Operating Systems CPU Memory CPU Memory Windows 7 (32/64-bit) Intel Core 2 2GB RAM Intel Core 2 4GB RAM Duo ... or above ŸWeb Browser: Internet Explorer (6.0 or higher) ŸWireless Router (e.g. TEW-690AP) ŸAn available DHCP Server - Before You Start Package Contents ŸTV-IP312WN ŸCD-ROM (Utility and User's Guide) ŸMulti-Language Quick Installation Guide ŸNetwork Cable (1.5m / 5ft) Ÿ1 x 2dBi Detachable Antenna ŸMounting Kit...

Quick Installation Guide
Page 8
... Troubleshooting section, User's Guide CD-ROM, or TRENDnet's website at : www.trendnet.com/register Thank you would like to use SecurView Pro software, please install the software by clicking SecurView Pro in the Autorun window and refer to the IP camera may have changed. Note: If the TV-IP312WN's configuration page cannot be displayed, the IP...
... Troubleshooting section, User's Guide CD-ROM, or TRENDnet's website at : www.trendnet.com/register Thank you would like to use SecurView Pro software, please install the software by clicking SecurView Pro in the Autorun window and refer to the IP camera may have changed. Note: If the TV-IP312WN's configuration page cannot be displayed, the IP...