
Quick Installation Guide
Page 2
... (PoE) devices that follow the IEEE 802.3af standard. Ÿ The TV-IP321PI has a 5.5 mm barrel connector for an optional 12 V DC 1A power adapter (model 12VDC1A sold separately). Free Management Software: TRENDnetVIEW Pro Requirements Supported Operating Systems 1-8 Cameras CPU Memory 9-32 Cameras CPU Memory Windows 8.1 (32/64-bit) / Windows 8 (32/64-bit) / ...1 TPE-105I optional) Ÿ A computer with an Ethernet port and web browser Ÿ CD-ROM Drive Ÿ Wired network Ÿ Network cable Note: Ÿ The TV-IP321PI works with Power over Ethernet (PoE) switch (e.g. 1.
... (PoE) devices that follow the IEEE 802.3af standard. Ÿ The TV-IP321PI has a 5.5 mm barrel connector for an optional 12 V DC 1A power adapter (model 12VDC1A sold separately). Free Management Software: TRENDnetVIEW Pro Requirements Supported Operating Systems 1-8 Cameras CPU Memory 9-32 Cameras CPU Memory Windows 8.1 (32/64-bit) / Windows 8 (32/64-bit) / ...1 TPE-105I optional) Ÿ A computer with an Ethernet port and web browser Ÿ CD-ROM Drive Ÿ Wired network Ÿ Network cable Note: Ÿ The TV-IP321PI works with Power over Ethernet (PoE) switch (e.g. 1.

Quick Installation Guide
Page 3
Do not install or mount the IP camera until after you complete the installation steps below. Temporarily place the IP camera next to http://www.trendnet.com/support and select the TV-IP321PI within the Products Download dropdown list. 1. Select language from your computer to a LAN port ...on your computer. 2. Write down menu. 5. Then click Next. 2 Click Install Camera. 6. Connect network...
Do not install or mount the IP camera until after you complete the installation steps below. Temporarily place the IP camera next to http://www.trendnet.com/support and select the TV-IP321PI within the Products Download dropdown list. 1. Select language from your computer to a LAN port ...on your computer. 2. Write down menu. 5. Then click Next. 2 Click Install Camera. 6. Connect network...
Quick Installation Guide
Page 4
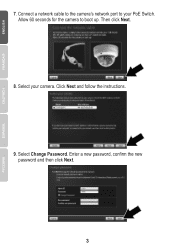
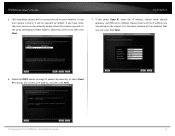
Allow 60 seconds for the camera to your camera. Enter a new password, confirm the new password and then click Next. 3 Click Next and follow the instructions. 9. Select your PoE Switch. Select Change Password. Then click Next. 8. 7. Connect a network cable to the camera's network port to boot up.
Allow 60 seconds for the camera to your camera. Enter a new password, confirm the new password and then click Next. 3 Click Next and follow the instructions. 9. Select your PoE Switch. Select Change Password. Then click Next. 8. 7. Connect a network cable to the camera's network port to boot up.

Quick Installation Guide
Page 5
... now ready to the management page. Click Finish to the TRENDnetVIEW Pro User's Guide on the CD for more information. 4 To manage multiple cameras and for more advanced features, please install the TRENDnetVIEW Pro software. Install the software by clicking Install TRENDnetVIEW Pro Software in its final location. 10. ...This will open up a web browser. Congratulations! Scan the QR code to download a free mobile app to your mobile device. Your camera is complete! To resume installation, minimize the web browser and then click Next. 11.
... now ready to the management page. Click Finish to the TRENDnetVIEW Pro User's Guide on the CD for more information. 4 To manage multiple cameras and for more advanced features, please install the TRENDnetVIEW Pro software. Install the software by clicking Install TRENDnetVIEW Pro Software in its final location. 10. ...This will open up a web browser. Congratulations! Scan the QR code to download a free mobile app to your mobile device. Your camera is complete! To resume installation, minimize the web browser and then click Next. 11.

Quick Installation Guide
Page 6
...DNS service in your router and IP camera user's guide for instructions. 13. Install the camera in order to your network with PoE, please use either of the following methods: Using the TV-IP321PI with a PoE switch (TPE-S44) TPE-S44 Non PoE Internet TV-IP321PI Router PoE Ÿ Connect the ...provided network cable from the Power over Ethernet switch (e.g. To connect the IP camera to view your network. 5 TPE-S44) to the...
...DNS service in your router and IP camera user's guide for instructions. 13. Install the camera in order to your network with PoE, please use either of the following methods: Using the TV-IP321PI with a PoE switch (TPE-S44) TPE-S44 Non PoE Internet TV-IP321PI Router PoE Ÿ Connect the ...provided network cable from the Power over Ethernet switch (e.g. To connect the IP camera to view your network. 5 TPE-S44) to the...
Quick Installation Guide
Page 8
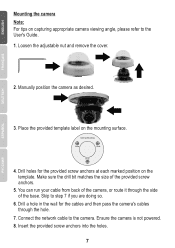
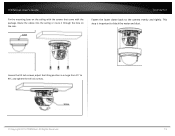
... doing so. 6. Place the provided template label on the template. Ceiling Mounting Hole Hole Hole 4. Drill holes for the cables and then pass the camera's cables through the side of the base. Loosen the adjustable nut and remove the cover. 2. Skip to the... route it through the hole. 7. Insert the provided screw anchors into the holes. 7 Mounting the camera Note: For tips on capturing appropriate camera viewing angle, please refer to the User's Guide. 1. Ensure the camera is not powered. 8. You can run your cable from back of the provided screw anchors. 5. Drill a hole in...
... doing so. 6. Place the provided template label on the template. Ceiling Mounting Hole Hole Hole 4. Drill holes for the cables and then pass the camera's cables through the side of the base. Loosen the adjustable nut and remove the cover. 2. Skip to the... route it through the hole. 7. Insert the provided screw anchors into the holes. 7 Mounting the camera Note: For tips on capturing appropriate camera viewing angle, please refer to the User's Guide. 1. Ensure the camera is not powered. 8. You can run your cable from back of the provided screw anchors. 5. Drill a hole in...

Quick Installation Guide
Page 9
9. Sealing the edge of the cable to a PoE switch or injector on your network. 11. Secure the housing to the ceiling. 10. Power up the camera by connected the other end of camera base with the screw anchors, and then use the provided screws to secure the camera to the camera. 12. Align the mounting bracket with exterior grade caulking. 8
9. Sealing the edge of the cable to a PoE switch or injector on your network. 11. Secure the housing to the ceiling. 10. Power up the camera by connected the other end of camera base with the screw anchors, and then use the provided screws to secure the camera to the camera. 12. Align the mounting bracket with exterior grade caulking. 8
Quick Installation Guide
Page 10
Company Address: 20675 Manhattan Place Torrance, CA 90501 USA Product Information: Product Description: Outdoor 1.3 MP HD PoE Dome IR Network Camera Model Number: TV-IP321PI Brand Name: TRENDnet Technical Standards: EN 55022: 2010 Class A EN 61000-3-2: 2006 + A1: 2009 + A2: 2009 EN 61000-3-3: 2008 EN 50130-4: 2011 EN 60950-1: 2006+ A11: 2009 + A1: ... above are consistent with the Directive of the guidelines. Sonny Su Name Director of Technology Title June 30, 2014 Date Signature Company Information: Company Name: TRENDnet, Inc.
Company Address: 20675 Manhattan Place Torrance, CA 90501 USA Product Information: Product Description: Outdoor 1.3 MP HD PoE Dome IR Network Camera Model Number: TV-IP321PI Brand Name: TRENDnet Technical Standards: EN 55022: 2010 Class A EN 61000-3-2: 2006 + A1: 2009 + A2: 2009 EN 61000-3-3: 2008 EN 50130-4: 2011 EN 60950-1: 2006+ A11: 2009 + A1: ... above are consistent with the Directive of the guidelines. Sonny Su Name Director of Technology Title June 30, 2014 Date Signature Company Information: Company Name: TRENDnet, Inc.

User's Guide
Page 2
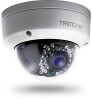
... Vandal Resistant Impact protection rated: IEC60068-275Eh, 50J; All Rights Reserved. 2 TRENDnet User's Guide Product Overview TV-IP321PI Hardware Compact Fixed Dome Manually pan 355 and tilt 75° to set the camera's final viewing field PoE Save installation costs with a free Apple® and ...to manage up to 32 TRENDnet cameras. This ultra-compact vandal resistant fixed dome camera is outdoor ready with an IP66 weather rated housing. EN50102, exceeding IK10 TV-IP321PI Features The Outdoor 1.3 MP HD PoE Dome IR Network Camera, model TV-IP321PI, provides powerful 1.3 megapixel ...
... Vandal Resistant Impact protection rated: IEC60068-275Eh, 50J; All Rights Reserved. 2 TRENDnet User's Guide Product Overview TV-IP321PI Hardware Compact Fixed Dome Manually pan 355 and tilt 75° to set the camera's final viewing field PoE Save installation costs with a free Apple® and ...to manage up to 32 TRENDnet cameras. This ultra-compact vandal resistant fixed dome camera is outdoor ready with an IP66 weather rated housing. EN50102, exceeding IK10 TV-IP321PI Features The Outdoor 1.3 MP HD PoE Dome IR Network Camera, model TV-IP321PI, provides powerful 1.3 megapixel ...

User's Guide
Page 3
...Complimentary pro-grade software to manage up to TRENDnet 32 cameras Package Contents TV-IP321PI package includes: • TV-IP321PI • Multi-Language Quick Installation Guide • CD-ROM (Utility and User's Guide) • Camera mounting hardware • (Optional power adapter...Android® apps © Copyright 2014 TRENDnet. All Rights Reserved. TRENDnet User's Guide TV-IP321PI Camera Management Multi-Language Interface Support for English, French, Spanish, German, and Russian Advanced Playback Advanced in-camera archived video review functionality Dynamic DNS Support ...
...Complimentary pro-grade software to manage up to TRENDnet 32 cameras Package Contents TV-IP321PI package includes: • TV-IP321PI • Multi-Language Quick Installation Guide • CD-ROM (Utility and User's Guide) • Camera mounting hardware • (Optional power adapter...Android® apps © Copyright 2014 TRENDnet. All Rights Reserved. TRENDnet User's Guide TV-IP321PI Camera Management Multi-Language Interface Support for English, French, Spanish, German, and Russian Advanced Playback Advanced in-camera archived video review functionality Dynamic DNS Support ...

User's Guide
Page 4
... Power 12V DC 1A (Optional) Reset Button 4 All Rights Reserved. Screw Reset Button Push and hold the reset button then power on the camera. TRENDnet User's Guide Physical Descriptions TV-IP321PI Angle Adjustment Loosen the tilt lock screws, adjust the tilting position in a range from 15 to factory default. Lower dome 5. Vertical stand...
... Power 12V DC 1A (Optional) Reset Button 4 All Rights Reserved. Screw Reset Button Push and hold the reset button then power on the camera. TRENDnet User's Guide Physical Descriptions TV-IP321PI Angle Adjustment Loosen the tilt lock screws, adjust the tilting position in a range from 15 to factory default. Lower dome 5. Vertical stand...
User's Guide
Page 5
... extended period of time, put on the lens cap to all construction and electric regulations and other local codes. © Copyright 2014 TRENDnet. TRENDnet User's Guide TV-IP321PI Warnings Serious injury or death may be caused if any of these cautions are neglected. Never attempt to rain or water. •...The installation should be done by a laser beam, so when any liquid. • While shipping, the camera should conform to protect the sensor from dirt. • Do not aim the camera lens at the strong light such as the Sun or an incandescent lamp. All Rights Reserved. Follow these ...
... extended period of time, put on the lens cap to all construction and electric regulations and other local codes. © Copyright 2014 TRENDnet. TRENDnet User's Guide TV-IP321PI Warnings Serious injury or death may be caused if any of these cautions are neglected. Never attempt to rain or water. •...The installation should be done by a laser beam, so when any liquid. • While shipping, the camera should conform to protect the sensor from dirt. • Do not aim the camera lens at the strong light such as the Sun or an incandescent lamp. All Rights Reserved. Follow these ...

User's Guide
Page 6
All Rights Reserved. 6 Follow the suggested installation steps and go through the check lists. This guide will help you make your camera installation smoothly and easily. • Plan for installation location, see page 7 (next paragraph) • Setup Your Camera with CD, see page 8 • TV-IP321PI © Copyright 2014 TRENDnet. TRENDnet User's Guide Installation Procedure There are number of factors involved in a successful camera installation.
All Rights Reserved. 6 Follow the suggested installation steps and go through the check lists. This guide will help you make your camera installation smoothly and easily. • Plan for installation location, see page 7 (next paragraph) • Setup Your Camera with CD, see page 8 • TV-IP321PI © Copyright 2014 TRENDnet. TRENDnet User's Guide Installation Procedure There are number of factors involved in a successful camera installation.

User's Guide
Page 7
...see page 12 Plan for the image sensor. • Lighting: Consider installing your camera in moist environments. TV-IP321PI heater and blower if you expect to the existing light source are good choices. ...TV-IP321PI works within a specified temperature range. For severe weather conditions, a camera housing with temperature and moisture control is a dome camera with severe temperatures should also be avoided when installing the camera. The motion detection area should be considered when installing the camera. Shooting images with a © Copyright 2014 TRENDnet. TRENDnet...
...see page 12 Plan for the image sensor. • Lighting: Consider installing your camera in moist environments. TV-IP321PI heater and blower if you expect to the existing light source are good choices. ...TV-IP321PI works within a specified temperature range. For severe weather conditions, a camera housing with temperature and moisture control is a dome camera with severe temperatures should also be avoided when installing the camera. The motion detection area should be considered when installing the camera. Shooting images with a © Copyright 2014 TRENDnet. TRENDnet...

User's Guide
Page 8
... done. * A power adapter (sold separately) can be used instead of the camera. 4. Choose your computer's CD-ROM drive to a PoE switch and wait for the camera. © Copyright 2014 TRENDnet. Connect a PoE capable network cable to the camera's network port and then to initiate the Auto-Run program. TRENDnet User's Guide TV-IP321PI Setup Your Camera with CD 1.
... done. * A power adapter (sold separately) can be used instead of the camera. 4. Choose your computer's CD-ROM drive to a PoE switch and wait for the camera. © Copyright 2014 TRENDnet. Connect a PoE capable network cable to the camera's network port and then to initiate the Auto-Run program. TRENDnet User's Guide TV-IP321PI Setup Your Camera with CD 1.
User's Guide
Page 9
...address, and then click Next. © Copyright 2014 TRENDnet. Click Next. 6. If you are setting on your network. If only one camera on the network, please choose the camera you have more than one camera is found on the camera is in the same network of the computer that you... Fixed IP, enter the IP address, subnet mask, default gateway, and DNS server address. The installation wizard will list cameras found , it will be selected by identifying its MAC address. Please make sure the IP address you are using. All Rights Reserved. 9 TRENDnet User's Guide TV-IP321PI 5.
...address, and then click Next. © Copyright 2014 TRENDnet. Click Next. 6. If you are setting on your network. If only one camera on the network, please choose the camera you have more than one camera is found on the camera is in the same network of the computer that you... Fixed IP, enter the IP address, subnet mask, default gateway, and DNS server address. The installation wizard will list cameras found , it will be selected by identifying its MAC address. Please make sure the IP address you are using. All Rights Reserved. 9 TRENDnet User's Guide TV-IP321PI 5.

User's Guide
Page 10
...setup the password and want to the camera's web page or click Next for mobile app installation. © Copyright 2014 TRENDnet. The default password is also good for a brand new installation. Click here to access to access your camera.) TV-IP321PI 9. Enter the default password: admin ...and enter the new passwords for finding the camera if it was setup with the ...
...setup the password and want to the camera's web page or click Next for mobile app installation. © Copyright 2014 TRENDnet. The default password is also good for a brand new installation. Click here to access to access your camera.) TV-IP321PI 9. Enter the default password: admin ...and enter the new passwords for finding the camera if it was setup with the ...

User's Guide
Page 12
... cap to remove the lower dome. © Copyright 2014 TRENDnet. Waterproof cap The TV-IP321PI itself is a set of twisted lines are required for new camera installation. Mount your cable or running into camera through the accessories, and then crimp the cable with the ...package. Poor cable quality may cause unexpected problems. Testing your camera Try out the best camera video shooting position. TRENDnet User's Guide TV-IP321PI Hardware Installation Cabling It's recommended that comes with the package to prevent water running a new ...
... cap to remove the lower dome. © Copyright 2014 TRENDnet. Waterproof cap The TV-IP321PI itself is a set of twisted lines are required for new camera installation. Mount your cable or running into camera through the accessories, and then crimp the cable with the ...package. Poor cable quality may cause unexpected problems. Testing your camera Try out the best camera video shooting position. TRENDnet User's Guide TV-IP321PI Hardware Installation Cabling It's recommended that comes with the package to prevent water running a new ...
User's Guide
Page 13
TRENDnet User's Guide Fix the mounting base on the side. Loosen the tilt lock screws, adjust the tilting position in a range from 15 to block the water and dust. All Rights Reserved. 13 This step is important to 90, and tighten the tilt lock screws. Cable TV-IP321PI Fasten the lower dome back to the camera evenly and tightly. Screw © Copyright 2014 TRENDnet. Route the cables into the ceiling or route it through the hole on the ceiling with the screws that come with the package.
TRENDnet User's Guide Fix the mounting base on the side. Loosen the tilt lock screws, adjust the tilting position in a range from 15 to block the water and dust. All Rights Reserved. 13 This step is important to 90, and tighten the tilt lock screws. Cable TV-IP321PI Fasten the lower dome back to the camera evenly and tightly. Screw © Copyright 2014 TRENDnet. Route the cables into the ceiling or route it through the hole on the ceiling with the screws that come with the package.

User's Guide
Page 14
TRENDnet User's Guide TV-IP321PI Access your Camera with the Web Browser System Management and Default Settings It is included on your network, the IP address will be installed to http://www.TRENDnet.com/support enter the model number "TV-IP321PI" and download the software. If you do not have a home gateway ...on your network and you plug-in the camera on the same network, you can find the camera's IP address on the network or...
TRENDnet User's Guide TV-IP321PI Access your Camera with the Web Browser System Management and Default Settings It is included on your network, the IP address will be installed to http://www.TRENDnet.com/support enter the model number "TV-IP321PI" and download the software. If you do not have a home gateway ...on your network and you plug-in the camera on the same network, you can find the camera's IP address on the network or...


