
User's Guide
Page 5
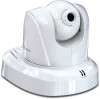
...Camera from the remote site via the Intranet or Internet. TV-IP600/W Wireless Network Camera 1 Introduction Thank you for purchasing the TV-IP600/TV-IP600W Pan/Tilt (Wireless) Internet Camera, a standalone system that can be integrated easily into your Camera. With comprehensive application support, the Internet Camera...70°) using the Web Configuration Utility. Motion detection and event triggered digital image or video recording - The camera supports TCP/IP networking, SMTP e-mail, HTTP and other applications. 2 Remote Utility - Broad Range of platforms - Supports ...
...Camera from the remote site via the Intranet or Internet. TV-IP600/W Wireless Network Camera 1 Introduction Thank you for purchasing the TV-IP600/TV-IP600W Pan/Tilt (Wireless) Internet Camera, a standalone system that can be integrated easily into your Camera. With comprehensive application support, the Internet Camera...70°) using the Web Configuration Utility. Motion detection and event triggered digital image or video recording - The camera supports TCP/IP networking, SMTP e-mail, HTTP and other applications. 2 Remote Utility - Broad Range of platforms - Supports ...

User's Guide
Page 13
The default IP address 192.168.10.30 and subnet mask 255.255.255.0 will begin to factory settings. If using the TV-IP600W Wireless Camera, the default SSID is actively connected to the network. The reset button is admin. The administrator's default user name is admin and the password is ... below. See the Rear Panel Components picture above to factory defaults, please follow these steps: 1. To reset the system settings to locate the reset button. 2. TV-IP600/W Wireless Network Camera Reset Camera A manual reset can be applied unless a DHCP server is "TRENDNet".
The default IP address 192.168.10.30 and subnet mask 255.255.255.0 will begin to factory settings. If using the TV-IP600W Wireless Camera, the default SSID is actively connected to the network. The reset button is admin. The administrator's default user name is admin and the password is ... below. See the Rear Panel Components picture above to factory defaults, please follow these steps: 1. To reset the system settings to locate the reset button. 2. TV-IP600/W Wireless Network Camera Reset Camera A manual reset can be applied unless a DHCP server is "TRENDNet".

User's Guide
Page 35
... screen below: System Status display Device Status This section displays the Camera Name, Location, Model, and Firmware Version, MAC Address and IP Address of the camera. TV-IP600/W Wireless Network Camera Status The following menus are available in the Status: System, Video, Wireless (only for TV-IP600W camera), Network and Active Users. System Status Click the System link from...
... screen below: System Status display Device Status This section displays the Camera Name, Location, Model, and Firmware Version, MAC Address and IP Address of the camera. TV-IP600/W Wireless Network Camera Status The following menus are available in the Status: System, Video, Wireless (only for TV-IP600W camera), Network and Active Users. System Status Click the System link from...

User's Guide
Page 106
TV-IP600/W Wireless Network Camera Netscape, and Google Chrome To Run Software Windows XP, Vista IPView Pro 2.0 Channel: supports up to 32 cameras Record/Playback/Motion Detection Network Protocols IP, ARP, TCP, UDP, ICMP DHCP Client, NTP Client, DNS Client, DDNS Client, SMTP Client, FTP Client HTTP...80 (default) Digital Zoom 4x Dynamic DNS Yes Time Synchronize with NTP server or set time/date manually SMTP Support SMTP mail Wireless (TV‐IP600W ONLY) Standard IEEE 802.11b, IEEE 802.11g Frequency 2.412 ~ 2.4835GHz ISM band Antenna 1 x 2dBi dipole antenna (Reverse&#...
TV-IP600/W Wireless Network Camera Netscape, and Google Chrome To Run Software Windows XP, Vista IPView Pro 2.0 Channel: supports up to 32 cameras Record/Playback/Motion Detection Network Protocols IP, ARP, TCP, UDP, ICMP DHCP Client, NTP Client, DNS Client, DDNS Client, SMTP Client, FTP Client HTTP...80 (default) Digital Zoom 4x Dynamic DNS Yes Time Synchronize with NTP server or set time/date manually SMTP Support SMTP mail Wireless (TV‐IP600W ONLY) Standard IEEE 802.11b, IEEE 802.11g Frequency 2.412 ~ 2.4835GHz ISM band Antenna 1 x 2dBi dipole antenna (Reverse&#...

Quick Installation Guide
Page 7
Select the IP camera and click Next. 12. By default: ID: admin Password: admin 13. If you do not wish to change the password. Leave Change Password unchecked if ... you have the TV-IP600, please skip to 8 characters. 14. Enter your ID and password. Note: Password is limited to up to step 18. 11. Click I want to step 15. 15. Select DHCP and then click Next. If you have the TV-IP600W, continue on to use wireless for the camera and then click Next...
Select the IP camera and click Next. 12. By default: ID: admin Password: admin 13. If you do not wish to change the password. Leave Change Password unchecked if ... you have the TV-IP600, please skip to 8 characters. 14. Enter your ID and password. Note: Password is limited to up to step 18. 11. Click I want to step 15. 15. Select DHCP and then click Next. If you have the TV-IP600W, continue on to use wireless for the camera and then click Next...
Quick Installation Guide
Page 9
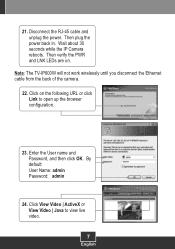
Disconnect the RJ-45 cable and unplug the power. Note: The TV-IP600W will not work wirelessly until you disconnect the Ethernet cable from the back of the camera. 22. By default: User Name: admin Password: admin 24. Then verify the PWR and LNK LEDs are on the following URL or click Link to view live video. 7 English Click on . Enter the User name and Password, and then click OK. Then plug the power back in. Click View Video | ActiveX or View Video | Java to open up the browser configuration. 23. 21. Wait about 30 seconds while the IP Camera reboots.
Disconnect the RJ-45 cable and unplug the power. Note: The TV-IP600W will not work wirelessly until you disconnect the Ethernet cable from the back of the camera. 22. By default: User Name: admin Password: admin 24. Then verify the PWR and LNK LEDs are on the following URL or click Link to view live video. 7 English Click on . Enter the User name and Password, and then click OK. Then plug the power back in. Click View Video | ActiveX or View Video | Java to open up the browser configuration. 23. 21. Wait about 30 seconds while the IP Camera reboots.

Quick Installation Guide
Page 11
...First, verify that the LINK LED is disabled on the IP Camera? A7: Take a pin or paperclip and press the reset button on your computer's network adapter. Second, disable any questions regarding the TV-IP600/TV-IP600W, please contact TRENDnet's Technical Support Department. 9 A2: First, go to http...://www.java.com to configure the camera with the SSID and encryption key . See steps 25 to 26 in ...
...First, verify that the LINK LED is disabled on the IP Camera? A7: Take a pin or paperclip and press the reset button on your computer's network adapter. Second, disable any questions regarding the TV-IP600/TV-IP600W, please contact TRENDnet's Technical Support Department. 9 A2: First, go to http...://www.java.com to configure the camera with the SSID and encryption key . See steps 25 to 26 in ...


