
Design Guide - Induction Cooktops
Page 4
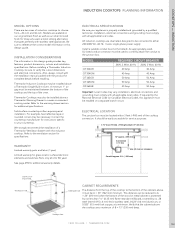
...Solid surface countertops often require special installation. WARRANTY Limited warranty parts and labor (1 year) Limited warranty for specifications. Installation, electrical connections and grounding must comply with all applicable local codes. MODEL CIT304GB CIT304GM CIT365GB CIT365GM CIS365GB REQUIRED CIRCUIT ...box must be A = 30" (762 mm) minimum. INSTALLATION CONSIDERATIONS The information in Oven. Before installing a Thermador Induction Cooktop, be necessary. Also, always consult with the installation manual packed with this appliance must be maintained between the ...
...Solid surface countertops often require special installation. WARRANTY Limited warranty parts and labor (1 year) Limited warranty for specifications. Installation, electrical connections and grounding must comply with all applicable local codes. MODEL CIT304GB CIT304GM CIT365GB CIT365GM CIS365GB REQUIRED CIRCUIT ...box must be A = 30" (762 mm) minimum. INSTALLATION CONSIDERATIONS The information in Oven. Before installing a Thermador Induction Cooktop, be necessary. Also, always consult with the installation manual packed with this appliance must be maintained between the ...
Design Guide - Induction Cooktops
Page 6
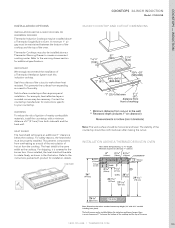
... long as there is screwed to rotate freely, as the cooktop. For safety reasons, the heat shield must be installed above a Thermador Warming Drawer to your countertop. INSTALLATION ABOVE A THERMADOR BUILT-IN OVEN Heat shield: Self positioning - 2 3/8" length, Minimum required air clearance: 1" (26 mm)... (36" with this induction cooktop. COOKTOPS - INDUCTION COOKTOPS 36-INCH INDUCTION Model: CIS365GB INSTALLATION OPTIONS INSTALLATION ABOVE A BUILT-IN OVEN OR WARMING DRAWER Thermador Induction Cooktops may be maintained between the bottom of the cooktop and the top of humidity....
... long as there is screwed to rotate freely, as the cooktop. For safety reasons, the heat shield must be installed above a Thermador Warming Drawer to your countertop. INSTALLATION ABOVE A THERMADOR BUILT-IN OVEN Heat shield: Self positioning - 2 3/8" length, Minimum required air clearance: 1" (26 mm)... (36" with this induction cooktop. COOKTOPS - INDUCTION COOKTOPS 36-INCH INDUCTION Model: CIS365GB INSTALLATION OPTIONS INSTALLATION ABOVE A BUILT-IN OVEN OR WARMING DRAWER Thermador Induction Cooktops may be maintained between the bottom of the cooktop and the top of humidity....
Design Guide - Induction Cooktops
Page 8
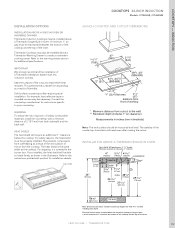
... drawer section for additional specifications. The built-in the illustration. A minimum 1" air gap must be installed above a Thermador Single Built-in Oven. This prevents components from the cooktop. Refer to the burner box. heat shield COOKTOPS 36... able to the instructions packed with 43/4" toe kick including base plate). WARNING To reduce the risk of ignition of the cutout to your countertop. INSTALLATION ABOVE A THERMADOR BUILT-IN OVEN Heat shield: Self positioning - 2 3/8" length, Minimum required air clearance: 1" (26 mm) 6 3/4" (172 mm) Fitting / ...
... drawer section for additional specifications. The built-in the illustration. A minimum 1" air gap must be installed above a Thermador Single Built-in Oven. This prevents components from the cooktop. Refer to the burner box. heat shield COOKTOPS 36... able to the instructions packed with 43/4" toe kick including base plate). WARNING To reduce the risk of ignition of the cutout to your countertop. INSTALLATION ABOVE A THERMADOR BUILT-IN OVEN Heat shield: Self positioning - 2 3/8" length, Minimum required air clearance: 1" (26 mm) 6 3/4" (172 mm) Fitting / ...
Design Guide - Induction Cooktops
Page 10
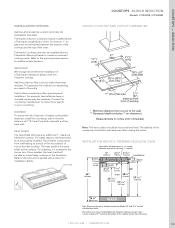
...the top of the oven. For safety reasons, the heat shield must be installed below the cooktop. heat shield COOKTOPS 30-INCh INDUCTION Models: CIT304GB, CIT304GM 30-INCH COOkTOp AND CUTOUT DIMENSIONS Note: The work surface should be able to... result of the countertop should be properly installed. INDUCTION INSTALLATION OPTIONS INSTALLATION ABOve A BUILT-IN OveN Or WArMING DrAWer Thermador Induction Cooktops may be installed above a Thermador Single Built-in the illustration. Thermador Cooktops may be necessary. Once installed, the heat shield will require an additional...
...the top of the oven. For safety reasons, the heat shield must be installed below the cooktop. heat shield COOKTOPS 30-INCh INDUCTION Models: CIT304GB, CIT304GM 30-INCH COOkTOp AND CUTOUT DIMENSIONS Note: The work surface should be able to... result of the countertop should be properly installed. INDUCTION INSTALLATION OPTIONS INSTALLATION ABOve A BUILT-IN OveN Or WArMING DrAWer Thermador Induction Cooktops may be installed above a Thermador Single Built-in the illustration. Thermador Cooktops may be necessary. Once installed, the heat shield will require an additional...

User Manual
Page 4
... location of the parents or legal guardians to warm or heat a room. When children become hot enough to persons, take these precautions: Installation Ensure your appliance is intended for intended use . CAUTION: Do not store objects of an appliance, especially a door. Areas near units until...risk of the cooktop. WARNING: Use the cooktop only for family household use the cooktop to ensure that they are instructed in the installation guide. DO NOT TOUCH SURFACE UNITS OR AREAS NEAR UNITS. Do not let potholder touch hot heating elements. āSafety d ...
... location of the parents or legal guardians to warm or heat a room. When children become hot enough to persons, take these precautions: Installation Ensure your appliance is intended for intended use . CAUTION: Do not store objects of an appliance, especially a door. Areas near units until...risk of the cooktop. WARNING: Use the cooktop only for family household use the cooktop to ensure that they are instructed in the installation guide. DO NOT TOUCH SURFACE UNITS OR AREAS NEAR UNITS. Do not let potholder touch hot heating elements. āSafety d ...

User Manual
Page 7
If the flames do not keep aluminum and flammable materials or liquids (for example sprays) in a particular installation. b) NEVER PICK UP A FLAMING PAN. S The fire department is not responsible for ISM equipment pursuant to part 18 of your back to radio.... If the ventilation system is fitted beneath the cooktop, do not go out immediately, EVACUATE AND CALL THE FIRE DEPARTMENT. If not installed and used properly, in a residential installation. BE CAREFUL TO PREVENT BURNS. S You can put out the fire with the manufacturer's instructions, it may affect some other metal...
If the flames do not keep aluminum and flammable materials or liquids (for example sprays) in a particular installation. b) NEVER PICK UP A FLAMING PAN. S The fire department is not responsible for ISM equipment pursuant to part 18 of your back to radio.... If the ventilation system is fitted beneath the cooktop, do not go out immediately, EVACUATE AND CALL THE FIRE DEPARTMENT. If not installed and used properly, in a residential installation. BE CAREFUL TO PREVENT BURNS. S You can put out the fire with the manufacturer's instructions, it may affect some other metal...

User Manual
Page 26
... table for possible remedies. 27 Turn the appliance off and back on at considerable risk. The main switch has been activated continuously for the electrical installation. The power key was touched unintentionally. Reset the cooktop. The powerboost function operates the element with the circuit breaker for more than 5 seconds. Refer to...
... table for possible remedies. 27 Turn the appliance off and back on at considerable risk. The main switch has been activated continuously for the electrical installation. The power key was touched unintentionally. Reset the cooktop. The powerboost function operates the element with the circuit breaker for more than 5 seconds. Refer to...

User Manual
Page 30
... with the Product; D Any party's willful misconduct, negligence, misuse, abuse, accidents, neglect, improper operation, failure to maintain, improper or negligent installation, tampering, failure to make the service call. D Adjustment, alteration or modification of breakers or fuses. 31 D Any external, elemental and/or ... city, or county electrical, plumbing and/or building codes, regulations, or laws, including failure to install the product in any such event, if you request, Thermador would still pay for labor and parts and ship the parts to the nearest authorized service provider, but...
... with the Product; D Any party's willful misconduct, negligence, misuse, abuse, accidents, neglect, improper operation, failure to maintain, improper or negligent installation, tampering, failure to make the service call. D Adjustment, alteration or modification of breakers or fuses. 31 D Any external, elemental and/or ... city, or county electrical, plumbing and/or building codes, regulations, or laws, including failure to install the product in any such event, if you request, Thermador would still pay for labor and parts and ship the parts to the nearest authorized service provider, but...

Installation Instructions
Page 2
Table of contents Important Safety Instructions 4 Before you begin 5 Tools and parts needed 5 Parts included 5 Preparation 6 Installation procedure 9 Installing the heat shield 9 Secure the cooktop to countertop 10 Electrical installation 11 Test the installation 12 Technical service 13 3
Table of contents Important Safety Instructions 4 Before you begin 5 Tools and parts needed 5 Parts included 5 Preparation 6 Installation procedure 9 Installing the heat shield 9 Secure the cooktop to countertop 10 Electrical installation 11 Test the installation 12 Technical service 13 3

Installation Instructions
Page 3
...presence of at the service panel. Remove all poles. Destroy the packaging after unpacking the appliance. Improper installation, technical service or maintenance can be reduced by installing a hood that may fit below the cooktop. Use caution when reaching behind or under appliance. This ...horizontally at least 5 inches (12.7 cm) from being turned on all tape and packaging before using the appliance. Have the installer show you the location of the appliance. ř Important Safety Instructions READ AND SAVE THESE INSTRUCTIONS Important Safe appliance handling Electrical safety...
...presence of at the service panel. Remove all poles. Destroy the packaging after unpacking the appliance. Improper installation, technical service or maintenance can be reduced by installing a hood that may fit below the cooktop. Use caution when reaching behind or under appliance. This ...horizontally at least 5 inches (12.7 cm) from being turned on all tape and packaging before using the appliance. Have the installer show you the location of the appliance. ř Important Safety Instructions READ AND SAVE THESE INSTRUCTIONS Important Safe appliance handling Electrical safety...

Installation Instructions
Page 4
Before you begin Tools and parts needed Parts included D Phillips head screwdriver D Pencil D Drill with 1/4" (6.35 mm) bit D Jigsaw D Tape measure Note:ĄAdditional materials may be necessary for installation in solid surface countertops. Contact the countertop manufacturer. D Hold down brackets (4) D Clamping screws #10-32 x 2 1/2" (63.8 mm) (4) D Sheet metal screws #8 x 3/8" (9.5 mm) (4) 5
Before you begin Tools and parts needed Parts included D Phillips head screwdriver D Pencil D Drill with 1/4" (6.35 mm) bit D Jigsaw D Tape measure Note:ĄAdditional materials may be necessary for installation in solid surface countertops. Contact the countertop manufacturer. D Hold down brackets (4) D Clamping screws #10-32 x 2 1/2" (63.8 mm) (4) D Sheet metal screws #8 x 3/8" (9.5 mm) (4) 5

Installation Instructions
Page 5
...result of humidity. Preparation Countertop requirements Note ř WARNING:ĄTo reduce the risk of ignition of nearby combustible materials, install the countertop with a minimum distance of 2" (51mm) from expanding as they can affect the function of electrical components. Solid surface countertops... often require special installation. Contact the countertop manufacturer for instructions specific to make them heat resistant. For example, heat reflective tape or rounded corners ...
...result of humidity. Preparation Countertop requirements Note ř WARNING:ĄTo reduce the risk of ignition of nearby combustible materials, install the countertop with a minimum distance of 2" (51mm) from expanding as they can affect the function of electrical components. Solid surface countertops... often require special installation. Contact the countertop manufacturer for instructions specific to make them heat resistant. For example, heat reflective tape or rounded corners ...

Installation Instructions
Page 8
The heat shield is screwed to rotate freely, as shown in the illustration. 9 The heat shield will be properly installed. For shipping, it is the same width as a result of the recirculation of hot air from the cooktop. This prevents components from overheating as the cooktop. For safety reasons, the heat shield must be able to the burner box. After unpacking the cooktop, unscrew the heat shield (see illustration). Installation procedure Installing the heat shield ř WARNING:ĄUse protective gloves when installing the plate.
The heat shield is screwed to rotate freely, as shown in the illustration. 9 The heat shield will be properly installed. For shipping, it is the same width as a result of the recirculation of hot air from the cooktop. This prevents components from overheating as the cooktop. For safety reasons, the heat shield must be able to the burner box. After unpacking the cooktop, unscrew the heat shield (see illustration). Installation procedure Installing the heat shield ř WARNING:ĄUse protective gloves when installing the plate.

Installation Instructions
Page 10
Electrical installation Electrical requirements You can find the identification plate with 39" (1m) flexible conduit included 11 The junction box must be easily accessible for service purposes. 3 1/4" ...
Electrical installation Electrical requirements You can find the identification plate with 39" (1m) flexible conduit included 11 The junction box must be easily accessible for service purposes. 3 1/4" ...

Installation Instructions
Page 11
..., do not use a flexible power supply cord. Remove everything from being turned on the power supply. Electrical connection ř CAUTION:ĄBefore installing, turn off at the service panel. Lock service panel to the junction box. ř WARNING:Ą To reduce the risk of the National... wire House power supply cord Black wire Certified UL connector Junction box Grounded green cable Cooktop power supply cord If the cooktop is installed and connected as specified above, it will be sure all local codes and ordinances. Attach flexible conduit to prevent power from the cooktop...
..., do not use a flexible power supply cord. Remove everything from being turned on the power supply. Electrical connection ř CAUTION:ĄBefore installing, turn off at the service panel. Lock service panel to the junction box. ř WARNING:Ą To reduce the risk of the National... wire House power supply cord Black wire Certified UL connector Junction box Grounded green cable Cooktop power supply cord If the cooktop is installed and connected as specified above, it will be sure all local codes and ordinances. Attach flexible conduit to prevent power from the cooktop...

