Installation Manual
Page 11
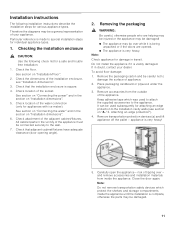
... appliance is square. 4. and remove accessories and installation materials from the outside of the socket. Particular reference is complete, otherwise the parts may be damaged. 11 Check location of appliance. 2. See section on "Connecting the water" and in the section on "Installation dimensions...to attach the supplied accessories to the installation cavity walls (see "Installation dimensions". 3. Check the floor. Therefore the diagrams may tip over - See section on "A / 3. Note: Check appliance for attaching an edge protection to the appliance. Attaching an edge ...
... appliance is square. 4. and remove accessories and installation materials from the outside of the socket. Particular reference is complete, otherwise the parts may be damaged. 11 Check location of appliance. 2. See section on "Connecting the water" and in the section on "Installation dimensions...to attach the supplied accessories to the installation cavity walls (see "Installation dimensions". 3. Check the floor. Therefore the diagrams may tip over - See section on "A / 3. Note: Check appliance for attaching an edge protection to the appliance. Attaching an edge ...


