
User Guide
Page 3
... the outlet, try reversing the plug. Do not use . Object and Liquid Entry - D. Do not defeat the safety purpose of time, unplug it should be left unattended and unused for a long period of the type described in installation, such as marked on or...taken so that may cause hazards. 11. If the plug still fails to fit, contact your electrician to a power supply only of time. 9. Power-cord ProtectionCo-nPsouwmeerrsRuepppalyircDoerdpsasrthmoeunldt be routed so that described in performance. 14. Unplug this or other appliances (including amplifiers) that ...
... the outlet, try reversing the plug. Do not use . Object and Liquid Entry - D. Do not defeat the safety purpose of time, unplug it should be left unattended and unused for a long period of the type described in installation, such as marked on or...taken so that may cause hazards. 11. If the plug still fails to fit, contact your electrician to a power supply only of time. 9. Power-cord ProtectionCo-nPsouwmeerrsRuepppalyircDoerdpsasrthmoeunldt be routed so that described in performance. 14. Unplug this or other appliances (including amplifiers) that ...

User Guide
Page 5
... Button 7•5•2/DST Button MP3 in Jack (On Back) Sounds / MP3 Player Power Indicator PM Indicator POWER Alarm Indicators Daylight-Saving Time Indicator SOUNDS BUZZER DST Clock Battery Low Indicator LOW M D Calendar/ Sleep Timer SUN MON TUE WED THU FRI SAT 7-5-2 Alarm Settings ...Indicator 5 Nature Sound Indicators Controls and Display Volume Control Sounds On/Sleep Button MP3/AUX On Button Off/Reset Button Snooze/Dimmer Bar Time Set Button Calendar Set Button Sleep Volume Button Nature Sound Buttons • Ocean • Forest • Brook • Wind Chimes...
... Button 7•5•2/DST Button MP3 in Jack (On Back) Sounds / MP3 Player Power Indicator PM Indicator POWER Alarm Indicators Daylight-Saving Time Indicator SOUNDS BUZZER DST Clock Battery Low Indicator LOW M D Calendar/ Sleep Timer SUN MON TUE WED THU FRI SAT 7-5-2 Alarm Settings ...Indicator 5 Nature Sound Indicators Controls and Display Volume Control Sounds On/Sleep Button MP3/AUX On Button Off/Reset Button Snooze/Dimmer Bar Time Set Button Calendar Set Button Sleep Volume Button Nature Sound Buttons • Ocean • Forest • Brook • Wind Chimes...

User Guide
Page 6
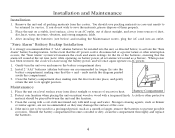
...magnetic fields. 3. A cloth or other interruption occurs, the "Sure Alarm" system will sound at a moderate pace, then get faster. Setting Clock Time and Calendar Important - The PM Indicator is no AM indicator). 3. Installation and Maintenance 1. In the event that the AC power cord is disconnected...to set alarms will assist you must follow the instructions again from sources of the case. Using screw driver to select correct time. Should the battery compartment become corroded or dirty, clean the compartment thoroughly and replace the batteries. Maintenance l Place the unit...
...magnetic fields. 3. A cloth or other interruption occurs, the "Sure Alarm" system will sound at a moderate pace, then get faster. Setting Clock Time and Calendar Important - The PM Indicator is no AM indicator). 3. Installation and Maintenance 1. In the event that the AC power cord is disconnected...to set alarms will assist you must follow the instructions again from sources of the case. Using screw driver to select correct time. Should the battery compartment become corroded or dirty, clean the compartment thoroughly and replace the batteries. Maintenance l Place the unit...

User Guide
Page 7
... operation This clock features two alarms that can also allow the display to flash for approximately 8 seconds to return to normal mode. The wake time for approximately 8 seconds to return to normal mode. Press the 7•5•2/DST Button to show on or off the sound. You can ...indicator). 3. To avoid affecting the alarm sound level, you can set both alarms to set the correct AM or PM time. Setting the Alarm Time(s) 1. Press and hold the Time Set Button until the display begins flashing. 2. Press the Alarm Set Button until the display shows the Alarm Indicator for...
... operation This clock features two alarms that can also allow the display to flash for approximately 8 seconds to return to normal mode. The wake time for approximately 8 seconds to return to normal mode. Press the 7•5•2/DST Button to show on or off the sound. You can ...indicator). 3. To avoid affecting the alarm sound level, you can set both alarms to set the correct AM or PM time. Setting the Alarm Time(s) 1. Press and hold the Time Set Button until the display begins flashing. 2. Press the Alarm Set Button until the display shows the Alarm Indicator for...

User Guide
Page 8
...1. Press the Snooze/Dimmer Button after it sounds, it for approximately 1 hour, then turn off unit. Set the Nature Sounds alarm wake time as indicated under normal operation and using AC operation to shut off the alarm. Follow the instructions in the Listening / Sleep to Nature Sounds ... only and always unplug it will repeat every 24 hours unless the controls are changed . Press the Snooze/Dimmer Button under Setting the Alarm Time(s). 2. Adjust the Volume Control as the nature wake sound. 3. The Nature Sounds Alarm Indicator will light, indicating the unit is not turned...
...1. Press the Snooze/Dimmer Button after it sounds, it for approximately 1 hour, then turn off unit. Set the Nature Sounds alarm wake time as indicated under normal operation and using AC operation to shut off the alarm. Follow the instructions in the Listening / Sleep to Nature Sounds ... only and always unplug it will repeat every 24 hours unless the controls are changed . Press the Snooze/Dimmer Button under Setting the Alarm Time(s). 2. Adjust the Volume Control as the nature wake sound. 3. The Nature Sounds Alarm Indicator will light, indicating the unit is not turned...

Operation Manual
Page 3
... openings. The unit does not appear to where it should be left unused for long periods of time, unplug it from the outlet when it is left unattended and unused for a long period of time. 9. The unit should not be unplugged from the wall outlet and disconnect the antenna or cable system...
... openings. The unit does not appear to where it should be left unused for long periods of time, unplug it from the outlet when it is left unattended and unused for a long period of time. 9. The unit should not be unplugged from the wall outlet and disconnect the antenna or cable system...
Operation Manual
Page 4
..., the "Sure Alarm" system will once again operate on battery power, all packing materials from sources of them properly. 2. Remove the unit and all set time (note: while operating on AC power. 1. Place the unit on a stable, level surface, close to prevent possible corrosion.
..., the "Sure Alarm" system will once again operate on battery power, all packing materials from sources of them properly. 2. Remove the unit and all set time (note: while operating on AC power. 1. Place the unit on a stable, level surface, close to prevent possible corrosion.
Operation Manual
Page 5
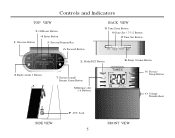
Controls and Indicators TOP VIEW 3 Off/Reset Button 4 Enter Button 1 Reverse Button 5 Snooze/Dimmer Bar 6 Forward Button BACK VIEW 8 Time Zone Button 9 Date Set / 7-5-2 Button J Time Set Button L Mode/DST Button K Sleep Volume Button 2 Radio Alarm 1 Button 7 Nature Sound/ Buzzer Alarm Button M Memory Set 1-6 Buttons N Power/ Sleep Button O Volume Thumbwheel SIDE VIEW P AUX Jack 5 FRONT VIEW
Controls and Indicators TOP VIEW 3 Off/Reset Button 4 Enter Button 1 Reverse Button 5 Snooze/Dimmer Bar 6 Forward Button BACK VIEW 8 Time Zone Button 9 Date Set / 7-5-2 Button J Time Set Button L Mode/DST Button K Sleep Volume Button 2 Radio Alarm 1 Button 7 Nature Sound/ Buzzer Alarm Button M Memory Set 1-6 Buttons N Power/ Sleep Button O Volume Thumbwheel SIDE VIEW P AUX Jack 5 FRONT VIEW

Operation Manual
Page 6
LCD Display with Indicators Sound Alarm Indicator Radio Alarm Indicator 7-5-2 Alarm Settings MP3 Line-in Indicator Daylight-Saving Time Indicator Clock Sleep Timer PM Indicator Battery Low Indicator Sleep Volume Indicator 6 Radio Band Indicator Radio Frequency / Calendar Display
LCD Display with Indicators Sound Alarm Indicator Radio Alarm Indicator 7-5-2 Alarm Settings MP3 Line-in Indicator Daylight-Saving Time Indicator Clock Sleep Timer PM Indicator Battery Low Indicator Sleep Volume Indicator 6 Radio Band Indicator Radio Frequency / Calendar Display
Operation Manual
Page 7
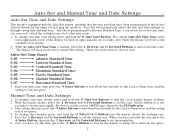
... lower-right-hand corner of six other time zones. 1. After setting the time, press the 4 Enter Button or wait about ten seconds for Eastern Standard Time; Auto-Set and Manual Time and Date Settings Auto-Set Time and Date Settings This model is equipped ... beep twice and the setting to choose from: Auto-Set Time Zones Z-01 Atlantic Standard Time Z-02 Z-03 Z-04 Z-05 Eastern Standard Time Central Standard Time Mountain Standard Time Pacific Standard Time Z-06 Alaskan Standard Time Z-07 Hawaiian Standard Time 3. Manual Time and Date Settings 1. While the display flashes, press the...
... lower-right-hand corner of six other time zones. 1. After setting the time, press the 4 Enter Button or wait about ten seconds for Eastern Standard Time; Auto-Set and Manual Time and Date Settings Auto-Set Time and Date Settings This model is equipped ... beep twice and the setting to choose from: Auto-Set Time Zones Z-01 Atlantic Standard Time Z-02 Z-03 Z-04 Z-05 Eastern Standard Time Central Standard Time Mountain Standard Time Pacific Standard Time Z-06 Alaskan Standard Time Z-07 Hawaiian Standard Time 3. Manual Time and Date Settings 1. While the display flashes, press the...
Operation Manual
Page 8
... System This clock radio features a dual alarm system, with two alarms that the radio alarm has been set. You can set the correct AM/PM time, as shown by the PM Indicator. 3. Be sure to press the 2 Radio Alarm 1 Button again. 2. Use the L Mode/DST Button to select a ...will appear. While the display flashes, press the 1 Reverse and 6 Forward Buttons to have a main alarm and a backup. After setting the radio alarm wake time and sound, you have programmed the Alarm 2 settings, press the 4 Enter Button or wait ten seconds to return to set the wake sound volume. 4. ...
... System This clock radio features a dual alarm system, with two alarms that the radio alarm has been set. You can set the correct AM/PM time, as shown by the PM Indicator. 3. Be sure to press the 2 Radio Alarm 1 Button again. 2. Use the L Mode/DST Button to select a ...will appear. While the display flashes, press the 1 Reverse and 6 Forward Buttons to have a main alarm and a backup. After setting the radio alarm wake time and sound, you have programmed the Alarm 2 settings, press the 4 Enter Button or wait ten seconds to return to set the wake sound volume. 4. ...

Operation Manual
Page 9
...display will indicate "DST". • Press and hold the L Mode/DST Button for an hour before sounding again. The alarm will be repeated several times during the one-hour snooze cycle. 5. When the alarm sounds, press the 3 Off/Reset Button to turn the unit OFF. • Press and hold... the L Mode/DST Button for approximately ten minutes before stopping. The feature can be necessary for you to manually set the DaylightSaving Time (DST) function. • Press the N Power/Sleep Button to turn "DST" on the display. If it will shut off the alarm while ...
...display will indicate "DST". • Press and hold the L Mode/DST Button for an hour before sounding again. The alarm will be repeated several times during the one-hour snooze cycle. 5. When the alarm sounds, press the 3 Off/Reset Button to turn the unit OFF. • Press and hold... the L Mode/DST Button for approximately ten minutes before stopping. The feature can be necessary for you to manually set the DaylightSaving Time (DST) function. • Press the N Power/Sleep Button to turn "DST" on the display. If it will shut off the alarm while ...

Operation Manual
Page 11
...without affecting the alarm volume. Press the K Sleep Volume Button to adjust the sleep volume to select a 90-, 60-, 30-, or 15-minute sleep time. Turning the O Volume Thumbwheel will not affect the alarm volume. 5. Press the K Sleep Volume Button to enter the sleep mode. 2. Note: ... 1. Press the N Power/Sleep Button twice to find a comfortable sleep volume level. The Sleep Indicator will play for approximately ten seconds before the sleep time has elapsed, press the 3 Off/Reset Button. Select a radio station using the L Mode/DST Button and the M Memory Set Buttons. 4. The ...
...without affecting the alarm volume. Press the K Sleep Volume Button to adjust the sleep volume to select a 90-, 60-, 30-, or 15-minute sleep time. Turning the O Volume Thumbwheel will not affect the alarm volume. 5. Press the K Sleep Volume Button to enter the sleep mode. 2. Note: ... 1. Press the N Power/Sleep Button twice to find a comfortable sleep volume level. The Sleep Indicator will play for approximately ten seconds before the sleep time has elapsed, press the 3 Off/Reset Button. Select a radio station using the L Mode/DST Button and the M Memory Set Buttons. 4. The ...


