
User Manual
Page 1
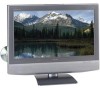
...picture, the TV must be receiving a High Definition signal (such as an overthe-air High Definition TV broadcast, a High Definition digital cable program, or a High Definition digital satellite program). Model number: 27HLV95 Serial number: For an overview of steps for setting up and using your new TV, see page 11. 27HLV95 © 2005 TOSHIBA... CORPORATION All Rights Reserved Owner's Record The model number and serial number are on the back of your Toshiba dealer about this TV. however, to these numbers in the ...
...picture, the TV must be receiving a High Definition signal (such as an overthe-air High Definition TV broadcast, a High Definition digital cable program, or a High Definition digital satellite program). Model number: 27HLV95 Serial number: For an overview of steps for setting up and using your new TV, see page 11. 27HLV95 © 2005 TOSHIBA... CORPORATION All Rights Reserved Owner's Record The model number and serial number are on the back of your Toshiba dealer about this TV. however, to these numbers in the ...

User Manual
Page 4
...cables, wires, or any kind into the TV cabinet slots. 31) While it is 32 ºF (0 ºC) or below, the picture brightness may damage the surface. These actions will damage the LCD screen. Never attempt to this page. from previous page) 25) Always make ...; Ask the service technician to clean the LCD screen, follow these sounds become frequent or continuous, unplug the power cord and contact a Toshiba Authorized Service Center. 34) WARNING: RISK OF SERIOUS PERSONAL INJURY OR EQUIPMENT DAMAGE ! Installation (cont. For disposal or recycling information, contact...
...cables, wires, or any kind into the TV cabinet slots. 31) While it is 32 ºF (0 ºC) or below, the picture brightness may damage the surface. These actions will damage the LCD screen. Never attempt to this page. from previous page) 25) Always make ...; Ask the service technician to clean the LCD screen, follow these sounds become frequent or continuous, unplug the power cord and contact a Toshiba Authorized Service Center. 34) WARNING: RISK OF SERIOUS PERSONAL INJURY OR EQUIPMENT DAMAGE ! Installation (cont. For disposal or recycling information, contact...

User Manual
Page 5
... LCD technology, is viewed from an air conditioned room. • When you put the TV in figure below. Such pixels are not visible when the picture is not a sign of the disc. Do not use a cracked, deformed, or repaired disc. In the same way, moisture may appear on -screen target may... (dot of 4 cm or more or if the set when a disc is not responsible for example, when you use the TV in this TV. Therefore, Toshiba is loaded. These discs are not an indication of the disc slot when disc is not covered under your fingers well clear of malfunction. After...
... LCD technology, is viewed from an air conditioned room. • When you put the TV in figure below. Such pixels are not visible when the picture is not a sign of the disc. Do not use a cracked, deformed, or repaired disc. In the same way, moisture may appear on -screen target may... (dot of 4 cm or more or if the set when a disc is not responsible for example, when you use the TV in this TV. Therefore, Toshiba is loaded. These discs are not an indication of the disc slot when disc is not covered under your fingers well clear of malfunction. After...
User Manual
Page 6
...screen during playback. patents and other countries, and may still be subject to the instructions provided with some discs. 6 Copyright © 2005 TOSHIBA CORPORATION. Reverse engineering or disassembly is prohibited. • Do not use , distribution, or revision of the United States and other intellectual ...operation during DVD operation, it means that the operation or feature is intended for using the menu displayed on the disc cause picture and sound deterioration. Some DVDs are divided into titles, and the titles are printed on your DVDs. There may be ...
...screen during playback. patents and other countries, and may still be subject to the instructions provided with some discs. 6 Copyright © 2005 TOSHIBA CORPORATION. Reverse engineering or disassembly is prohibited. • Do not use , distribution, or revision of the United States and other intellectual ...operation during DVD operation, it means that the operation or feature is intended for using the menu displayed on the disc cause picture and sound deterioration. Some DVDs are divided into titles, and the titles are printed on your DVDs. There may be ...

User Manual
Page 7
... IS OPENED. DVD-R/RW discs of DVD video format CD-R/CD-RW discs of CD-DA, Video CD, MP3, or JPEG format Kodak Picture CD and FUJICOLOR CD format Some of every DVD bearing the DVD logo and/or every CD bearing the CD logo. TO ENSURE PROPER USE... LASER SYSTEM. USE OF CONTROLS, ADJUSTMENTS OR THE PERFORMANCE OF PROCEDURES OTHER THAN THOSE SPECIFIED HEREIN MAY RESULT IN HAZARDOUS RADIATION EXPOSURE. Copyright © 2005 TOSHIBA CORPORATION. SHOULD THE UNIT REQUIRE MAINTENANCE, CONTACT AN AUTHORIZED SERVICE LOCATION. You cannot play discs other than a standard 12 cm (4.75") diameter disc into ...
... IS OPENED. DVD-R/RW discs of DVD video format CD-R/CD-RW discs of CD-DA, Video CD, MP3, or JPEG format Kodak Picture CD and FUJICOLOR CD format Some of every DVD bearing the DVD logo and/or every CD bearing the CD logo. TO ENSURE PROPER USE... LASER SYSTEM. USE OF CONTROLS, ADJUSTMENTS OR THE PERFORMANCE OF PROCEDURES OTHER THAN THOSE SPECIFIED HEREIN MAY RESULT IN HAZARDOUS RADIATION EXPOSURE. Copyright © 2005 TOSHIBA CORPORATION. SHOULD THE UNIT REQUIRE MAINTENANCE, CONTACT AN AUTHORIZED SERVICE LOCATION. You cannot play discs other than a standard 12 cm (4.75") diameter disc into ...

User Manual
Page 9
...between two channels using Channel Return 64 Switching between two channels using SurfLock 64 Selecting the picture size 65 Scrolling the TheaterWide® picture (TheaterWide 2 and 3 only 67 Using the auto aspect ratio feature 67 Selecting the ...cinema mode (480i signals only 68 Using the FREEZE feature 68 Adjusting the picture 69 Selecting the picture mode 69 Adjusting the picture quality 69 Using CableClear®/DNR (digital noise reduction) ...... 70 Selecting the color...Warranty 97 Limited Canada Warranty 98 Index 100 Copyright © 2005 TOSHIBA CORPORATION.
...between two channels using Channel Return 64 Switching between two channels using SurfLock 64 Selecting the picture size 65 Scrolling the TheaterWide® picture (TheaterWide 2 and 3 only 67 Using the auto aspect ratio feature 67 Selecting the ...cinema mode (480i signals only 68 Using the FREEZE feature 68 Adjusting the picture 69 Selecting the picture mode 69 Adjusting the picture quality 69 Using CableClear®/DNR (digital noise reduction) ...... 70 Selecting the color...Warranty 97 Limited Canada Warranty 98 Index 100 Copyright © 2005 TOSHIBA CORPORATION.
User Manual
Page 10
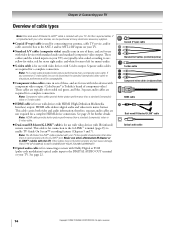
...) and SRS WOW™ (page 76) audio technologies. • Digital Audio Out optical audio connection (page 22). • CableClear® DNR digital picture noise reduction (page 70). • DVD video (and Video CD, Audio CD) player (page 84). • PC IN (Analog RGB) computer terminal...this manual carefully, and keep this manual for future reference. WOW technology is a trademark of Cable Television Laboratories, Inc. 10 Copyright © 2005 TOSHIBA CORPORATION. Features of your new TV The following issued United States patents 6,498,895, 6,418,556, 6,331,877; 6,239,794; 6,154,203...
...) and SRS WOW™ (page 76) audio technologies. • Digital Audio Out optical audio connection (page 22). • CableClear® DNR digital picture noise reduction (page 70). • DVD video (and Video CD, Audio CD) player (page 84). • PC IN (Analog RGB) computer terminal...this manual carefully, and keep this manual for future reference. WOW technology is a trademark of Cable Television Laboratories, Inc. 10 Copyright © 2005 TOSHIBA CORPORATION. Features of your new TV The following issued United States patents 6,498,895, 6,418,556, 6,331,877; 6,239,794; 6,154,203...

User Manual
Page 11
... 5 for details on setting up the TV Guide On Screen™ system (if available in the remote control (page 26). 8. Copyright © 2005 TOSHIBA CORPORATION. Chapter 1: Introduction Overview of steps for installing, setting up, and using your new TV Follow these steps to allow loading/unloading a disc. •...disc slot side should be sure to reset the TV. 11. If the TV stops responding to the controls on the screen until the picture appears or the green LED will damage the TV. Program channels into standby mode. For details on using its many exciting features. 1. ...
... 5 for details on setting up the TV Guide On Screen™ system (if available in the remote control (page 26). 8. Copyright © 2005 TOSHIBA CORPORATION. Chapter 1: Introduction Overview of steps for installing, setting up, and using your new TV Follow these steps to allow loading/unloading a disc. •...disc slot side should be sure to reset the TV. 11. If the TV stops responding to the controls on the screen until the picture appears or the green LED will damage the TV. Program channels into standby mode. For details on using its many exciting features. 1. ...
User Manual
Page 14
...picture performance than a standard (composite) video or S-video cable. ● HDMI cable is for a complete connection. See page 21 for connection to the G-LINK™ terminal (page 23) to enable TV Guide On Screen™ recording features (Chapters 5 and 7). THIS TYPE OF DAMAGE IS NOT COVERED BY YOUR TOSHIBA...video cables (red/green/blue) HDMI cable Dual-wand IR blaster/G-LINK™ cable Optical audio cable 14 Copyright © 2005 TOSHIBA CORPORATION. Separate audio cables are not required for use with devices with your TV. Separate audio cables are for a complete HDMI ...
...picture performance than a standard (composite) video or S-video cable. ● HDMI cable is for a complete connection. See page 21 for connection to the G-LINK™ terminal (page 23) to enable TV Guide On Screen™ recording features (Chapters 5 and 7). THIS TYPE OF DAMAGE IS NOT COVERED BY YOUR TOSHIBA...video cables (red/green/blue) HDMI cable Dual-wand IR blaster/G-LINK™ cable Optical audio cable 14 Copyright © 2005 TOSHIBA CORPORATION. Separate audio cables are not required for use with devices with your TV. Separate audio cables are for a complete HDMI ...

User Manual
Page 16
..., or revision of television programs, videotapes, DVDs, and other materials is prohibited under the Copyright Laws of a standard video cable for better picture performance. To view the antenna or Cable signal: Select the ANT 1 video input source on the TV.* From Cable TV or antenna Signal...instead of the inputs on the remote control (see Chapter 3. 16 Copyright © 2005 TOSHIBA CORPORATION. Note: The VIDEO/AUDIO OUT terminals output signals from ANT OUT to VIDEO 1 at the same time or the picture performance will need : one set of standard A/V cables • If you have a...
..., or revision of television programs, videotapes, DVDs, and other materials is prohibited under the Copyright Laws of a standard video cable for better picture performance. To view the antenna or Cable signal: Select the ANT 1 video input source on the TV.* From Cable TV or antenna Signal...instead of the inputs on the remote control (see Chapter 3. 16 Copyright © 2005 TOSHIBA CORPORATION. Note: The VIDEO/AUDIO OUT terminals output signals from ANT OUT to VIDEO 1 at the same time or the picture performance will need : one set of standard A/V cables • If you have a...
User Manual
Page 17
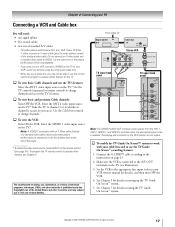
... audio cables) instead of the standard video cable. See Chapter 5 for details on the remote control (see illustration). 3. Copyright © 2005 TOSHIBA CORPORATION. To view basic Cable channels and use the TV's features: Select the ANT 1 video input source on the TV (see page 60).... TV Connecting a VCR and Cable box You will need: one signal splitter five coaxial cables two sets of standard A/V cables • For better picture performance from the ANT 1, ANT 2, VIDEO 1, and VIDEO 2 terminals when the appropriate input mode is selected. The unauthorized recording, use, distribution,...
... audio cables) instead of the standard video cable. See Chapter 5 for details on the remote control (see illustration). 3. Copyright © 2005 TOSHIBA CORPORATION. To view basic Cable channels and use the TV's features: Select the ANT 1 video input source on the TV (see page 60).... TV Connecting a VCR and Cable box You will need: one signal splitter five coaxial cables two sets of standard A/V cables • For better picture performance from the ANT 1, ANT 2, VIDEO 1, and VIDEO 2 terminals when the appropriate input mode is selected. The unauthorized recording, use, distribution,...
User Manual
Page 18
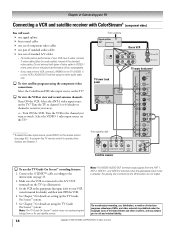
... Note: The TV Guide On Screen™ system does not receive program listings from ANT OUT to civil and criminal liability. 18 Copyright © 2005 TOSHIBA CORPORATION. The playing disc's contents by the DVD section are not output. Make sure the VCR is vacant in your area). Set the VCR to... splitter four coaxial cables one set of component video cables one pair of standard audio cables two sets of standard A/V cables • For better picture performance, if your VCR owner's manual for details on the TV.* To view the VCR or view and record antenna channels: Turn ON the ...
... Note: The TV Guide On Screen™ system does not receive program listings from ANT OUT to civil and criminal liability. 18 Copyright © 2005 TOSHIBA CORPORATION. The playing disc's contents by the DVD section are not output. Make sure the VCR is vacant in your area). Set the VCR to... splitter four coaxial cables one set of component video cables one pair of standard audio cables two sets of standard A/V cables • For better picture performance, if your VCR owner's manual for details on the TV.* To view the VCR or view and record antenna channels: Turn ON the ...
User Manual
Page 19
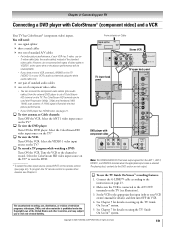
... OUT terminals on the TV (see illustration). 3. Copyright © 2005 TOSHIBA CORPORATION. The ColorStream HD terminal can connect the component video cables (plus the audio cables) instead of standard A/V cables • For better picture performance, if your VCR has S-video, use an S-video cable (plus ... your TV Connecting a DVD player with Progressive (480p, 720p) and Interlaced (480i, 1080i) scan systems. A 1080i signal will provide the best picture performance. • If your DVD player has HDMI video, see page 21. You will be used with ColorStream® (component video) and a...
... OUT terminals on the TV (see illustration). 3. Copyright © 2005 TOSHIBA CORPORATION. The ColorStream HD terminal can connect the component video cables (plus the audio cables) instead of standard A/V cables • For better picture performance, if your VCR has S-video, use an S-video cable (plus ... your TV Connecting a DVD player with Progressive (480p, 720p) and Interlaced (480i, 1080i) scan systems. A 1080i signal will provide the best picture performance. • If your DVD player has HDMI video, see page 21. You will be used with ColorStream® (component video) and a...

User Manual
Page 20
... turn OFF the VCR. 4. However, do not connect both VCRs. Select the ANT 1 video input source on the TV at the same time or the picture performance will be unacceptable. • If VCR 1 has mono audio, connect L/MONO on the TV (VIDEO 1) to civil and criminal liability. Set VCR 2 to...other countries, and may prevent you to the audio out terminal on VCR 1 using the TV Guide On Screen™ system. 20 Copyright © 2005 TOSHIBA CORPORATION. Use of the United States and other devices, see Chapter 3. **Do not connect the unit through VCRs may be affected by U.S. The unauthorized ...
... turn OFF the VCR. 4. However, do not connect both VCRs. Select the ANT 1 video input source on the TV at the same time or the picture performance will be unacceptable. • If VCR 1 has mono audio, connect L/MONO on the TV (VIDEO 1) to civil and criminal liability. Set VCR 2 to...other countries, and may prevent you to the audio out terminal on VCR 1 using the TV Guide On Screen™ system. 20 Copyright © 2005 TOSHIBA CORPORATION. Use of the United States and other devices, see Chapter 3. **Do not connect the unit through VCRs may be affected by U.S. The unauthorized ...
User Manual
Page 24
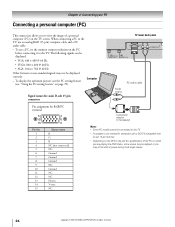
...you to view the image of the PC on the PC before connecting it to pause during multi-angle scenes. 24 Copyright © 2005 TOSHIBA CORPORATION. Computer Signal names for mini D-sub 15 pin connector TV lower back panel Audio output PC audio cable Pin assignment for RGB/PC terminal... not be connected to the TV, use the PC setting feature. (see "Using the PC setting feature" on the TV screen. To display the optimum picture, use an analog RGB (15-pin) computer cable and a PC audio cable. - Chapter 2: Connecting your TV Connecting a personal computer (PC) This connection allows ...
...you to view the image of the PC on the PC before connecting it to pause during multi-angle scenes. 24 Copyright © 2005 TOSHIBA CORPORATION. Computer Signal names for mini D-sub 15 pin connector TV lower back panel Audio output PC audio cable Pin assignment for RGB/PC terminal... not be connected to the TV, use the PC setting feature. (see "Using the PC setting feature" on the TV screen. To display the optimum picture, use an analog RGB (15-pin) computer cable and a PC audio cable. - Chapter 2: Connecting your TV Connecting a personal computer (PC) This connection allows ...
User Manual
Page 25
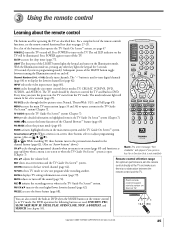
...yz cycles through programmed channels when no obstruction between turning the Illumination mode on and off the sound (page 74). MODE cycles through the five pictures sizes: Natural, TheaterWide 1/2/3, and Full (page 65). PIC SIZE cycles through the six remote control device modes: TV, CBL/SAT, VCR/...x / • While watching TV, these buttons select or adjust programming menus. (Also see chapter 10). 16.4 ft (5m) Copyright © 2005 TOSHIBA CORPORATION. Note: The error message "Not Available" will remain lit for 5 seconds (10 seconds if you turn on , the TV starts from the TV ...
...yz cycles through programmed channels when no obstruction between turning the Illumination mode on and off the sound (page 74). MODE cycles through the five pictures sizes: Natural, TheaterWide 1/2/3, and Full (page 65). PIC SIZE cycles through the six remote control device modes: TV, CBL/SAT, VCR/...x / • While watching TV, these buttons select or adjust programming menus. (Also see chapter 10). 16.4 ft (5m) Copyright © 2005 TOSHIBA CORPORATION. Note: The error message "Not Available" will remain lit for 5 seconds (10 seconds if you turn on , the TV starts from the TV ...
User Manual
Page 33
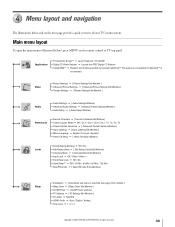
... ➞ HDMI Audio ➞ Auto / Digital / Analog ➞ Gray Level ➞ 1 / 2 / 3 Copyright © 2005 TOSHIBA CORPORATION. All rights reserved. 33 Main menu layout To open the main menus (illustrated below and on the remote control or TV top panel.... the next page provide a quick overview of items provided by inserted CableCard™. Video ➞ Picture Settings ➞ [ Picture Settings Edit Window ] ➞ Advanced Picture Settings ➞ [ Advanced Picture Settings Edit Window ] ➞ Theater Settings ➞ [ Theater Settings Edit Window ] Audio ...
... ➞ HDMI Audio ➞ Auto / Digital / Analog ➞ Gray Level ➞ 1 / 2 / 3 Copyright © 2005 TOSHIBA CORPORATION. All rights reserved. 33 Main menu layout To open the main menus (illustrated below and on the remote control or TV top panel.... the next page provide a quick overview of items provided by inserted CableCard™. Video ➞ Picture Settings ➞ [ Picture Settings Edit Window ] ➞ Advanced Picture Settings ➞ [ Advanced Picture Settings Edit Window ] ➞ Theater Settings ➞ [ Theater Settings Edit Window ] Audio ...
User Manual
Page 65
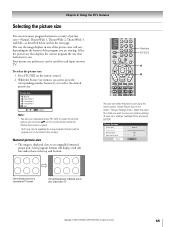
...bars at the top and bottom. Press PIC SIZE on the format of the program you . Natural picture size • The image is on your wide-screen TV Copyright © 2005 TOSHIBA CORPORATION. Picture Size 0 Natural 1 TheaterWide 1 2 TheaterWide 2 3 TheaterWide 3 4 Full 0 - 4 / ...PIC SIZE to Select Note: • You also can repeatedly press PIC SIZE to you are viewing. Theater Settings Picture Size Picture Scroll Cinema Mode Auto Aspect Ratio...
...bars at the top and bottom. Press PIC SIZE on the format of the program you . Natural picture size • The image is on your wide-screen TV Copyright © 2005 TOSHIBA CORPORATION. Picture Size 0 Natural 1 TheaterWide 1 2 TheaterWide 2 3 TheaterWide 3 4 Full 0 - 4 / ...PIC SIZE to Select Note: • You also can repeatedly press PIC SIZE to you are viewing. Theater Settings Picture Size Picture Scroll Cinema Mode Auto Aspect Ratio...
User Manual
Page 66
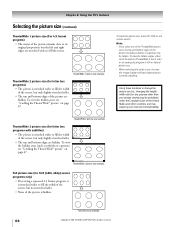
...the screen, but only slightly stretched taller. • The top and bottom edges of the picture (including subtitles or captions) may be prohibited under the Copyright Laws of the United States and other ...picture size example TheaterWide 2 picture size (for letter box programs with subtitles) • The picture is stretched wider to fill the width of the picture is stretched wider to fill the screen. TheaterWide 2 picture size example TheaterWide 3 picture size (for letter box programs) • The picture is hidden. 66 Full picture size example Copyright © 2005 TOSHIBA...
...the screen, but only slightly stretched taller. • The top and bottom edges of the picture (including subtitles or captions) may be prohibited under the Copyright Laws of the United States and other ...picture size example TheaterWide 2 picture size (for letter box programs with subtitles) • The picture is stretched wider to fill the width of the picture is stretched wider to fill the screen. TheaterWide 2 picture size example TheaterWide 3 picture size (for letter box programs) • The picture is hidden. 66 Full picture size example Copyright © 2005 TOSHIBA...
User Manual
Page 67
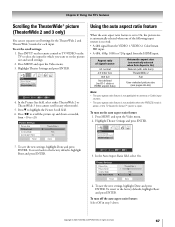
...Done and press ENTER. To turn on the TV to select the input for each input. Press x • to scroll the picture up and down as needed, from the HDMI input. Highlight Theater Settings and press ENTER. Press INPUT on the remote control or TV...On Done 4. Navigate Select CH RTN Back EXIT Exit 3. Video Picture Settings Advanced Picture Settings Theater Settings 7. To save the new settings, highlight Done and press ENTER. Press z to the factory defaults, highlight Reset and press ENTER. Copyright © 2005 TOSHIBA CORPORATION. Press MENU and open the Video menu. 2.
...Done and press ENTER. To turn on the TV to select the input for each input. Press x • to scroll the picture up and down as needed, from the HDMI input. Highlight Theater Settings and press ENTER. Press INPUT on the remote control or TV...On Done 4. Navigate Select CH RTN Back EXIT Exit 3. Video Picture Settings Advanced Picture Settings Theater Settings 7. To save the new settings, highlight Done and press ENTER. Press z to the factory defaults, highlight Reset and press ENTER. Copyright © 2005 TOSHIBA CORPORATION. Press MENU and open the Video menu. 2.


