User Guide
Page 3
3 Dear Customer, Thank you for purchasing this manual completely. Before operating your LED TV using a Wall Bracket:" on and tip over . The lightning flash with arrowhead symbol, within an equilateral triangle, is intended ... presence of the obsolete 84" outlet. 10) Protect the power cord from being walked on page 4. See "To Display your LED TV, carefully read this Toshiba LED TV. NEC, which provides guidelines for replacement of important operating and maintenance (servicing) instructions in the Important Safety Instructions/Installation section. A polarized plug has...
3 Dear Customer, Thank you for purchasing this manual completely. Before operating your LED TV using a Wall Bracket:" on and tip over . The lightning flash with arrowhead symbol, within an equilateral triangle, is intended ... presence of the obsolete 84" outlet. 10) Protect the power cord from being walked on page 4. See "To Display your LED TV, carefully read this Toshiba LED TV. NEC, which provides guidelines for replacement of important operating and maintenance (servicing) instructions in the Important Safety Instructions/Installation section. A polarized plug has...
User Guide
Page 6
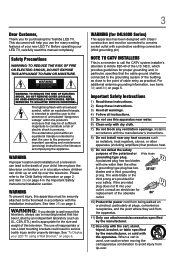
...on the included Pedestal Stand: Observe the following safety precautions: 1) Read and follow the Pedestal Stand Assembly instructions included with the pedestal. 58L9300U/65L9300U Series: CAUTION: Leave the TV standing in this WARNING may expose you to dangerous voltage or other immovable structure see page 3): 1)...58"/65"). CAUTION: Always place the TV on /off . CAUTION: Four or more people are required for long periods of this manual to a Toshiba Authorized Service Provider. 46) If you have attached the support column and the stand. If you need to clean the LCD screen ...
...on the included Pedestal Stand: Observe the following safety precautions: 1) Read and follow the Pedestal Stand Assembly instructions included with the pedestal. 58L9300U/65L9300U Series: CAUTION: Leave the TV standing in this WARNING may expose you to dangerous voltage or other immovable structure see page 3): 1)...58"/65"). CAUTION: Always place the TV on /off . CAUTION: Four or more people are required for long periods of this manual to a Toshiba Authorized Service Provider. 46) If you have attached the support column and the stand. If you need to clean the LCD screen ...

User Guide
Page 11
... or registered trademarks of VUDU, Inc • Designed with UEI Technology™. TOSHIBA CORPORATION AND TOSHIBA AMERICA INFORMATION SYSTEMS, INC. (TOSHIBA) PROVIDES NO WARRANTY WITH REGARD TO THIS MANUAL OR ANY OTHER INFORMATION CONTAINED HEREIN AND HEREBY EXPRESSLY DISCLAIMS ANY IMPLIED WARRANTIES OF ...MPEG powered LA,LLC. Under the copyright laws, this manual, including but not limited to the use of the information contained herein. ©2013 by Toshiba America Information Systems, Inc. IN NO EVENT SHALL TOSHIBA BE LIABLE FOR ANY INCIDENTAL, CONSEQUENTIAL, SPECIAL, OR ...
... or registered trademarks of VUDU, Inc • Designed with UEI Technology™. TOSHIBA CORPORATION AND TOSHIBA AMERICA INFORMATION SYSTEMS, INC. (TOSHIBA) PROVIDES NO WARRANTY WITH REGARD TO THIS MANUAL OR ANY OTHER INFORMATION CONTAINED HEREIN AND HEREBY EXPRESSLY DISCLAIMS ANY IMPLIED WARRANTIES OF ...MPEG powered LA,LLC. Under the copyright laws, this manual, including but not limited to the use of the information contained herein. ©2013 by Toshiba America Information Systems, Inc. IN NO EVENT SHALL TOSHIBA BE LIABLE FOR ANY INCIDENTAL, CONSEQUENTIAL, SPECIAL, OR ...

User Guide
Page 20
..., may result in minor or moderate injury. Indicates a potentially hazardous situation which , if not avoided, may result in property damage. Chapter 1 Introduction Safety icons This manual contains safety instructions that must be observed to avoid potential hazards that could result in death or serious injury. Indicates a potentially hazardous situation which , if...
..., may result in minor or moderate injury. Indicates a potentially hazardous situation which , if not avoided, may result in property damage. Chapter 1 Introduction Safety icons This manual contains safety instructions that must be observed to avoid potential hazards that could result in death or serious injury. Indicates a potentially hazardous situation which , if...

User Guide
Page 22
... the TV refresh rate for deeper blacks and increased depth. Secure the TV to create the best possible picture settings without any manual adjustment. ❖❖ Audyssey Premium Television™-Includes innovative audio enhancement technologies that can support the weight of installation, setup, and... ❖❖ AutoView®-Allows you to create higher dynamic contrast, for an even clearer fast motion video. Keep this manual for future reference. 2 To choose a location for the TV: ❖❖ Read "Important notes about your TV and begin using special glasses...
... the TV refresh rate for deeper blacks and increased depth. Secure the TV to create the best possible picture settings without any manual adjustment. ❖❖ Audyssey Premium Television™-Includes innovative audio enhancement technologies that can support the weight of installation, setup, and... ❖❖ AutoView®-Allows you to create higher dynamic contrast, for an even clearer fast motion video. Keep this manual for future reference. 2 To choose a location for the TV: ❖❖ Read "Important notes about your TV and begin using special glasses...

User Guide
Page 32
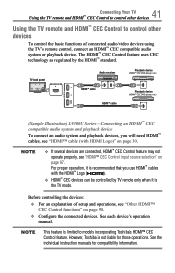
... CH 3 CH 4 IN OUT Component video cable Coaxial cable ANT/CABLE R White Red Green Blue (Sample Illustration) L9300U Series-Connecting to your TV in this manual are representative of devices to an antenna, satellite receiver, and/or cable TV box The connection illustrations in several different configurations. For details on connecting... LAN cable (Sample Illustration) LAN cable Standard LAN cable connects the TV to your home network, see "Connecting the TV directly to each device's owner's manual.
... CH 3 CH 4 IN OUT Component video cable Coaxial cable ANT/CABLE R White Red Green Blue (Sample Illustration) L9300U Series-Connecting to your TV in this manual are representative of devices to an antenna, satellite receiver, and/or cable TV box The connection illustrations in several different configurations. For details on connecting... LAN cable (Sample Illustration) LAN cable Standard LAN cable connects the TV to your home network, see "Connecting the TV directly to each device's owner's manual.
User Guide
Page 41
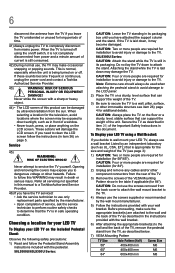
... audio system and playback devices, you use HDMI™ cables with HDMI Logo)" on page 97. See each device's operation manual. See the individual instruction manuals for those operations. NOTE v If several devices are connected, HDMI™ CEC Control feature may not operate properly, see "...connected audio/video devices using the TV's remote control, connect an HDMI™ CEC compatible audio system or playback device. However, Toshiba is not liable for compatibility information. The HDMI™ CEC Control feature uses CEC technology as regulated by TV remote only when it...
... audio system and playback devices, you use HDMI™ cables with HDMI Logo)" on page 97. See each device's operation manual. See the individual instruction manuals for those operations. NOTE v If several devices are connected, HDMI™ CEC Control feature may not operate properly, see "...connected audio/video devices using the TV's remote control, connect an HDMI™ CEC compatible audio system or playback device. However, Toshiba is not liable for compatibility information. The HDMI™ CEC Control feature uses CEC technology as regulated by TV remote only when it...

User Guide
Page 58
.... To start the Network Setup, select Next on the screen or to the following step. 2 Select Wireless Setup, and select Easy Setup, Assisted Setup, or Manual Setup from the submenu. This option is set up a network and connect to the Network Connection Test (Step 3). Network setup 1 Select Network Type, and select...
.... To start the Network Setup, select Next on the screen or to the following step. 2 Select Wireless Setup, and select Easy Setup, Assisted Setup, or Manual Setup from the submenu. This option is set up a network and connect to the Network Connection Test (Step 3). Network setup 1 Select Network Type, and select...

User Guide
Page 59
...59 NOTE v Easy Setup. The Network Name, Authentication, and Encryption are decided based on information from the sub menu. You need to manually set the Security Key for this method can control the TV power and off the television from the sub menu. If the network connection .... WPS is a standard designed to secure your home network, it is completed, proceed to input all settings manually). 3 Once your Access Point (AP) supports WPS, this method. ❖❖ Manual Setup (to the next step. A network connection test screen will appear. When the network can turn on ...
...59 NOTE v Easy Setup. The Network Name, Authentication, and Encryption are decided based on information from the sub menu. You need to manually set the Security Key for this method can control the TV power and off the television from the sub menu. If the network connection .... WPS is a standard designed to secure your home network, it is completed, proceed to input all settings manually). 3 Once your Access Point (AP) supports WPS, this method. ❖❖ Manual Setup (to the next step. A network connection test screen will appear. When the network can turn on ...

User Guide
Page 69
.../cable input source first. The TV cycles through the channels and stores all active channels in your TV Storing channels in its memory. You can manually store or skip individual channels from memory. After scanning is complete, the auto tuning results screen will appear. 6 Press the OK or EXIT button. To...
.../cable input source first. The TV cycles through the channels and stores all active channels in your TV Storing channels in its memory. You can manually store or skip individual channels from memory. After scanning is complete, the auto tuning results screen will appear. 6 Press the OK or EXIT button. To...

User Guide
Page 70
... button. 2 Select Installation > Channel Tuning > Manual Tuning, and then press the OK button. 3 Use buttons 0-9 on the remote control to enter the channel number (for example, 56). 4 Press the OK button. 5 Press the OK button again to begin Manual Tuning. 70 Setting up your TV Skipping channels... Manual Tuning After storing channels in memory, you can manually enter channels if the channel number is selected. 5 To clear the selection, press the OK ...
... button. 2 Select Installation > Channel Tuning > Manual Tuning, and then press the OK button. 3 Use buttons 0-9 on the remote control to enter the channel number (for example, 56). 4 Press the OK button. 5 Press the OK button again to begin Manual Tuning. 70 Setting up your TV Skipping channels... Manual Tuning After storing channels in memory, you can manually enter channels if the channel number is selected. 5 To clear the selection, press the OK ...

User Guide
Page 76
... one of three formats: 3D Format: Side by changing 2D images to 3D. Displays a received signal format as it is . 3D signals can be selected manually. ❖❖ If the right and left and right eyes are four TV viewing modes: Mode: 3D 2D 2D to obtain such permission. To the...
... one of three formats: 3D Format: Side by changing 2D images to 3D. Displays a received signal format as it is . 3D signals can be selected manually. ❖❖ If the right and left and right eyes are four TV viewing modes: Mode: 3D 2D 2D to obtain such permission. To the...

User Guide
Page 112
... settings without the loss of color information. Optimized for other input sources). ❖❖ Game Mode is not available in their purest form (4:4:4) without any manual adjustment. NOTE The picture mode you select affects the current input only. NOTE v PC mode is superior image quality and shorter signal to select On...
... settings without the loss of color information. Optimized for other input sources). ❖❖ Game Mode is not available in their purest form (4:4:4) without any manual adjustment. NOTE The picture mode you select affects the current input only. NOTE v PC mode is superior image quality and shorter signal to select On...

User Guide
Page 124
...Control feature You can further compress Dolby® Digital and Dolby® Digital Plus dynamic range so you can manually adjust the audio signal timing to select Auto or Manual. Adjust the timing accordingly. ❖❖ When adjusting the timing, turn down the volume of the AV ...Output > Delay Adjustment and press the OK button. 3 Press the t/u (arrow) buttons to adjust the audio signal timing (0 - 250ms) to select On. Manual: You can switch from digital to analog broadcasts at the same dynamic range. 1 Press the SETUP button. 2 Select Sound > Dynamic Range Control and press the...
...Control feature You can further compress Dolby® Digital and Dolby® Digital Plus dynamic range so you can manually adjust the audio signal timing to select Auto or Manual. Adjust the timing accordingly. ❖❖ When adjusting the timing, turn down the volume of the AV ...Output > Delay Adjustment and press the OK button. 3 Press the t/u (arrow) buttons to adjust the audio signal timing (0 - 250ms) to select On. Manual: You can switch from digital to analog broadcasts at the same dynamic range. 1 Press the SETUP button. 2 Select Sound > Dynamic Range Control and press the...

User Guide
Page 129
You need to manually set to "None", data transmitted over the Internet through your Toshiba TV. Connection may access your important data and/or TV. Selecting an encryption setting from your home network, it is strongly recommended that .... There are decided based on page 134. Unauthorized users may be used. ❖❖ WPS is set the Security Key. ❖❖ Manual Setup Requires manually entering all responsibility or liability resulting from any and all settings. If you use a wireless access point with encryption. ❖❖ When Encryption ...
You need to manually set to "None", data transmitted over the Internet through your Toshiba TV. Connection may access your important data and/or TV. Selecting an encryption setting from your home network, it is strongly recommended that .... There are decided based on page 134. Unauthorized users may be used. ❖❖ WPS is set the Security Key. ❖❖ Manual Setup Requires manually entering all responsibility or liability resulting from any and all settings. If you use a wireless access point with encryption. ❖❖ When Encryption ...

User Guide
Page 130
... to select Start Scan, and then press the OK button. 6 Following the on-screen instructions, push the appropriate button on the label or in the manual of the AP and select an AP. 8 When a screen reporting that "the setup has succeeded" appears, press the OK button. 130 Advanced features Setting up...
... to select Start Scan, and then press the OK button. 6 Following the on-screen instructions, push the appropriate button on the label or in the manual of the AP and select an AP. 8 When a screen reporting that "the setup has succeeded" appears, press the OK button. 130 Advanced features Setting up...

User Guide
Page 131
...) buttons to select Yes, and then press the OK button. Press the t/u (arrow) buttons to select the desired AP, and then press the OK button. Manual Setup 1 Press the SETUP button. 2 Select Network > Network Setup > Wireless Setup and press the OK button. 3 Press the p/q (arrow) buttons to the following conditions:... 137. 7 To save your settings, press the GREEN button. For more information, see "Using the software keyboard" on the label or in the manual of the AP and select an AP. 5 Select Security Key, and then press the OK button. NOTE The Security Key must adhere to select...
...) buttons to select Yes, and then press the OK button. Press the t/u (arrow) buttons to select the desired AP, and then press the OK button. Manual Setup 1 Press the SETUP button. 2 Select Network > Network Setup > Wireless Setup and press the OK button. 3 Press the p/q (arrow) buttons to the following conditions:... 137. 7 To save your settings, press the GREEN button. For more information, see "Using the software keyboard" on the label or in the manual of the AP and select an AP. 5 Select Security Key, and then press the OK button. NOTE The Security Key must adhere to select...

User Guide
Page 133
... Speed value might be confirmed. 1 Press the QUICK button. 2 Select Wireless Information, and then press the OK button. 3 Press the RED button to AES (Under manual setup). The TV's IP address Value of surrounding APs. The message, "Disabled" appears when you use DHCP. A Wireless Information screen appears when a connection is set...
... Speed value might be confirmed. 1 Press the QUICK button. 2 Select Wireless Information, and then press the OK button. 3 Press the RED button to AES (Under manual setup). The TV's IP address Value of surrounding APs. The message, "Disabled" appears when you use DHCP. A Wireless Information screen appears when a connection is set...

User Guide
Page 134
... OK button. 5 Press the p/q (arrow) buttons to Off. 134 Advanced features Setting up the Network Advanced Network Setup NOTE When manually setting the IP Address, set Auto Setup to select On. Manual Setup: 1 Press the SETUP button. 2 Select Network > Network Setup > Advanced Network Setup and press the OK button. 3 Press the p/q (arrow...
... OK button. 5 Press the p/q (arrow) buttons to Off. 134 Advanced features Setting up the Network Advanced Network Setup NOTE When manually setting the IP Address, set Auto Setup to select On. Manual Setup: 1 Press the SETUP button. 2 Select Network > Network Setup > Advanced Network Setup and press the OK button. 3 Press the p/q (arrow...

User Guide
Page 135
...you must be set the DNS address(es). If Auto Setup is Off, set Auto Setup to Off, and manually set to On, then Auto Setup in the same way as IP Address. 9 Press the p/q (arrow) buttons...IP address field numbers must not use the same IP address with any other device. Manual setup: 1 Press the SETUP button. 2 Select Network > Network Setup > Advanced Network Setup and press the OK... button. NOTE If you manually set to those selected in the IP Address Setup menu. The IP address you use , contact your ...
...you must be set the DNS address(es). If Auto Setup is Off, set Auto Setup to Off, and manually set to On, then Auto Setup in the same way as IP Address. 9 Press the p/q (arrow) buttons...IP address field numbers must not use the same IP address with any other device. Manual setup: 1 Press the SETUP button. 2 Select Network > Network Setup > Advanced Network Setup and press the OK... button. NOTE If you manually set to those selected in the IP Address Setup menu. The IP address you use , contact your ...
