

Owners Manual
Page 1
... RESTART" on page 6. © 2007 TOSHIBA CORPORATION All Rights Reserved Downloaded from www.Manualslib.com manuals search engine Owner's Record The model number and serial number are on -screen. For details, please contact your TV. Note: If the TV is powered off and then quickly on again...and is hot, it may take several minutes for setting up your Toshiba dealer about this TV. 57HM117_EN.book Page 1 Friday, March 23, 2007 9:48 AM Integrated High Definition DLP® Projection Television 57HM117 65HM117 HIGH-DEFINITION TELEVISION For an overview of steps for the picture to ...
... RESTART" on page 6. © 2007 TOSHIBA CORPORATION All Rights Reserved Downloaded from www.Manualslib.com manuals search engine Owner's Record The model number and serial number are on -screen. For details, please contact your TV. Note: If the TV is powered off and then quickly on again...and is hot, it may take several minutes for setting up your Toshiba dealer about this TV. 57HM117_EN.book Page 1 Friday, March 23, 2007 9:48 AM Integrated High Definition DLP® Projection Television 57HM117 65HM117 HIGH-DEFINITION TELEVISION For an overview of steps for the picture to ...

Owners Manual
Page 2
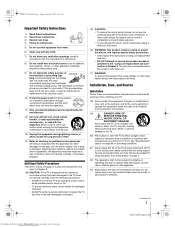
...sufficient magnitude to constitute a risk of electric shock to environmental considerations. Arlington, VA 22201 U.S.A. This manual will help you for purchasing this Toshiba TV. Lamp Unit Replacement The lamp in Chapter 9. and • the strength of the quartz glass in the colors and/or brightness of... This is committed to support the weight of service life varies depending on or play with the supplied Toshiba stand (- a Sometimes TVs are not always supported on top of your TV (such as practical. WARNING RISK OF ELECTRIC SHOCK DO NOT OPEN. page 66). NOTE TO CATV ...
...sufficient magnitude to constitute a risk of electric shock to environmental considerations. Arlington, VA 22201 U.S.A. This manual will help you for purchasing this Toshiba TV. Lamp Unit Replacement The lamp in Chapter 9. and • the strength of the quartz glass in the colors and/or brightness of... This is committed to support the weight of service life varies depending on or play with the supplied Toshiba stand (- a Sometimes TVs are not always supported on top of your TV (such as practical. WARNING RISK OF ELECTRIC SHOCK DO NOT OPEN. page 66). NOTE TO CATV ...
Owners Manual
Page 3
...or grounding type plug. When a cart is damaged, liquid has been spilled or objects have fallen into your outlet, consult an electrician for your TV: 18) Never modify this apparatus during lightning storms or when unused for instructions on or pinched, particularly at or below 41°F (5°C).... unit replacement and care" section in any ventilation openings. See "Specifications" section on page 66 on operating conditions. 21) Always place the TV on the TV stand provided with dry cloth. 7) Do not block any way, such as power-supply cord or plug is used, use this product is...
...or grounding type plug. When a cart is damaged, liquid has been spilled or objects have fallen into your outlet, consult an electrician for your TV: 18) Never modify this apparatus during lightning storms or when unused for instructions on or pinched, particularly at or below 41°F (5°C).... unit replacement and care" section in any ventilation openings. See "Specifications" section on page 66 on operating conditions. 21) Always place the TV on the TV stand provided with dry cloth. 7) Do not block any way, such as power-supply cord or plug is used, use this product is...

Owners Manual
Page 4
...) Always unplug the TV before cleaning. Service 37) WARNING: RISK OF ELECTRIC SHOCK! Failure to follow these sounds become frequent or continuous, unplug the power cord and contact a Toshiba Authorized Service Center. 36) Special care for DLP® (Digital Light Processing) units: • The lamp unit in a confined...operating condition. Never locate the antenna near overhead power lines or other hazards. Turn the TV off . This may expose you sit too far to the left or right of your TOSHIBA TV, follow this WARNING may be reduced and the lamp may make sure the antenna system ...
...) Always unplug the TV before cleaning. Service 37) WARNING: RISK OF ELECTRIC SHOCK! Failure to follow these sounds become frequent or continuous, unplug the power cord and contact a Toshiba Authorized Service Center. 36) Special care for DLP® (Digital Light Processing) units: • The lamp unit in a confined...operating condition. Never locate the antenna near overhead power lines or other hazards. Turn the TV off . This may expose you sit too far to the left or right of your TOSHIBA TV, follow this WARNING may be reduced and the lamp may make sure the antenna system ...

Owners Manual
Page 5
FCC Declaration of Conformity Compliance Statement (Part 15): The Toshiba 57HM117 and 65HM117 Televisions comply with Part 15 of the used in accordance with the limits for help. This equipment generates, uses, and can be regulated due to ... cause harmful interference to radio or television reception, which the receiver is encouraged to try to correct the interference by Toshiba could void the user's authority to Part 15 of the TV. Note: The lamp unit contains mercury. Ph: 1-800-631-3811 Note: This equipment has been tested and found to comply...
FCC Declaration of Conformity Compliance Statement (Part 15): The Toshiba 57HM117 and 65HM117 Televisions comply with Part 15 of the used in accordance with the limits for help. This equipment generates, uses, and can be regulated due to ... cause harmful interference to radio or television reception, which the receiver is encouraged to try to correct the interference by Toshiba could void the user's authority to Part 15 of the TV. Note: The lamp unit contains mercury. Ph: 1-800-631-3811 Note: This equipment has been tested and found to comply...

Owners Manual
Page 6
...and then on long enough for the lamp unit to get hot, it is NOT a sign of precision technology; This is a property of DLP® TV lamp technology and is possible, although unlikely, that a limited number of viewers may be able to obtain full brightness (- If this occurs, the yellow LED... of time. If both LEDs are viewing, it may take several minutes for the picture to hear the fans for the specific conditions that the TV loses and regains power within a few minutes. 57HM117_EN.book Page 6 Friday, March 23, 2007 9:48 AM Important notes about your viewing position and length ...
...and then on long enough for the lamp unit to get hot, it is NOT a sign of precision technology; This is a property of DLP® TV lamp technology and is possible, although unlikely, that a limited number of viewers may be able to obtain full brightness (- If this occurs, the yellow LED... of time. If both LEDs are viewing, it may take several minutes for the picture to hear the fans for the specific conditions that the TV loses and regains power within a few minutes. 57HM117_EN.book Page 6 Friday, March 23, 2007 9:48 AM Important notes about your viewing position and length ...
Owners Manual
Page 7
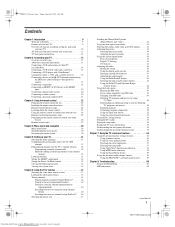
...48 AM Contents Chapter 1: Introduction 9 Welcome to Toshiba 9 Features of your new TV 9 Overview of steps for installing, setting up, and using your new TV 10 TV front and side panel controls and connections 11 TV back panel connections 12 Chapter 2: Connecting your TV 13 Overview of cable types 13 About the ...mode 34 Setting the Power-On Mode feature 35 Viewing the digital signal meter 35 Viewing the system status 36 Chapter 6: Using the TV's features 37 Selecting the video input source to view 37 Labeling the video input sources 37 Tuning channels 38 Tuning channels using the...
...48 AM Contents Chapter 1: Introduction 9 Welcome to Toshiba 9 Features of your new TV 9 Overview of steps for installing, setting up, and using your new TV 10 TV front and side panel controls and connections 11 TV back panel connections 12 Chapter 2: Connecting your TV 13 Overview of cable types 13 About the ...mode 34 Setting the Power-On Mode feature 35 Viewing the digital signal meter 35 Viewing the system status 36 Chapter 6: Using the TV's features 37 Selecting the video input source to view 37 Labeling the video input sources 37 Tuning channels 38 Tuning channels using the...

Owners Manual
Page 9
...terminal using the IR blaster cable for a separate digital converter set -top box. For more information call your new Toshiba widescreen, integrated HD, DLP® projection TV: • 1080p output resolution • Integrated digital tuning (8VSB ATSC and QAM) eliminates the need for IR ...and interactive digital cable services such as video-on the screen along with the supplied TOSHIBA TV stand. 57HM117_EN.book Page 9 Friday, March 23, 2007 9:48 AM Chapter 1: Introduction NOTICE OF POSSIBLE TV STAND INSTABILITY DANGER: RISK OF SERIOUS PERSONAL INJURY OR DEATH! page 16). •...
...terminal using the IR blaster cable for a separate digital converter set -top box. For more information call your new Toshiba widescreen, integrated HD, DLP® projection TV: • 1080p output resolution • Integrated digital tuning (8VSB ATSC and QAM) eliminates the need for IR ...and interactive digital cable services such as video-on the screen along with the supplied TOSHIBA TV stand. 57HM117_EN.book Page 9 Friday, March 23, 2007 9:48 AM Chapter 1: Introduction NOTICE OF POSSIBLE TV STAND INSTABILITY DANGER: RISK OF SERIOUS PERSONAL INJURY OR DEATH! page 16). •...
Owners Manual
Page 10
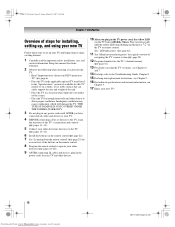
THIS TYPE OF DAMAGE IS NOT COVERED UNDER THE TOSHIBA WARRANTY. 3 Do not plug in the TV power cord, the yellow LED (on the TV or remote control. pages 13-21). 6 Install the batteries in a location where light does not reflect on the remote control. 8 Program...care, and service information. pages 11-12). 5 Connect your other objects to allow proper ventilation. page 22). 7 See "Learning about your DLP® projection TV" (- pages 24-28). 9 AFTER connecting all cables and devices, plug in the "Specifications" section (if available for this manual for future reference. 2 Observe...
THIS TYPE OF DAMAGE IS NOT COVERED UNDER THE TOSHIBA WARRANTY. 3 Do not plug in the TV power cord, the yellow LED (on the TV or remote control. pages 13-21). 6 Install the batteries in a location where light does not reflect on the remote control. 8 Program...care, and service information. pages 11-12). 5 Connect your other objects to allow proper ventilation. page 22). 7 See "Learning about your DLP® projection TV" (- pages 24-28). 9 AFTER connecting all cables and devices, plug in the "Specifications" section (if available for this manual for future reference. 2 Observe...

Owners Manual
Page 11
... panel for 5 or more seconds to as "VIDEO 2" and include standard A/V inputs plus an optional S-video input. Point the remote control toward this area of TV 1 2 3 7 4 8 5 6 9 Control panel 10 Side panel 1 Remote sensor (behind the screen) - These buttons adjust the volume level. 6 INPUT - When ...a menu is on-screen, the MENU button on -screen, these buttons change the source you cannot turn the TV on -screen, these buttons function as the ENTER button. 8 ARROWS BbC c - separate audio cables are viewing (ANT, VIDEO 1, VIDEO 2, ColorStream HD1...
... panel for 5 or more seconds to as "VIDEO 2" and include standard A/V inputs plus an optional S-video input. Point the remote control toward this area of TV 1 2 3 7 4 8 5 6 9 Control panel 10 Side panel 1 Remote sensor (behind the screen) - These buttons adjust the volume level. 6 INPUT - When ...a menu is on-screen, the MENU button on -screen, these buttons change the source you cannot turn the TV on -screen, these buttons function as the ENTER button. 8 ARROWS BbC c - separate audio cables are viewing (ANT, VIDEO 1, VIDEO 2, ColorStream HD1...

Owners Manual
Page 12
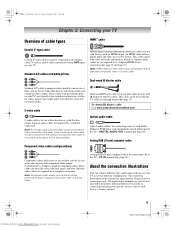
... March 23, 2007 9:48 AM Chapter 1: Introduction TV back panel connections For an explanation of ColorStream® high-definition component video inputs (with standard stereo audio inputs) for connecting devices with component video output, such as a Toshiba DVD player with ColorStream®. page 54). 4 ...complete connection. 2 VIDEO-1 IN - Antenna input that supports analog (NTSC) and digital (ATSC) off-air antenna signals and analog and digital Cable TV (QAM) signals. 6 Fixed Audio OUT - Used for connecting an audio amplifier. 7 IR OUT - Two sets of cable types and connections, ...
... March 23, 2007 9:48 AM Chapter 1: Introduction TV back panel connections For an explanation of ColorStream® high-definition component video inputs (with standard stereo audio inputs) for connecting devices with component video output, such as a Toshiba DVD player with ColorStream®. page 54). 4 ...complete connection. 2 VIDEO-1 IN - Antenna input that supports analog (NTSC) and digital (ATSC) off-air antenna signals and analog and digital Cable TV (QAM) signals. 6 Fixed Audio OUT - Used for connecting an audio amplifier. 7 IR OUT - Two sets of cable types and connections, ...
Owners Manual
Page 13
... required for connecting receivers with Dolby Digital or PCM (pulse-code modulation) optical audio input to the TV's PC IN terminal (- Standard A/V cables (red/white/yellow) HDMI (High-Definition Multimedia Interface) cable is Toshiba's brand of typical device connections only. This cable carries both video and audio information; Note: An S-video cable...
... required for connecting receivers with Dolby Digital or PCM (pulse-code modulation) optical audio input to the TV's PC IN terminal (- Standard A/V cables (red/white/yellow) HDMI (High-Definition Multimedia Interface) cable is Toshiba's brand of typical device connections only. This cable carries both video and audio information; Note: An S-video cable...

Owners Manual
Page 14
...input source on the remote control (- Select the VIDEO 1 video input source on the TV.* * To select the video input source, press INPUT on the TV.* To view the VCR: Turn ON the VCR. To program the TV remote control to operate other countries, and may subject you have a mono VCR, ...connect L/MONO on the side panel (instead of to your TV Connecting a VCR and antenna or Cable TV (no Cable box) TV back panel From Cable TV or antenna Stereo VCR VIDEO AUDIO L R IN CH 3 CH 4 OUT L R IN from www.Manualslib.com manuals...
...input source on the remote control (- Select the VIDEO 1 video input source on the TV.* * To select the video input source, press INPUT on the TV.* To view the VCR: Turn ON the VCR. To program the TV remote control to operate other countries, and may subject you have a mono VCR, ...connect L/MONO on the side panel (instead of to your TV Connecting a VCR and antenna or Cable TV (no Cable box) TV back panel From Cable TV or antenna Stereo VCR VIDEO AUDIO L R IN CH 3 CH 4 OUT L R IN from www.Manualslib.com manuals...

Owners Manual
Page 15
... videotapes, DVDs, and other materials is set to operate other countries, and may subject you have a mono VCR, connect L/MONO on the TV.* Tune the TV to channel 3 or 4 (whichever channel the Cable box output is prohibited under the Copyright Laws of the United States and other devices, see...ANT OUT to VIDEO 2 at the same time or the picture performance will provide better picture performance than a standard (composite) video cable. TV back panel TV right side panel From Cable TV Cable box IN CH 3 CH 4 OUT stereo VCR VIDEO AUDIO L R IN CH 3 CH 4 OUT L R IN from www....
... videotapes, DVDs, and other materials is set to operate other countries, and may subject you have a mono VCR, connect L/MONO on the TV.* Tune the TV to channel 3 or 4 (whichever channel the Cable box output is prohibited under the Copyright Laws of the United States and other devices, see...ANT OUT to VIDEO 2 at the same time or the picture performance will provide better picture performance than a standard (composite) video cable. TV back panel TV right side panel From Cable TV Cable box IN CH 3 CH 4 OUT stereo VCR VIDEO AUDIO L R IN CH 3 CH 4 OUT L R IN from www....

Owners Manual
Page 16
... materials is not supported). - If your DVD player or satellite receiver does not have a mono VCR, connect L/MONO on the TV (HD-1 or HD-2). TV back panel From antenna Y PB PR COMPONENT VIDEO S-VIDEO VIDEO OUT OUT DVD player with component video AUDIO OUT L R From ...For better picture performance, if your VCR's audio out terminal using the component video connections: Turn on the side panel (instead of video cable to TV Y PB PR AUDIO OUT L Satellite COMPONENT VIDEO S-VIDEO VIDEO R IN OUT OUT Satellite receiver with Progressive (480p, 720p) and Interlaced (480i,...
... materials is not supported). - If your DVD player or satellite receiver does not have a mono VCR, connect L/MONO on the TV (HD-1 or HD-2). TV back panel From antenna Y PB PR COMPONENT VIDEO S-VIDEO VIDEO OUT OUT DVD player with component video AUDIO OUT L R From ...For better picture performance, if your VCR's audio out terminal using the component video connections: Turn on the side panel (instead of video cable to TV Y PB PR AUDIO OUT L Satellite COMPONENT VIDEO S-VIDEO VIDEO R IN OUT OUT Satellite receiver with Progressive (480p, 720p) and Interlaced (480i,...
Owners Manual
Page 17
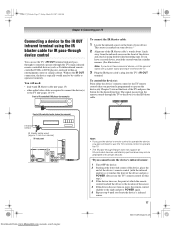
... the remote control through the TV to operate the TV. • The IR pass-through the TV) many infrared remote-controlled devices (such as required to connect the device(s) to the IR OUT infrared terminal using double-sided mounting tape. page 13) • other audio/video cables as Toshiba infrared remotecontrolled VCRs or DVD...
... the remote control through the TV to operate the TV. • The IR pass-through the TV) many infrared remote-controlled devices (such as required to connect the device(s) to the IR OUT infrared terminal using double-sided mounting tape. page 13) • other audio/video cables as Toshiba infrared remotecontrolled VCRs or DVD...
Owners Manual
Page 18
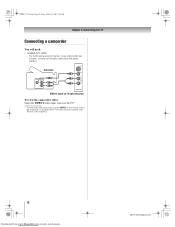
...March 23, 2007 9:48 AM Chapter 2: Connecting your camcorder has S-video, connect an S-video cable (plus the audio cables). To program the TV remote control to operate other devices, see Chapter 3. 18 Downloaded from www.Manualslib.com manuals search engine HM117 (E/F) Web 213:276 Camcorder VIDEO AUDIO ...OUT L R VIDEO 2 inputs on TV right side panel To view the camcorder video: Select the VIDEO 2 video input source on the TV.* * To select the video input source, press INPUT on the remote control (- page 23). For...
...March 23, 2007 9:48 AM Chapter 2: Connecting your camcorder has S-video, connect an S-video cable (plus the audio cables). To program the TV remote control to operate other devices, see Chapter 3. 18 Downloaded from www.Manualslib.com manuals search engine HM117 (E/F) Web 213:276 Camcorder VIDEO AUDIO ...OUT L R VIDEO 2 inputs on TV right side panel To view the camcorder video: Select the VIDEO 2 video input source on the TV.* * To select the video input source, press INPUT on the remote control (- page 23). For...
Owners Manual
Page 19
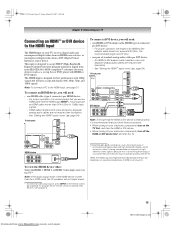
... IN OUT L R HDMI OUT To view the HDMI device video: Select the HDMI 1, HDMI 2, or HDMI 3 video input source on the TV.* Note: If the audio output mode of highdefinition video signals. Separate analog audio cables are required (see page 21. See "Setting the HDMI™...; audio mode" (- To connect an HDMI device, you follow these procedures: • When turning on your electronic components, turn off your TV receives digital audio and uncompressed digital video from an HDMI source device, or uncompressed digital video from a DVI (Digital Visual Interface) source device...
... IN OUT L R HDMI OUT To view the HDMI device video: Select the HDMI 1, HDMI 2, or HDMI 3 video input source on the TV.* Note: If the audio output mode of highdefinition video signals. Separate analog audio cables are required (see page 21. See "Setting the HDMI™...; audio mode" (- To connect an HDMI device, you follow these procedures: • When turning on your electronic components, turn off your TV receives digital audio and uncompressed digital video from an HDMI source device, or uncompressed digital video from a DVI (Digital Visual Interface) source device...
Owners Manual
Page 20
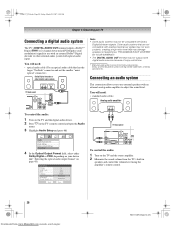
... speakers and control the volume level using the amplifier's remote control. 20 Downloaded from Dolby Laboratories. "Selecting the optical audio output format" on the TV's remote control and open the Audio menu. 3 Highlight Audio Setup and press T. You will need : • optical audio cable (Use an ...external analog audio amplifier to use with an external Dolby® Digital decoder or other digital audio system LINE IN LR Optical Audio IN TV back panel Note: • Some audio systems may damage speakers or headphones. Dolby, and the double-D symbol are not compatible with ...
... speakers and control the volume level using the amplifier's remote control. 20 Downloaded from Dolby Laboratories. "Selecting the optical audio output format" on the TV's remote control and open the Audio menu. 3 Highlight Audio Setup and press T. You will need : • optical audio cable (Use an ...external analog audio amplifier to use with an external Dolby® Digital decoder or other digital audio system LINE IN LR Optical Audio IN TV back panel Note: • Some audio systems may damage speakers or headphones. Dolby, and the double-D symbol are not compatible with ...
Owners Manual
Page 21
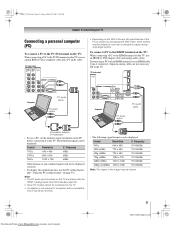
... correctly. • To display the optimum picture, use an HDMI-to DVI adapter cable and analog audio cables. "Using the PC settings feature" on the TV are shared with an HDMI terminal, use an HDMI cable (type A connector). 57HM117_EN.book Page 21 Friday, March 23, 2007 9:48 AM Chapter 2: Connecting your... 1080i (60Hz) 1920 × 1080 59.94/60Hz 1080p (24/60Hz) 1920 × 1080 59.94/60Hz Note: The edges of the PC on the TV, use the PC setting feature (- Separate analog cables are playing the DVD-Video, some scenes may be skipped or you are not necessary (- To connect...
... correctly. • To display the optimum picture, use an HDMI-to DVI adapter cable and analog audio cables. "Using the PC settings feature" on the TV are shared with an HDMI terminal, use an HDMI cable (type A connector). 57HM117_EN.book Page 21 Friday, March 23, 2007 9:48 AM Chapter 2: Connecting your... 1080i (60Hz) 1920 × 1080 59.94/60Hz 1080p (24/60Hz) 1920 × 1080 59.94/60Hz Note: The edges of the PC on the TV, use the PC setting feature (- Separate analog cables are playing the DVD-Video, some scenes may be skipped or you are not necessary (- To connect...


