
User Guide
Page 9
... gigabeat® On and Off 20 Functions of the Up/Down/Left/Right button and Enter button 21 Installing Windows Media® Player 22 Charging the Built-in Battery/Connecting to a computer 22 Disconnecting the gigabeat® from the computer ....24 Turning the gigabeat&#... steps for Windows Media® Player 11 26 Downloading steps for Windows Media® Player 10 27 Transferring audio files on your computer to the gigabeat 29 Transferring audio files using Windows Media® Player 11 29 Transferring audio files using Windows Media® Player 10 32 Transferring album artwork 36...
... gigabeat® On and Off 20 Functions of the Up/Down/Left/Right button and Enter button 21 Installing Windows Media® Player 22 Charging the Built-in Battery/Connecting to a computer 22 Disconnecting the gigabeat® from the computer ....24 Turning the gigabeat&#... steps for Windows Media® Player 11 26 Downloading steps for Windows Media® Player 10 27 Transferring audio files on your computer to the gigabeat 29 Transferring audio files using Windows Media® Player 11 29 Transferring audio files using Windows Media® Player 10 32 Transferring album artwork 36...

User Guide
Page 26
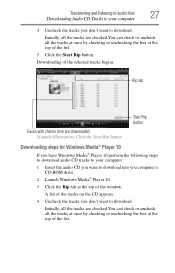
Downloading steps for Windows Media® Player 11 If you have Windows Media® Player 11, perform the following steps to download audio CD tracks to your computer: 1 Insert the audio CD for recording, downloading, storage, and/or playback of authorized content and any other lawful use. A list of the ...opening window. You can download audio CD tracks to your computer Using Windows Media® Player, you computer's CD-ROM drive. 2 Launch Windows Media® Player 11. 3 Click the Rip tab at the top of the tracks on your gigabeat&#...
Downloading steps for Windows Media® Player 11 If you have Windows Media® Player 11, perform the following steps to download audio CD tracks to your computer: 1 Insert the audio CD for recording, downloading, storage, and/or playback of authorized content and any other lawful use. A list of the ...opening window. You can download audio CD tracks to your computer Using Windows Media® Player, you computer's CD-ROM drive. 2 Launch Windows Media® Player 11. 3 Click the Rip tab at the top of the tracks on your gigabeat&#...
User Guide
Page 27
... tracks on the CD appears. 4 Uncheck the tracks you don't want to download into you computer's CD-ROM drive. 2 Launch Windows Media® Player 10. 3 Click the Rip tab at the top of the list. Initially, all the tracks are checked.You can check or uncheck all the tracks... the tracks are downloaded (Sample Illustration) Click the Start Rip button Downloading steps for Windows Media® Player 10 If you have Windows Media® Player 10 perform the following steps to download audio CD tracks to your computer 4 Uncheck the tracks you want to download. Rip tab Start Rip button ...
... tracks on the CD appears. 4 Uncheck the tracks you don't want to download into you computer's CD-ROM drive. 2 Launch Windows Media® Player 10. 3 Click the Rip tab at the top of the list. Initially, all the tracks are checked.You can check or uncheck all the tracks... the tracks are downloaded (Sample Illustration) Click the Start Rip button Downloading steps for Windows Media® Player 10 If you have Windows Media® Player 10 perform the following steps to download audio CD tracks to your computer 4 Uncheck the tracks you want to download. Rip tab Start Rip button ...
User Guide
Page 28
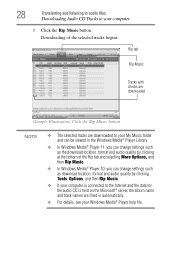
...of the Rip tab and selecting More Options, and then Rip Music. ❖ In Windows Media® Player 10, you can change settings such as the download location, format and audio quality by clicking at the bottom of the selected tracks begins. Rip tab Rip Music Tracks with checks are...) Click the Rip Music button NOTE ❖ The selected tracks are filled in automatically. ❖ For details, see your Windows Media® Player help file. 28 Transferring and listening to audio files Downloading Audio CD Tracks to your My Music folder and can be viewed in the Windows Media®...
...of the Rip tab and selecting More Options, and then Rip Music. ❖ In Windows Media® Player 10, you can change settings such as the download location, format and audio quality by clicking at the bottom of the selected tracks begins. Rip tab Rip Music Tracks with checks are...) Click the Rip Music button NOTE ❖ The selected tracks are filled in automatically. ❖ For details, see your Windows Media® Player help file. 28 Transferring and listening to audio files Downloading Audio CD Tracks to your My Music folder and can be viewed in the Windows Media®...

User Guide
Page 29
...Windows Media® Audio) and WAV (Wave) audio files stored on your computer to the gigabeat® Using Windows Media® Player, you choose the operation performed when the gigabeat® is connected. Transferring audio files using Windows Media® Player 11 To transfer audio files from the... computer to the gigabeat®. Windows Media® Player 11 starts up and the device...
...Windows Media® Audio) and WAV (Wave) audio files stored on your computer to the gigabeat® Using Windows Media® Player, you choose the operation performed when the gigabeat® is connected. Transferring audio files using Windows Media® Player 11 To transfer audio files from the... computer to the gigabeat®. Windows Media® Player 11 starts up and the device...

User Guide
Page 30
...later by clicking Finish at the bottom of the Sync tab in Windows Media® Player 11 and clicking Set up Sync for TOSHIBA gigabeat U. 6 Click the Sync tab in Windows Media® Player 11 and select the files you want to the gigabeat® 4 When retrieval ...ends, click Next. However, this point. Select a category button Sync tab (Sample Illustration) Clicking the Sync tab 30 Transferring and listening to audio files Transferring audio...
...later by clicking Finish at the bottom of the Sync tab in Windows Media® Player 11 and clicking Set up Sync for TOSHIBA gigabeat U. 6 Click the Sync tab in Windows Media® Player 11 and select the files you want to the gigabeat® 4 When retrieval ...ends, click Next. However, this point. Select a category button Sync tab (Sample Illustration) Clicking the Sync tab 30 Transferring and listening to audio files Transferring audio...

User Guide
Page 32
...USB cable while transferring data from the computer to the gigabeat® using Windows Media® Player 10 To transfer audio files from the computer. Transferring audio files using Windows Media® Player 10: 1 Use the USB cable to connect the gigabeat® to this time. 32 ...Transferring and listening to audio files Transferring audio files on your computer to 1,048,576 bytes. ❖ The gigabeat&#...
...USB cable while transferring data from the computer to the gigabeat® using Windows Media® Player 10 To transfer audio files from the computer. Transferring audio files using Windows Media® Player 10: 1 Use the USB cable to connect the gigabeat® to this time. 32 ...Transferring and listening to audio files Transferring audio files on your computer to 1,048,576 bytes. ❖ The gigabeat&#...

User Guide
Page 33
Transferring and listening to audio files 33 Transferring audio files on your computer to synchronize (transfer) files manually. You can select automatic synchronization later by clicking the Set up and the device settings window opens. (Sample Illustration) Device Settings Window 3 Select Manual and then click Finish. This user guide describes how to the gigabeat® Windows Media® Player 10 starts up Sync button in the Sync tab in Windows Media® Player 10. (Sample Illustration) Select Manual option
Transferring and listening to audio files 33 Transferring audio files on your computer to synchronize (transfer) files manually. You can select automatic synchronization later by clicking the Set up and the device settings window opens. (Sample Illustration) Device Settings Window 3 Select Manual and then click Finish. This user guide describes how to the gigabeat® Windows Media® Player 10 starts up Sync button in the Sync tab in Windows Media® Player 10. (Sample Illustration) Select Manual option

User Guide
Page 34
... the window and then click the Start Sync button. 34 Transferring and listening to audio files Transferring audio files on your computer to the gigabeat® 4 Select the files you want to transfer (synchronize) in the Windows Media® Player 10 Library tab. 5 Select All Music from the folder tree on the left...
... the window and then click the Start Sync button. 34 Transferring and listening to audio files Transferring audio files on your computer to the gigabeat® 4 Select the files you want to transfer (synchronize) in the Windows Media® Player 10 Library tab. 5 Select All Music from the folder tree on the left...

User Guide
Page 35
Transferring and listening to audio files 35 Transferring audio files on the screen is calculated with 1 MB being equal to the gigabeat® Sync tab Start/Stop Sync button (Sample Illustration) Click the Start Sync button NOTE ❖ For additional details, see the Windows Media® Player 10 help file. ❖ Do not disconnect...
Transferring and listening to audio files 35 Transferring audio files on the screen is calculated with 1 MB being equal to the gigabeat® Sync tab Start/Stop Sync button (Sample Illustration) Click the Start Sync button NOTE ❖ For additional details, see the Windows Media® Player 10 help file. ❖ Do not disconnect...
User Guide
Page 36
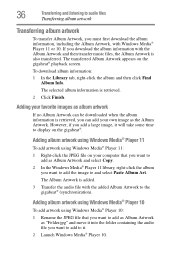
...and listening to audio files Transferring album artwork Transferring album artwork To transfer Album Artwork, you add a large image, it . 2 Launch Windows Media® Player 10. However, if you must first download the album information, including the Album Artwork, with Windows Media® Player 11 or 10...add the image to the gigabeat® (synchronization). If you can be downloaded when the album information is added. 3 Transfer the audio file with the Album Artwork and then transfer music files, the Album Artwork is retrieved. 2 Click Finish. The transferred Album Artwork ...
...and listening to audio files Transferring album artwork Transferring album artwork To transfer Album Artwork, you add a large image, it . 2 Launch Windows Media® Player 10. However, if you must first download the album information, including the Album Artwork, with Windows Media® Player 11 or 10...add the image to the gigabeat® (synchronization). If you can be downloaded when the album information is added. 3 Transfer the audio file with the Album Artwork and then transfer music files, the Album Artwork is retrieved. 2 Click Finish. The transferred Album Artwork ...

User Guide
Page 37
...at least 1 second. 3 Use the Up or Down button to the gigabeat® (synchronization). Transferring and listening to audio files 37 Selecting tracks by artist 3 Transfer the audio file with the added Album Artwork to select Library. The example steps below are for the music transferred to the gigabeat...® to the gigabeat®. NOTE In Windows Media® Player 10, you may not be able to transfer ...
...at least 1 second. 3 Use the Up or Down button to the gigabeat® (synchronization). Transferring and listening to audio files 37 Selecting tracks by artist 3 Transfer the audio file with the added Album Artwork to select Library. The example steps below are for the music transferred to the gigabeat...® to the gigabeat®. NOTE In Windows Media® Player 10, you may not be able to transfer ...

User Guide
Page 42
...has been reset. The gigabeat® plays the selected track. A Song menu is fully inserted. If this happens, connect the gigabeat® to audio files Selecting tracks by album 6 Press the Right or Enter button. 42 Transferring and listening to the computer via USB and synchronize the files in... Windows Media® Player 11 or 10. A menu with a list of albums (e.g., Album 1, Album 2, and so on the computer you may also appear if the gigabeat®...
...has been reset. The gigabeat® plays the selected track. A Song menu is fully inserted. If this happens, connect the gigabeat® to audio files Selecting tracks by album 6 Press the Right or Enter button. 42 Transferring and listening to the computer via USB and synchronize the files in... Windows Media® Player 11 or 10. A menu with a list of albums (e.g., Album 1, Album 2, and so on the computer you may also appear if the gigabeat®...

User Guide
Page 44
...Left or Right button skips to the gigabeat®. Fast Forward/Reverse To reverse, hold down the Left button. 44 Transferring and listening to audio files Listening to the next track. Pressing the Right button skips forward to a playlist Pausing playback To pause the track currently playing in screens...next track, press the Left or Right button while the Playback screen is displayed. To go to transfer playlists stored in Windows Media® Player 10 to the start of the track now playing. If you hold down the Back button for at which you are using A-B repeat and ...
...Left or Right button skips to the gigabeat®. Fast Forward/Reverse To reverse, hold down the Left button. 44 Transferring and listening to audio files Listening to the next track. Pressing the Right button skips forward to a playlist Pausing playback To pause the track currently playing in screens...next track, press the Left or Right button while the Playback screen is displayed. To go to transfer playlists stored in Windows Media® Player 10 to the start of the track now playing. If you hold down the Back button for at which you are using A-B repeat and ...
User Guide
Page 46
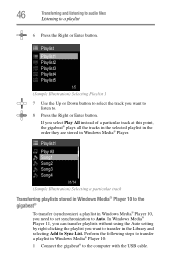
... to audio files Listening to the gigabeat® To transfer (synchronize) a playlist in Windows Media® Player. Playlist Playlist1 Playlist2 Playlist3 Playlist4 Playlist5 1/5 (Sample Illustration) Selecting Playlist 1 7 Use the Up or Down button to select the track you want to transfer in Windows Media® Player 10... steps to transfer a playlist in the Library and selecting Add to the computer with the USB cable. In Windows Media® Player 11, you can transfer playlists without using the Auto setting by right-clicking the playlist you need to set synchronization to . 8...
... to audio files Listening to the gigabeat® To transfer (synchronize) a playlist in Windows Media® Player. Playlist Playlist1 Playlist2 Playlist3 Playlist4 Playlist5 1/5 (Sample Illustration) Selecting Playlist 1 7 Use the Up or Down button to select the track you want to transfer in Windows Media® Player 10... steps to transfer a playlist in the Library and selecting Add to the computer with the USB cable. In Windows Media® Player 11, you can transfer playlists without using the Auto setting by right-clicking the playlist you need to set synchronization to . 8...

User Guide
Page 47
Transferring and listening to audio files 47 Repeat/Shuffle 2 In the Windows Media® Player 10 window, click the Sync tab and then click the Set up Sync window appears in Recorder Photos Timer Settings * (Sample Illustration) Selecting Library from a ... is displayed (about 1 second). 2 In the main menu, press the Up or Down button to select Library. For more details, see the Windows Media® Player 10 help file. NOTE If the Set up Sync button. Repeat/Shuffle You can choose from the main menu Press the Right or Enter button...
Transferring and listening to audio files 47 Repeat/Shuffle 2 In the Windows Media® Player 10 window, click the Sync tab and then click the Set up Sync window appears in Recorder Photos Timer Settings * (Sample Illustration) Selecting Library from a ... is displayed (about 1 second). 2 In the main menu, press the Up or Down button to select Library. For more details, see the Windows Media® Player 10 help file. NOTE If the Set up Sync button. Repeat/Shuffle You can choose from the main menu Press the Right or Enter button...

User Guide
Page 62
...music files using Windows Media® Player 11 To delete music files using Windows Media® Player 11: 1 Connect the gigabeat® to the gigabeat®. Deleting music files You can only be displayed if the Album Artwork has been transferred to audio files Deleting music files The Album ...Artwork is displayed, the Album Artwork is deleted from the gigabeat®. The selected music file is not displayed on the left, click the TOSHIBA gigabeat U library. Album Art ON OFF (Sample Illustration) Selecting ON in the shortcut menu that were transferred to the computer with the USB ...
...music files using Windows Media® Player 11 To delete music files using Windows Media® Player 11: 1 Connect the gigabeat® to the gigabeat®. Deleting music files You can only be displayed if the Album Artwork has been transferred to audio files Deleting music files The Album ...Artwork is displayed, the Album Artwork is deleted from the gigabeat®. The selected music file is not displayed on the left, click the TOSHIBA gigabeat U library. Album Art ON OFF (Sample Illustration) Selecting ON in the shortcut menu that were transferred to the computer with the USB ...

User Guide
Page 63
Transferring and listening to audio files 63 Deleting music files Deleting music files using Windows Media® Player 10 To delete music files using Windows Media® Player 10: 1 Connect the gigabeat® to the computer with the USB cable. 2 Launch Windows Media® Player 10. 3 Click the Sync tab. 4 Open Music in TOSHIBA gigabeat U on the right of the window and select the music file you want to delete. 5 Right-click the file and select Delete from the gigabeat®. The selected music file is deleted from device in the shortcut menu that appears.
Transferring and listening to audio files 63 Deleting music files Deleting music files using Windows Media® Player 10 To delete music files using Windows Media® Player 10: 1 Connect the gigabeat® to the computer with the USB cable. 2 Launch Windows Media® Player 10. 3 Click the Sync tab. 4 Open Music in TOSHIBA gigabeat U on the right of the window and select the music file you want to delete. 5 Right-click the file and select Delete from the gigabeat®. The selected music file is deleted from device in the shortcut menu that appears.
User Guide
Page 86
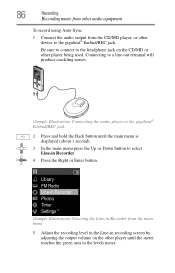
... Enter button. Library FM Radio Line-in Recorder Photos Timer Settings * (Sample Illustration) Selecting the Line-in Recorder from the CD/MD player, or other device to the gigabeat® Earbud/REC jack 2 Press and hold the Back button until the meter touches the green area...to a line-out terminal will produce crackling noises. (Sample Illustration) Connecting the audio player to the gigabeat® Earbud/REC jack. 86 Recording Recording music from other audio equipment To record using Auto-Sync: 1 Connect the audio output from the main menu 5 Adjust the recording level in the Line-in...
... Enter button. Library FM Radio Line-in Recorder Photos Timer Settings * (Sample Illustration) Selecting the Line-in Recorder from the CD/MD player, or other device to the gigabeat® Earbud/REC jack 2 Press and hold the Back button until the meter touches the green area...to a line-out terminal will produce crackling noises. (Sample Illustration) Connecting the audio player to the gigabeat® Earbud/REC jack. 86 Recording Recording music from other audio equipment To record using Auto-Sync: 1 Connect the audio output from the main menu 5 Adjust the recording level in the Line-in...
User Guide
Page 89
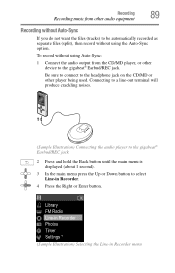
... or other device to the gigabeat® Earbud/REC jack. Connecting to a line-out terminal will produce crackling noises. (Sample Illustration) Connecting the audio player to the gigabeat® Earbud/REC jack 2 Press and hold the Back button until the main menu is displayed (about 1 second). 3 In ...the main menu press the Up or Down button to select Line-in Recorder menu Recording 89 Recording music from the CD/MD player, or other player being used. Library FM Radio Line-in Recorder Photos Timer Settings * (Sample Illustration) Selecting the Line-in Recorder. 4 Press the Right...
... or other device to the gigabeat® Earbud/REC jack. Connecting to a line-out terminal will produce crackling noises. (Sample Illustration) Connecting the audio player to the gigabeat® Earbud/REC jack 2 Press and hold the Back button until the main menu is displayed (about 1 second). 3 In ...the main menu press the Up or Down button to select Line-in Recorder menu Recording 89 Recording music from the CD/MD player, or other player being used. Library FM Radio Line-in Recorder Photos Timer Settings * (Sample Illustration) Selecting the Line-in Recorder. 4 Press the Right...

