
Customization Guide
Page 4
...This Guide...2 Chapter 1: Customization...6 Introduction...6 Customization overview ...8 Accessing the Magnia SG20...8 Copying software to the Magnia SG20 ...8 Modifying the Magnia SG20 GUI ...9 Listing installed Linux packages...9 User accounts and passwords ...10 Default accounts and passwords ...10 Initial account creation... configuration files ...19 Template Perl programming interface ...23 System startup scripts...24 Triggers...25 Trigger interface ...26 Manually executing a trigger ...27 Adding trigger scripts ...27 Implemented Triggers...28 Useful files...32 LCD panel customization ......
...This Guide...2 Chapter 1: Customization...6 Introduction...6 Customization overview ...8 Accessing the Magnia SG20...8 Copying software to the Magnia SG20 ...8 Modifying the Magnia SG20 GUI ...9 Listing installed Linux packages...9 User accounts and passwords ...10 Default accounts and passwords ...10 Initial account creation... configuration files ...19 Template Perl programming interface ...23 System startup scripts...24 Triggers...25 Trigger interface ...26 Manually executing a trigger ...27 Adding trigger scripts ...27 Implemented Triggers...28 Useful files...32 LCD panel customization ......
Quick Start Guide
Page 1
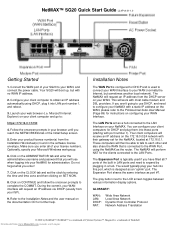
...the same interface as an "uplink" port. The gray button next to complete the COMMIT. Magnia® is a trademark of the built in your browser until you enter all 7 ports of Toshiba® Downloaded from the DHCP server on the ADMINSTRATOR tab and enter the administrative username and ...the clients connected to each other and also share the WAN that you have filled all of your SG20 to your client computer and go to the Installation Notes and the user manual on CONTINUE and follow the onscreen prompts to the LCD screen toggles between various information display options....
...the same interface as an "uplink" port. The gray button next to complete the COMMIT. Magnia® is a trademark of the built in your browser until you enter all 7 ports of Toshiba® Downloaded from the DHCP server on the ADMINSTRATOR tab and enter the administrative username and ...the clients connected to each other and also share the WAN that you have filled all of your SG20 to your client computer and go to the Installation Notes and the user manual on CONTINUE and follow the onscreen prompts to the LCD screen toggles between various information display options....