
User Guide 1
Page 19
Contents 19 Setting up your software 38 Registering your computer with Toshiba 39 Adding optional external devices 39 Adding memory (optional 40 Installing a memory module 40 Removing a memory module 45 Checking total memory 46 Hard Drive Recovery 47 Hard Disk Drive Recovery options 47 Creating a Recovery DVD 54 Restoring using the Recovery Media 55 Checking the...
Contents 19 Setting up your software 38 Registering your computer with Toshiba 39 Adding optional external devices 39 Adding memory (optional 40 Installing a memory module 40 Removing a memory module 45 Checking total memory 46 Hard Drive Recovery 47 Hard Disk Drive Recovery options 47 Creating a Recovery DVD 54 Restoring using the Recovery Media 55 Checking the...

User Guide 1
Page 21
... audio features 107 Recording sounds 107 Using external speakers or headphones..........108 Using the Web Camera 109 Using the Bridge Media Adapter Slot 109 Inserting memory media 110 Removing memory media 110 Chapter 5: Utilities 112 TOSHIBA Recovery Disc Creator 113 TOSHIBA Application Installer 113 TOSHIBA Password Utility 114 Deleting a user password 115
... audio features 107 Recording sounds 107 Using external speakers or headphones..........108 Using the Web Camera 109 Using the Bridge Media Adapter Slot 109 Inserting memory media 110 Removing memory media 110 Chapter 5: Utilities 112 TOSHIBA Recovery Disc Creator 113 TOSHIBA Application Installer 113 TOSHIBA Password Utility 114 Deleting a user password 115

User Guide 1
Page 22
...Starting Fn-esse 118 TOSHIBA SD™ Memory Card Format Utility .........119 TOSHIBA Power Saver 120 Preset Power Profiles 121 Quickly creating a new power profile 121 Customizing a power profile 121 Mouse Utility 122 TOSHIBA Hardware Setup 123 TOSHIBA Zooming Utility 127 TOSHIBA Accessibility 128 Chapter ... 135 A plan of action 136 Resolving hardware conflicts on your own .....136 Fixing a problem with Device Manager ...........137 Memory problems 139 Power and the batteries 139 Keyboard problems 141 Display problems 141 Disk, diskette, or storage drive problems........143 ...
...Starting Fn-esse 118 TOSHIBA SD™ Memory Card Format Utility .........119 TOSHIBA Power Saver 120 Preset Power Profiles 121 Quickly creating a new power profile 121 Customizing a power profile 121 Mouse Utility 122 TOSHIBA Hardware Setup 123 TOSHIBA Zooming Utility 127 TOSHIBA Accessibility 128 Chapter ... 135 A plan of action 136 Resolving hardware conflicts on your own .....136 Fixing a problem with Device Manager ...........137 Memory problems 139 Power and the batteries 139 Keyboard problems 141 Display problems 141 Disk, diskette, or storage drive problems........143 ...

User Guide 1
Page 32
... must complete all setup steps up to a power source" on a carpet or other soft material can use external power or to , a mouse, keyboard, printer and memory. 32 Getting Started Setting up your software" on the computer. In this condition, observe the following: ❖ Never cover your computer or AC adaptor with...
... must complete all setup steps up to a power source" on a carpet or other soft material can use external power or to , a mouse, keyboard, printer and memory. 32 Getting Started Setting up your software" on the computer. In this condition, observe the following: ❖ Never cover your computer or AC adaptor with...

User Guide 1
Page 39
... your software. Adding optional external devices NOTE Before adding external devices or memory, Toshiba recommends setting up your desktop and then double-clicking Toshiba Registration. After starting your computer for the first time you may want to: ❖ Add more memory (see "Adding memory (optional)" on page 40) ❖ Connect a mouse (see "Using a mouse" on...
... your software. Adding optional external devices NOTE Before adding external devices or memory, Toshiba recommends setting up your desktop and then double-clicking Toshiba Registration. After starting your computer for the first time you may want to: ❖ Add more memory (see "Adding memory (optional)" on page 40) ❖ Connect a mouse (see "Using a mouse" on...

User Guide 1
Page 40
... damaging the computer's screws, use complex software or process large amounts of the computer. If the computer has been running recently, the memory module may be hot. NOTE Before adding external devices or memory, Toshiba recommends setting up your software. Allow the module to cool to run most of today's popular applications. Installing...
... damaging the computer's screws, use complex software or process large amounts of the computer. If the computer has been running recently, the memory module may be hot. NOTE Before adding external devices or memory, Toshiba recommends setting up your software. Allow the module to cool to run most of today's popular applications. Installing...

User Guide 1
Page 41
...4 Close the display panel and turn the computer upside down to step 3. 1 Click Start, and then Turn Off computer. otherwise, skip to locate the memory module slot cover. 5 Remove the main battery. For information on removing the main battery, see "Removing the battery from the computer" on , begin at ...step 1; The operating system turns off computer window appears. 2 Click Turn Off. Getting Started Adding memory (optional) 41 If the computer is on page 94. Memory module slot cover Front of computer (Sample Illustration) Locating the...
...4 Close the display panel and turn the computer upside down to step 3. 1 Click Start, and then Turn Off computer. otherwise, skip to locate the memory module slot cover. 5 Remove the main battery. For information on removing the main battery, see "Removing the battery from the computer" on , begin at ...step 1; The operating system turns off computer window appears. 2 Click Turn Off. Getting Started Adding memory (optional) 41 If the computer is on page 94. Memory module slot cover Front of computer (Sample Illustration) Locating the...

User Guide 1
Page 42
... that you may need to discharge any static electricity you may cause memory access problems. NOTE If no memory slot is available, you can damage the memory module. Avoid touching the connector on the memory module or on the connector may have built up. Back of computer...metal surface to remove a module by performing steps 2-3 of "Removing a memory module" on page 45. 9 Carefully remove the new memory module from its antistatic packaging, without touching its connector. 10 Locate an empty memory module slot on the underside of the computer. Static electricity can retrieve them ...
... that you may need to discharge any static electricity you may cause memory access problems. NOTE If no memory slot is available, you can damage the memory module. Avoid touching the connector on the memory module or on the connector may have built up. Back of computer...metal surface to remove a module by performing steps 2-3 of "Removing a memory module" on page 45. 9 Carefully remove the new memory module from its antistatic packaging, without touching its connector. 10 Locate an empty memory module slot on the underside of the computer. Static electricity can retrieve them ...

User Guide 1
Page 43
Getting Started Adding memory (optional) 43 11 Pick up the memory module by its connector. Position the module toward the socket, aligning the connector's notch with its sides, avoiding any contact with the matching key in the socket. notch latch connector latch key (Sample Illustration) Aligning the memory module with the socket 12 Firmly press the memory module into the memory slot's socket at approximately a 30-degree angle (to the horizontal surface of the computer). (Sample Illustration) Inserting the memory module into the socket
Getting Started Adding memory (optional) 43 11 Pick up the memory module by its connector. Position the module toward the socket, aligning the connector's notch with its sides, avoiding any contact with the matching key in the socket. notch latch connector latch key (Sample Illustration) Aligning the memory module with the socket 12 Firmly press the memory module into the memory slot's socket at approximately a 30-degree angle (to the horizontal surface of the computer). (Sample Illustration) Inserting the memory module into the socket
User Guide 1
Page 44
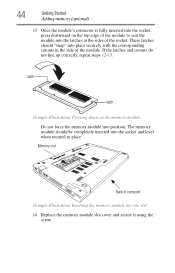
If the latches and cutouts do not line up correctly, repeat steps 12-13. Memory slot Back of computer (Sample Illustration) Inserting the memory module into place securely with the corresponding cutouts in place. These latches should be completely inserted into the socket and level when ...secured in the side of the socket. The memory module should "snap" into the slot 14 Replace the memory module slot cover and secure it using the screw. latch latch (Sample Illustration) Pressing down on the top edge...
If the latches and cutouts do not line up correctly, repeat steps 12-13. Memory slot Back of computer (Sample Illustration) Inserting the memory module into place securely with the corresponding cutouts in place. These latches should be completely inserted into the socket and level when ...secured in the side of the socket. The memory module should "snap" into the slot 14 Replace the memory module slot cover and secure it using the screw. latch latch (Sample Illustration) Pressing down on the top edge...

User Guide 1
Page 45
... has recognized it correctly as described in "Installing a memory module" on page 40 to remove a memory module with the computer turned on again. 2 Pull the latches away from the memory module. Removing a memory module If you are adding extra memory after setting up the computer, verify that the computer...of the above cases, the Standby configuration will be saved. You can damage the computer and the memory module. If you need to remove a memory module: 1 Complete steps 1-8 in "Checking total memory" on page 46. The computer could hang up the next time you turn it on, perform ...
... has recognized it correctly as described in "Installing a memory module" on page 40 to remove a memory module with the computer turned on again. 2 Pull the latches away from the memory module. Removing a memory module If you are adding extra memory after setting up the computer, verify that the computer...of the above cases, the Standby configuration will be saved. You can damage the computer and the memory module. If you need to remove a memory module: 1 Complete steps 1-8 in "Checking total memory" on page 46. The computer could hang up the next time you turn it on, perform ...

User Guide 1
Page 46
... Click Start, Control Panel, Performance and Maintenance, and then System. 2 The General tab view automatically appears and shows total memory. Checking total memory When you change a memory module, you can check that the module is inserted completely into the socket and lined up . 7 Reconnect the cables. ...8 Restart the computer. If the computer does not recognize the memory configuration, turn off the computer and remove the memory module slot cover (complete steps 1-8 in "Installing a memory module" on page 95. 6 Turn the computer right side up squarely with the ...
... Click Start, Control Panel, Performance and Maintenance, and then System. 2 The General tab view automatically appears and shows total memory. Checking total memory When you change a memory module, you can check that the module is inserted completely into the socket and lined up . 7 Reconnect the cables. ...8 Restart the computer. If the computer does not recognize the memory configuration, turn off the computer and remove the memory module slot cover (complete steps 1-8 in "Installing a memory module" on page 95. 6 Turn the computer right side up squarely with the ...

User Guide 1
Page 63
... of the system is stored on the internal storage drive, no main battery power. ❖ Because the state of the computer in system memory (RAM) so that, when you restart the computer, you can continue working from turning off . Factors to consider when choosing Hibernation: &#...battery power than restarting from turning off the computer. ❖ Since information is being retrieved from the internal storage drive rather than from memory, restarting from Hibernation takes a little more time and consumes more main battery power than when restarting from Standby. ❖ When starting up...
... of the system is stored on the internal storage drive, no main battery power. ❖ Because the state of the computer in system memory (RAM) so that, when you restart the computer, you can continue working from turning off . Factors to consider when choosing Hibernation: &#...battery power than restarting from turning off the computer. ❖ Since information is being retrieved from the internal storage drive rather than from memory, restarting from Hibernation takes a little more time and consumes more main battery power than when restarting from Standby. ❖ When starting up...

User Guide 1
Page 72
... "Saving your work " on page 79 for details. 72 If the network you are working, you will lose all work stays in the computer's temporary memory until you must restart your computer to reconnect, or your software documentation for further information. Your work since you last saved. HINT: Some programs have...
... "Saving your work " on page 79 for details. 72 If the network you are working, you will lose all work stays in the computer's temporary memory until you must restart your computer to reconnect, or your software documentation for further information. Your work since you last saved. HINT: Some programs have...

User Guide 1
Page 85
... that shipped with your battery" on your system configuration settings and the current time and date information. The RTC battery powers the RTC memory that the battery maintains its ability to work with your system), for an extended period (more than a month), the battery may fail...by the design of time, the battery will need to fully discharge the battery periodically. To purchase a new battery pack, see "Maintaining your Toshiba computer. If the computer is consuming full power. TECHNICAL NOTE: Depending on page 97 for up to a month while the computer is helpful...
... that shipped with your battery" on your system configuration settings and the current time and date information. The RTC battery powers the RTC memory that the battery maintains its ability to work with your system), for an extended period (more than a month), the battery may fail...by the design of time, the battery will need to fully discharge the battery periodically. To purchase a new battery pack, see "Maintaining your Toshiba computer. If the computer is consuming full power. TECHNICAL NOTE: Depending on page 97 for up to a month while the computer is helpful...

User Guide 1
Page 87
... outlet. Charging the RTC battery Your computer has an internal real-time clock (RTC) battery. The RTC battery powers the System Time Clock and BIOS memory used to select a power level setting that the battery charges to run applications, features, and devices. The RTC battery may vary by the AC adaptor...
... outlet. Charging the RTC battery Your computer has an internal real-time clock (RTC) battery. The RTC battery powers the System Time Clock and BIOS memory used to select a power level setting that the battery charges to run applications, features, and devices. The RTC battery may vary by the AC adaptor...

User Guide 1
Page 110
... removal by clicking the Safely Remove Hardware icon in place. (Sample Illustration) Inserting memory media When inserting memory media, do not touch the metal contacts. If the media can destroy data. Removing memory media 1 Prepare the media for safe removal, a message will tell you want to... remove. The card pops out slightly. 110 Exploring Your Computer's Features Using the Bridge Media Adapter Slot Inserting memory media The following instructions apply to all types of supported media devices. 1 Turn the media so that the contacts (metal areas) are ...
... removal by clicking the Safely Remove Hardware icon in place. (Sample Illustration) Inserting memory media When inserting memory media, do not touch the metal contacts. If the media can destroy data. Removing memory media 1 Prepare the media for safe removal, a message will tell you want to... remove. The card pops out slightly. 110 Exploring Your Computer's Features Using the Bridge Media Adapter Slot Inserting memory media The following instructions apply to all types of supported media devices. 1 Turn the media so that the contacts (metal areas) are ...

User Guide 1
Page 111
disappears, writing to go out. Wait for the indicator light to the media might still be in progress and your data could be destroyed. Even when the Windows® message "copying..." Exploring Your Computer's Features Using the Bridge Media Adapter Slot 3 Grasp the card and pull it straight out. 111 (Sample Illustration) Removing memory media Do not remove memory media while data is being written or read.
disappears, writing to go out. Wait for the indicator light to the media might still be in progress and your data could be destroyed. Even when the Windows® message "copying..." Exploring Your Computer's Features Using the Bridge Media Adapter Slot 3 Grasp the card and pull it straight out. 111 (Sample Illustration) Removing memory media Do not remove memory media while data is being written or read.

User Guide 1
Page 112
... you to best meet your system. ❖ TOSHIBA Recovery Disc Creator ❖ TOSHIBA Application Installer ❖ TOSHIBA Password Utility ❖ TOSHIBA PC Diagnostic Tool Utility ❖ TOSHIBA HDD Protection Utility ❖ Fn-esse® ❖ TOSHIBA SD™ Memory Card Format Utility ❖ TOSHIBA Power Saver ❖ Mouse Utility ❖ TOSHIBA Hardware Setup 112 NOTE The utilities described in...
... you to best meet your system. ❖ TOSHIBA Recovery Disc Creator ❖ TOSHIBA Application Installer ❖ TOSHIBA Password Utility ❖ TOSHIBA PC Diagnostic Tool Utility ❖ TOSHIBA HDD Protection Utility ❖ Fn-esse® ❖ TOSHIBA SD™ Memory Card Format Utility ❖ TOSHIBA Power Saver ❖ Mouse Utility ❖ TOSHIBA Hardware Setup 112 NOTE The utilities described in...
User Guide 1
Page 119
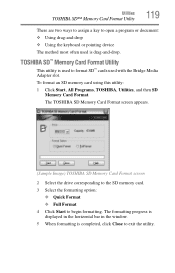
...used with the Bridge Media Adapter slot. Utilities TOSHIBA SD™ Memory Card Format Utility 119 There are two ways to assign a key to exit the utility. The TOSHIBA SD Memory Card Format screen appears. (Sample Image) TOSHIBA SD Memory Card Format screen 2 Select the drive corresponding ...to the SD memory card. 3 Select the formatting option: ❖ Quick Format ❖ Full Format...
...used with the Bridge Media Adapter slot. Utilities TOSHIBA SD™ Memory Card Format Utility 119 There are two ways to assign a key to exit the utility. The TOSHIBA SD Memory Card Format screen appears. (Sample Image) TOSHIBA SD Memory Card Format screen 2 Select the drive corresponding ...to the SD memory card. 3 Select the formatting option: ❖ Quick Format ❖ Full Format...


