

User Manual
Page 1
Model No. Serial No. Retain this information for future reference. Others Maintenance Operations Preparations Before Using TDP-T420 TDP-T360 DATA PROJECTOR OWNER'S MANUAL In the spaces provided below, record the Model and Serial No. located at the bottom of your projector.
Model No. Serial No. Retain this information for future reference. Others Maintenance Operations Preparations Before Using TDP-T420 TDP-T360 DATA PROJECTOR OWNER'S MANUAL In the spaces provided below, record the Model and Serial No. located at the bottom of your projector.

User Manual
Page 4
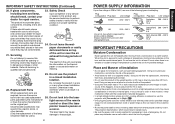
Do not place or keep the projector within the reach of an incompatible attachments could cause hazards or damage to overturn. 19. It may cause the product and cart combination to the ... of any way (If the cabinet should be sure to avoid injury) . The top and bottom surface of other unit. 16. Moving the projector When carrying the projector, be moved with care to use and may damage the other controls may touch dangerous voltage points or short-out parts that are covered...
Do not place or keep the projector within the reach of an incompatible attachments could cause hazards or damage to overturn. 19. It may cause the product and cart combination to the ... of any way (If the cabinet should be sure to avoid injury) . The top and bottom surface of other unit. 16. Moving the projector When carrying the projector, be moved with care to use and may damage the other controls may touch dangerous voltage points or short-out parts that are covered...
User Manual
Page 5
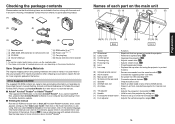
... part. Replacement Parts When replacement parts are required, be contaminated. 21. Otherwise it away from the TV or radio. • Moving the projector from a cold location to the eyesight. 8 POWER SUPPLY INFORMATION If your dealer for repair service. p.42 • Only plug the power ...cord into the laser light source of the projector. • Avoid locations with [Fan mode] set to qualified service personnel. 23. When the unit is reduced so use with...
... part. Replacement Parts When replacement parts are required, be contaminated. 21. Otherwise it away from the TV or radio. • Moving the projector from a cold location to the eyesight. 8 POWER SUPPLY INFORMATION If your dealer for repair service. p.42 • Only plug the power ...cord into the laser light source of the projector. • Avoid locations with [Fan mode] set to qualified service personnel. 23. When the unit is reduced so use with...
User Manual
Page 8
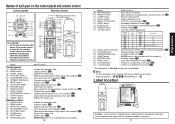
... manual Run the CD-ROM and double-click on the product destination. See the Help menu for internal cool down. (15) Tilt adjuster : Adjusts the projector's horizontal tilt. p.27 (6) Lens : Projects expanded image. (7) Lens cap : Replace the cap when not using . p.27 (18) Foot adjuster :...line ON (standby)/OFF. (11) Terminals on p. Preparations Checking the package contents Please make sure that the following items are using the projector to ship your model", then click on the desired language. For maximum protection when shipping your computer by pulling out. (17) Foot ...
... manual Run the CD-ROM and double-click on the product destination. See the Help menu for internal cool down. (15) Tilt adjuster : Adjusts the projector's horizontal tilt. p.27 (6) Lens : Projects expanded image. (7) Lens cap : Replace the cap when not using . p.27 (18) Foot adjuster :...line ON (standby)/OFF. (11) Terminals on p. Preparations Checking the package contents Please make sure that the following items are using the projector to ship your model", then click on the desired language. For maximum protection when shipping your computer by pulling out. (17) Foot ...
User Manual
Page 9
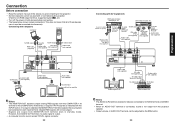
...8658; ; p.29 : Goes back one character. [6] (18) Remote control code switch : Sets the code of remote control to that of the projector. Note • For the remainder of this manual, buttons are not available. p.32 : Selects input. p.49 : Displays whether power is on. ... Function : Accepts the selected mode. : Displays menus. p.26 : Adjusts keystone distortion. p.24 : Lights when internal temperature is not operable with this projector. 16 Name (9) RETURN button (10) Selection button (11) LASER button (12) Laser indicator (13) Mouse control button (14) PAGE+ button (15...
...8658; ; p.29 : Goes back one character. [6] (18) Remote control code switch : Sets the code of remote control to that of the projector. Note • For the remainder of this manual, buttons are not available. p.32 : Selects input. p.49 : Displays whether power is on. ... Function : Accepts the selected mode. : Displays menus. p.26 : Adjusts keystone distortion. p.24 : Lights when internal temperature is not operable with this projector. 16 Name (9) RETURN button (10) Selection button (11) LASER button (12) Laser indicator (13) Mouse control button (14) PAGE+ button (15...

User Manual
Page 10
...VIDEO terminal : Input video signals from video equipment. (4) AC IN socket : Connects the supplied power cord here. (5) CONTROL terminal : When operating the projector via a computer, connect this happens, point the remote control at the main unit again, and repeat the operation. 19 Preparations p.56 (6) Main power.... • Keep the batteries away from the front 2 Insert the dry-cell batteries. When operating the remote control from behind the projector, the infrared signal is exposed to bright sunlight or fluorescent lighting. • Do not drop or bang. • Do ...
...VIDEO terminal : Input video signals from video equipment. (4) AC IN socket : Connects the supplied power cord here. (5) CONTROL terminal : When operating the projector via a computer, connect this happens, point the remote control at the main unit again, and repeat the operation. 19 Preparations p.56 (6) Main power.... • Keep the batteries away from the front 2 Insert the dry-cell batteries. When operating the remote control from behind the projector, the infrared signal is exposed to bright sunlight or fluorescent lighting. • Do not drop or bang. • Do ...

User Manual
Page 11
...computer with the Windows® 98/98SE, Windows® Me, Windows® 2000, Windows® XP, or Windows Vista® OS, that Toshiba does not guarantee the operation of 1.29 m (4.23 ft.) to do so. Mouse remote control receiver 2 Operating a computer Operate remote control's ...39.40 ft.). To USB port The remote control may cause you to fall , resulting in the direction you wish to mount the projector on a ceiling requires special ceiling brackets (sold separately) and specialized knowledge. Floor-mounted front projection Floor-mounted rear projection Ceiling-mounted front...
...computer with the Windows® 98/98SE, Windows® Me, Windows® 2000, Windows® XP, or Windows Vista® OS, that Toshiba does not guarantee the operation of 1.29 m (4.23 ft.) to do so. Mouse remote control receiver 2 Operating a computer Operate remote control's ...39.40 ft.). To USB port The remote control may cause you to fall , resulting in the direction you wish to mount the projector on a ceiling requires special ceiling brackets (sold separately) and specialized knowledge. Floor-mounted front projection Floor-mounted rear projection Ceiling-mounted front...
User Manual
Page 12
...White (L)/ Red (R) To video output (yellow) S-video cable (not supplied) To S-video output Audio amplifier, etc. However, from the projector speaker. • Output volume of AUDIO OUT terminal can or must be used with the INPUT button. Video recorder, etc. Connecting with computers Computer...from the COMPUTER 1 IN terminal or the COMPUTER 2 IN terminal, or outputs Y/PB/PR signals as selected with or connected to this projector. If no audio signal is selected, the MONITOR OUT terminal outputs the input signals last selected for control) RGB cable (not supplied) Audio...
...White (L)/ Red (R) To video output (yellow) S-video cable (not supplied) To S-video output Audio amplifier, etc. However, from the projector speaker. • Output volume of AUDIO OUT terminal can or must be used with the INPUT button. Video recorder, etc. Connecting with computers Computer...from the COMPUTER 1 IN terminal or the COMPUTER 2 IN terminal, or outputs Y/PB/PR signals as selected with or connected to this projector. If no audio signal is selected, the MONITOR OUT terminal outputs the input signals last selected for control) RGB cable (not supplied) Audio...
User Manual
Page 13
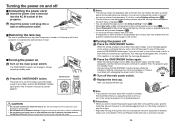
.... While the indicator is turned on. After use the Display setting menu p.38 . • The first time you wish to restart the projector again right after a moment. (This operation is set to light. • Right after a moment. Control panel Remote control CAUTION • Do ... the power on and off the power. This message will change to cool before this , use , replace the lens cap. Note • The projector consumes about 5 minutes) to orange, indicating standby mode. 2 Press the ON/STANDBY button. Doing so could become very hot, especially air exhaust, ...
.... While the indicator is turned on. After use the Display setting menu p.38 . • The first time you wish to restart the projector again right after a moment. (This operation is set to light. • Right after a moment. Control panel Remote control CAUTION • Do ... the power on and off the power. This message will change to cool before this , use , replace the lens cap. Note • The projector consumes about 5 minutes) to orange, indicating standby mode. 2 Press the ON/STANDBY button. Doing so could become very hot, especially air exhaust, ...
User Manual
Page 14
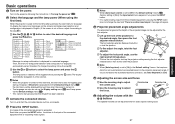
...corrected based on the next time, the start the connected device such as Standard. The lamp power, if selected, will appear. 5 Projector placement angle adjustments The placement angle and the height of the connected equipment that English has been selected. 3 Activate the connected device. Notes... • When the projector is automatically set [Auto keystone] to [Off]. 6 Adjusting the screen size and focus 1 Use the zooming ring to adjust the screen ...
...corrected based on the next time, the start the connected device such as Standard. The lamp power, if selected, will appear. 5 Projector placement angle adjustments The placement angle and the height of the connected equipment that English has been selected. 3 Activate the connected device. Notes... • When the projector is automatically set [Auto keystone] to [Off]. 6 Adjusting the screen size and focus 1 Use the zooming ring to adjust the screen ...
User Manual
Page 15
...not malfunction. (The lifetime of the lamp depends on conditions of computer having LCD displays or the like, displaying images simultaneously on the projector and the monitor's display may be corrected automatically based on . • The keystone correction settings are not malfunctions. Notes •... A lamp is made using both digital zoom and keystone correction while displaying an input image with this projector. Remote control Press the remote control's AUTO SET button. Control panel Remote control Notes • Depending on how to the optimum ...
...not malfunction. (The lifetime of the lamp depends on conditions of computer having LCD displays or the like, displaying images simultaneously on the projector and the monitor's display may be corrected automatically based on . • The keystone correction settings are not malfunctions. Notes •... A lamp is made using both digital zoom and keystone correction while displaying an input image with this projector. Remote control Press the remote control's AUTO SET button. Control panel Remote control Notes • Depending on how to the optimum ...
User Manual
Page 16
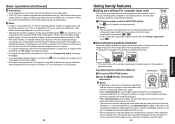
... the optical zoom (manual adjustment with the digital zoom (electric zoom: 100 - 62%) in size. Using handy features (Continued) ■ Zooming out the images This projector is provided with zooming ring). (Note that the display, if digitally zoomed out, may be reset.
... the optical zoom (manual adjustment with the digital zoom (electric zoom: 100 - 62%) in size. Using handy features (Continued) ■ Zooming out the images This projector is provided with zooming ring). (Note that the display, if digitally zoomed out, may be reset.
User Manual
Page 17
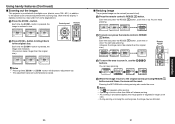
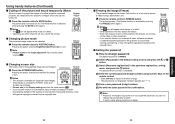
...and listening, it appears as [******]. 4 Enter a new password (6-digit number). 5 Re-enter the same password for the purpose of another projector, overhead projector, etc. Remote control ■ Changing picture mode The projected image mode can be changed. Operations 32 33 Using handy features (Continued) ... • Even if an image is in effect. • Operating any other equipment. • If you use this function on the projector, the pictures are cut off . Press the remote control's PICTURE button. Note • [Picture mode] of your private viewing and listening...
...and listening, it appears as [******]. 4 Enter a new password (6-digit number). 5 Re-enter the same password for the purpose of another projector, overhead projector, etc. Remote control ■ Changing picture mode The projected image mode can be changed. Operations 32 33 Using handy features (Continued) ... • Even if an image is in effect. • Operating any other equipment. • If you use this function on the projector, the pictures are cut off . Press the remote control's PICTURE button. Note • [Picture mode] of your private viewing and listening...
User Manual
Page 18
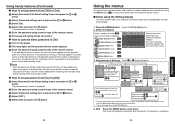
...or button. 4 Select [OFF]. 5 Select [OK] and press the button. 34 Using the menus You can call up screen appears and the projector goes into normal operation. The password that you enter a wrong password for operation instructions purposes. Adjustments & Settings Press or to previous item, press the... when restarting from the list by using . Toggle items with and press . End Press the MENU button once more than 5 times, the projector will not be adjusted with . • The figure shows displays given for more . (The menu will disappear automatically after the main power ...
...or button. 4 Select [OFF]. 5 Select [OK] and press the button. 34 Using the menus You can call up screen appears and the projector goes into normal operation. The password that you enter a wrong password for operation instructions purposes. Adjustments & Settings Press or to previous item, press the... when restarting from the list by using . Toggle items with and press . End Press the MENU button once more than 5 times, the projector will not be adjusted with . • The figure shows displays given for more . (The menu will disappear automatically after the main power ...
User Manual
Page 21
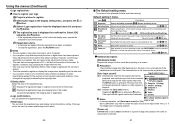
... input signal. Select the size of the registered logo. : Displays the registered image in colors more like projecting on once power is a power outage, the projector will appear after keystone distortion or digital zoom has been adjusted, those adjustments will return to [Auto] and there is restored. 41 Operations On Off...
... input signal. Select the size of the registered logo. : Displays the registered image in colors more like projecting on once power is a power outage, the projector will appear after keystone distortion or digital zoom has been adjusted, those adjustments will return to [Auto] and there is restored. 41 Operations On Off...
User Manual
Page 22
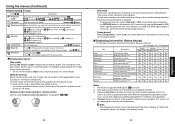
... with a dealer about the input signal, lamp use time, etc. Pressing the [RETURN] button on the control panel buttons of the projector. (The remote control operations are available.) Control panel operations are locked after the setting is done. • You cannot operate the remote... using remote control. p.16 p.17 42 [Key lock] Protect from operating errors by the remote control respectively, this menu sets the code for the projector and the remote control. [ or : Enter setting] [ : Select from 2 types. To refresh the information, dismiss the display, then display it...
... with a dealer about the input signal, lamp use time, etc. Pressing the [RETURN] button on the control panel buttons of the projector. (The remote control operations are available.) Control panel operations are locked after the setting is done. • You cannot operate the remote... using remote control. p.16 p.17 42 [Key lock] Protect from operating errors by the remote control respectively, this menu sets the code for the projector and the remote control. [ or : Enter setting] [ : Select from 2 types. To refresh the information, dismiss the display, then display it...
User Manual
Page 23
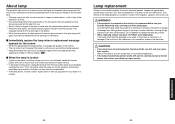
...lamp by lamp. This is characteristic of a lamp, and is not malfunction. (The lifetime of the lamp depends on condition of use your Toshiba dealership when the lamp has to broken pieces and contact your dealer for longer than the specified one . Uncovering the lamp while the...lamp that area, as they may burst shortly after first use lamp "TLPLW23" (sold separately). CAUTION • If you have been using the projector, the lamp will appear dark, and the lamp could burn out. Maintenance 44 45 Besides, working at increased internal pressure. If the lamp other than...
...lamp by lamp. This is characteristic of a lamp, and is not malfunction. (The lifetime of the lamp depends on condition of use your Toshiba dealership when the lamp has to broken pieces and contact your dealer for longer than the specified one . Uncovering the lamp while the...lamp that area, as they may burst shortly after first use lamp "TLPLW23" (sold separately). CAUTION • If you have been using the projector, the lamp will appear dark, and the lamp could burn out. Maintenance 44 45 Besides, working at increased internal pressure. If the lamp other than...
User Manual
Page 24
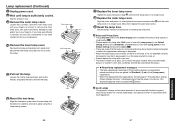
... period expires or before the replacement message is displayed. • Attach the outer lamp cover correctly so that it is not attached correctly, the projector may fail to be powered on or the lamp may fail to come on. • Always replace the lamp with [Lamp power] in the... 1 hour. 3 Remove the outer lamp cover. Be sure not to remove the lamp. Inner lamp cover 5 Pull out the lamp. Used Lamps This projector's lamps contain trace amounts of use (as shown to [Standard], and 3000 hours of environmentally harmful inorganic mercury. Tighten the screw removed in removal, you...
... period expires or before the replacement message is displayed. • Attach the outer lamp cover correctly so that it is not attached correctly, the projector may fail to be powered on or the lamp may fail to come on. • Always replace the lamp with [Lamp power] in the... 1 hour. 3 Remove the outer lamp cover. Be sure not to remove the lamp. Inner lamp cover 5 Pull out the lamp. Used Lamps This projector's lamps contain trace amounts of use (as shown to [Standard], and 3000 hours of environmentally harmful inorganic mercury. Tighten the screw removed in removal, you...
User Manual
Page 25
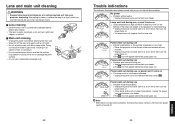
... Do not use benzene, thinner and the like as they may allow water to turn on, the lifetime of a ceiling-mounted unit from your projector dealership. Power went out during use ⇒ Problem with internal cooling fan. • Unplug the power cord, and contact your dealer. ❈...use a chemically saturated cloth. 48 Others Trouble indications The indicator illuminates and a beep sound informs you of internal abnormalities. No power ⇒ Problem with projector (Off) • Unplug the power cord, and contact your dealer. (Red lit) (Red flashing) Or (Red lit) (Red lit) Lamp...
... Do not use benzene, thinner and the like as they may allow water to turn on, the lifetime of a ceiling-mounted unit from your projector dealership. Power went out during use ⇒ Problem with internal cooling fan. • Unplug the power cord, and contact your dealer. ❈...use a chemically saturated cloth. 48 Others Trouble indications The indicator illuminates and a beep sound informs you of internal abnormalities. No power ⇒ Problem with projector (Off) • Unplug the power cord, and contact your dealer. (Red lit) (Red flashing) Or (Red lit) (Red lit) Lamp...
User Manual
Page 26
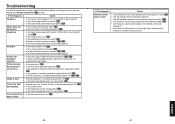
...42 • Are the remote control's batteries drained? • Are the batteries inserted into the remote control correctly? p.21 • Is the projector's screen placement angle tilted too far? p.41 • Is the lamp nearing the end of its service life? p.19 • Is the...connections set up correctly? Please see "Trouble indications" p.49 as well. Picture not displayed correctly • Is the input signal supported by the projector? No audio • Is the mute function on ? p.32 • Is the volume setting minimized? p.19 • Are there any obstructions...
...42 • Are the remote control's batteries drained? • Are the batteries inserted into the remote control correctly? p.21 • Is the projector's screen placement angle tilted too far? p.41 • Is the lamp nearing the end of its service life? p.19 • Is the...connections set up correctly? Please see "Trouble indications" p.49 as well. Picture not displayed correctly • Is the input signal supported by the projector? No audio • Is the mute function on ? p.32 • Is the volume setting minimized? p.19 • Are there any obstructions...


