
User Manual
Page 1
Serial No. located at the bottom of your projector. Model No. Before Using Preparations TDP-TW420 DATA PROJECTOR OWNER'S MANUAL Operations Network and USB memory Maintenance Others In the spaces provided below, record the Model and Serial No. Retain this information for future reference.
Serial No. located at the bottom of your projector. Model No. Before Using Preparations TDP-TW420 DATA PROJECTOR OWNER'S MANUAL Operations Network and USB memory Maintenance Others In the spaces provided below, record the Model and Serial No. Retain this information for future reference.
User Manual
Page 2
...city office or the shop where you purchased the product. 3 Before Using MODEL NAME: TDP-TW420 FCC Radio Frequency Interference Statement Note: This equipment has been tested and found to comply ...fications made to this product may cause radio interference in accordance with the instruction manual, may be required to take adequate measures. 2 Following information is only valid for ... In a domestic environment this equipment, not expressly approved by USA only Toshiba, or parties authorized by Toshiba, could void the user's authority to radio communications. USA only Lamp ...
...city office or the shop where you purchased the product. 3 Before Using MODEL NAME: TDP-TW420 FCC Radio Frequency Interference Statement Note: This equipment has been tested and found to comply ...fications made to this product may cause radio interference in accordance with the instruction manual, may be required to take adequate measures. 2 Following information is only valid for ... In a domestic environment this equipment, not expressly approved by USA only Toshiba, or parties authorized by Toshiba, could void the user's authority to radio communications. USA only Lamp ...
User Manual
Page 3
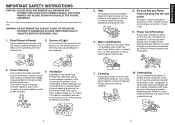
...loose outlet. 9. Power Cord Protection 6. in the cabinet are not sure of electric shock, do not use this product, read the owner's manual carefully, and follow these instructions may result in fire or electric shock. 4 5 Ventilation This product should be blocked or covered. Do... cord. Always use liquid cleaners or aerosol cleaners. Failure to protect it in a built-in fire or electric shock. Read Owner's Manual After unpacking this product near water. - Cleaning 10. Do not overload wall outlets. for example, near a swimming pool and the like. ...
...loose outlet. 9. Power Cord Protection 6. in the cabinet are not sure of electric shock, do not use this product, read the owner's manual carefully, and follow these instructions may result in fire or electric shock. 4 5 Ventilation This product should be blocked or covered. Do... cord. Always use liquid cleaners or aerosol cleaners. Failure to protect it in a built-in fire or electric shock. Read Owner's Manual After unpacking this product near water. - Cleaning 10. Do not overload wall outlets. for example, near a swimming pool and the like. ...
User Manual
Page 6
...a chemically saturated cloth. Disposal This product contains substances which could violate the direct or indirect copyrights of this Owner's Manual. • Toshiba Corporation accepts no responsibility for information being intercepted or leaked due to pages with new ones. • If the ...36 • The illustrations in serious injury. Then dispose of Apple Computer, Inc. • Windows is not related to Toshiba Corporation. • Toshiba bears no liability whatsoever for a long time, remove the batteries to humans and the environment. • The lamp contains mercury...
...a chemically saturated cloth. Disposal This product contains substances which could violate the direct or indirect copyrights of this Owner's Manual. • Toshiba Corporation accepts no responsibility for information being intercepted or leaked due to pages with new ones. • If the ...36 • The illustrations in serious injury. Then dispose of Apple Computer, Inc. • Windows is not related to Toshiba Corporation. • Toshiba bears no liability whatsoever for a long time, remove the batteries to humans and the environment. • The lamp contains mercury...
User Manual
Page 8
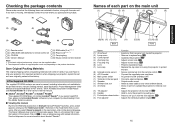
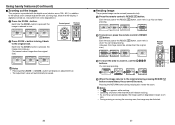
... appears asking you are included in your model", then click on a bookmark title to view that section of each Application, Project Management Utility Manual and Quick Reference in air from the remote control. p.16 (4) Zooming ring : Adjusts screen size. Click on the model name that you...Acrobat® Reader® or Adobe® Reader® The supplied CD-ROM does not contain Acrobat® Reader®. N Viewing the manual Run the CD-ROM and double-click on the rear panel : Connects external devices. to carry the projector by downloading it was originally packed...
... appears asking you are included in your model", then click on a bookmark title to view that section of each Application, Project Management Utility Manual and Quick Reference in air from the remote control. p.16 (4) Zooming ring : Adjusts screen size. Click on the model name that you...Acrobat® Reader® or Adobe® Reader® The supplied CD-ROM does not contain Acrobat® Reader®. N Viewing the manual Run the CD-ROM and double-click on the rear panel : Connects external devices. to carry the projector by downloading it was originally packed...
User Manual
Page 9
...) SCREEN SIZE button : Changes screen size. button : Enlarges image. p.20 p.63 p.69 Note • For the remainder of this manual may result in hazardous radiation exposure. 17 Preparations use of controls or adjustments or performance of procedures other than those specified herein may...of the remote control (20) or direct the laser pointer toward a person or a mirror. • Handling and adjusting other than described in this manual, buttons are referred to as right-click of a mouse. p.48 16 Name : Main Function (9) RETURN button : Goes back one screen. : ...
...) SCREEN SIZE button : Changes screen size. button : Enlarges image. p.20 p.63 p.69 Note • For the remainder of this manual may result in hazardous radiation exposure. 17 Preparations use of controls or adjustments or performance of procedures other than those specified herein may...of the remote control (20) or direct the laser pointer toward a person or a mirror. • Handling and adjusting other than described in this manual, buttons are referred to as right-click of a mouse. p.48 16 Name : Main Function (9) RETURN button : Goes back one screen. : ...
User Manual
Page 12
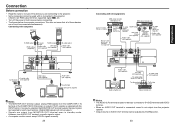
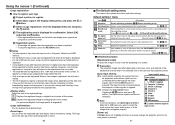
...) RGB cable (not supplied) Audio cable (not supplied) Monitor To audio input Speaker with the INPUT button. Preparations Connection Before connection • Read the owner's manual of the device you are output from MONITOR OUT terminal even in amplifier Notes • The MONITOR OUT terminal outputs analog RGB signals...
...) RGB cable (not supplied) Audio cable (not supplied) Monitor To audio input Speaker with the INPUT button. Preparations Connection Before connection • Read the owner's manual of the device you are output from MONITOR OUT terminal even in amplifier Notes • The MONITOR OUT terminal outputs analog RGB signals...
User Manual
Page 14
... 1 menu, the keystone distortion will be set via the Display setting menu p.38 and Lamp power via the Default setting 2 menu p.42 . • This owner's manual assumes that is outputting video signals. 26 Notes • When [Auto input search] is automatically set [Auto keystone] to [Off]. 6 Adjusting the screen size and...
... 1 menu, the keystone distortion will be set via the Display setting menu p.38 and Lamp power via the Default setting 2 menu p.42 . • This owner's manual assumes that is outputting video signals. 26 Notes • When [Auto input search] is automatically set [Auto keystone] to [Off]. 6 Adjusting the screen size and...

User Manual
Page 15
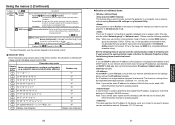
...the brightness to fluctuate slightly. • The DLP® chip is capable of correcting this keystone distortion. Adjusting Keystone distortion [Manual] 1 Press the KEYSTONE button. 2 Use the buttons for input signals other than those supported by the projector is input, the "... • The keystone correction settings are memorized after the power has been turned off the LCD display, see the computer's owner's manual. • If no signal is being input from displaying properly. These are intrinsic characteristics of RGB signals p.97 , any resolutions not...
...the brightness to fluctuate slightly. • The DLP® chip is capable of correcting this keystone distortion. Adjusting Keystone distortion [Manual] 1 Press the KEYSTONE button. 2 Use the buttons for input signals other than those supported by the projector is input, the "... • The keystone correction settings are memorized after the power has been turned off the LCD display, see the computer's owner's manual. • If no signal is being input from displaying properly. These are intrinsic characteristics of RGB signals p.97 , any resolutions not...
User Manual
Page 16
... resizing. • As zooming is processed digitally, the image quality is pressed, the image size increases. (You cannot make it back to the optical zoom (manual adjustment with zooming ring). (Note that the display, if digitally zoomed out, may be reset. Each time you press the RESIZE button, zoom ratio is...
... resizing. • As zooming is processed digitally, the image quality is pressed, the image size increases. (You cannot make it back to the optical zoom (manual adjustment with zooming ring). (Note that the display, if digitally zoomed out, may be reset. Each time you press the RESIZE button, zoom ratio is...
User Manual
Page 21
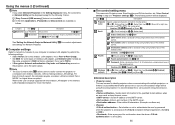
...projected, and switches input from the connected device that can be also selected.) Note • In normal operation, set for confirmation. Manual Auto Detailed description [Blackboard mode] Projects the image in colors more like projecting on the type, color, and material of the screen. : Displays...image varies depending on the data size. • If you use this function on the power when the ON/STANDBY button is pressed (Manual), or when the main power switch is only selected or not. Default setting 1 menu Item Description Keystone Screen shrinking at bottom Screen ...
...projected, and switches input from the connected device that can be also selected.) Note • In normal operation, set for confirmation. Manual Auto Detailed description [Blackboard mode] Projects the image in colors more like projecting on the type, color, and material of the screen. : Displays...image varies depending on the data size. • If you use this function on the power when the ON/STANDBY button is pressed (Manual), or when the main power switch is only selected or not. Default setting 1 menu Item Description Keystone Screen shrinking at bottom Screen ...
User Manual
Page 26
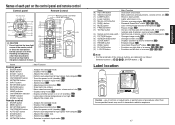
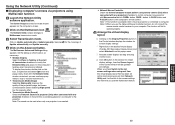
... LAN with the one character. 50 L Details on /off the password authentication for the settings below and set the IP address manually. This value specifies the IP address of four dot-separated three-digit numbers. (Example: 111.112.xxx.xxx) Note...different character string. Presentation: Accepts only the remote commands from a computer. Set the following items IP address, Subnet mask and Gateway manually. The format is projected on the remote control. Allowed Allowed: Presentation Forbidden The projector always accepts remote commands from the computer by ...
... LAN with the one character. 50 L Details on /off the password authentication for the settings below and set the IP address manually. This value specifies the IP address of four dot-separated three-digit numbers. (Example: 111.112.xxx.xxx) Note...different character string. Presentation: Accepts only the remote commands from a computer. Set the following items IP address, Subnet mask and Gateway manually. The format is projected on the remote control. Allowed Allowed: Presentation Forbidden The projector always accepts remote commands from the computer by ...

User Manual
Page 27
..., select WEP for Encryption. Note: Since the range of 10 characters in hexadecimal notation. • For use , then set the IP address manually. the uppercase characters and their factory defaults. 52 • [Wired LAN settings] If you made for Network authentication, as follows. Note 2: ...and change the key sometimes. If your network administrator for the settings below and set the following items IP address, Subnet mask and Gateway manually. The format is a string of wireless LAN terminal to a terminal. When you have set to operate properly. When you have forgotten your...
..., select WEP for Encryption. Note: Since the range of 10 characters in hexadecimal notation. • For use , then set the IP address manually. the uppercase characters and their factory defaults. 52 • [Wired LAN settings] If you made for Network authentication, as follows. Note 2: ...and change the key sometimes. If your network administrator for the settings below and set the following items IP address, Subnet mask and Gateway manually. The format is a string of wireless LAN terminal to a terminal. When you have set to operate properly. When you have forgotten your...
User Manual
Page 28
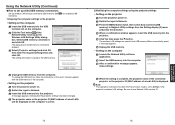
... numeric keys of the remote control. Destination address: Enter a character string using the same projector. N Computer settings Refer to instruction manuals of your computer or wireless LAN adapter to perform the following settings. • Select Ad hoc (for some wireless LAN adapters, ... network Confirm: [OK Cancel] [Enter: ] Disabled] L Detailed description • [Projector name] This can be used to the user's manual supplied with multiple projectors, or if there is a possibility that is out of wireless LAN adapter, use Network name instead) as the same as projector...
... numeric keys of the remote control. Destination address: Enter a character string using the same projector. N Computer settings Refer to instruction manuals of your computer or wireless LAN adapter to perform the following settings. • Select Ad hoc (for some wireless LAN adapters, ... network Confirm: [OK Cancel] [Enter: ] Disabled] L Detailed description • [Projector name] This can be used to the user's manual supplied with multiple projectors, or if there is a possibility that is out of wireless LAN adapter, use Network name instead) as the same as projector...
User Manual
Page 32
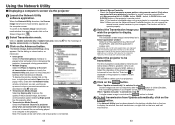
...of the projector you use the popup menu to stop or resume transmission as described in Tasktray at the start of Update automatically and Update manually. 3 Click on the list, launch it. Even with one projector) checkbox to transmit the sound being played on a computer to ..., double click on this list. (If the desired application is clicked. 7 To halt transmission from another mode, click on Update automatically or Update manually. Selecting High speed has the opposite effect. • Transmission Mode (Sound) Check the Transmit sound to a projector (Only when connected with the ...
...of the projector you use the popup menu to stop or resume transmission as described in Tasktray at the start of Update automatically and Update manually. 3 Click on the list, launch it. Even with one projector) checkbox to transmit the sound being played on a computer to ..., double click on this list. (If the desired application is clicked. 7 To halt transmission from another mode, click on Update automatically or Update manually. Selecting High speed has the opposite effect. • Transmission Mode (Sound) Check the Transmit sound to a projector (Only when connected with the ...
User Manual
Page 35
...USB memory 68 69 The Screen Image transmission mode window appears on the computer's screen. 2 Click on Update automatically or Update manually. When you check Switch to the last screen settings when using Multiscreen function 1 Launch the Network Utility software application. Using the...resume transmission. • Transmission Mode (Image) Selecting High quality improves the quality of Update automatically and Update manually. 4 Click on the desired virtual display (Toshiba DPJ Secondary Display Driver) and select Attached from the popup menu. 3 Allocate screen displays by drag and ...
...USB memory 68 69 The Screen Image transmission mode window appears on the computer's screen. 2 Click on Update automatically or Update manually. When you check Switch to the last screen settings when using Multiscreen function 1 Launch the Network Utility software application. Using the...resume transmission. • Transmission Mode (Image) Selecting High quality improves the quality of Update automatically and Update manually. 4 Click on the desired virtual display (Toshiba DPJ Secondary Display Driver) and select Attached from the popup menu. 3 Allocate screen displays by drag and ...

User Manual
Page 36
... (more than 70 cm) between projectors. CAUTION When you can also display the other units due to heat. 71 Network and USB memory When "Update manually" is selected in step 3 A single screen image is sent when the button is clicked. When "Update automatically" is selected in large size by combining each...
... (more than 70 cm) between projectors. CAUTION When you can also display the other units due to heat. 71 Network and USB memory When "Update manually" is selected in step 3 A single screen image is sent when the button is clicked. When "Update automatically" is selected in large size by combining each...
User Manual
Page 38
... the projector ID (MAC address of the Network Utility to Network. 3 Press the MENU button twice, then select Easy Connect (USB memory) in the user's manual supplied with the USB memory or the computer. • Setting on the projector 5 Turn the projector power on. 6 Switch the input to set to the...
... the projector ID (MAC address of the Network Utility to Network. 3 Press the MENU button twice, then select Easy Connect (USB memory) in the user's manual supplied with the USB memory or the computer. • Setting on the projector 5 Turn the projector power on. 6 Switch the input to set to the...
User Manual
Page 39
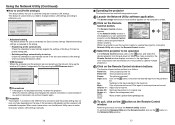
... feature is paused. Freeze: The picture is useful when you need to change wireless LAN settings according to where you make necessary wireless LAN settings manually. 76 N Operating the projector This function can operate the projector via the Remote Control window, while using the Network Utility's functions.
... feature is paused. Freeze: The picture is useful when you need to change wireless LAN settings according to where you make necessary wireless LAN settings manually. 76 N Operating the projector This function can operate the projector via the Remote Control window, while using the Network Utility's functions.
User Manual
Page 46
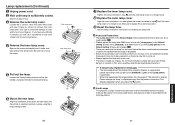
.... Align the cover, and press it aside, and take off the inner lamp cover. Please change the lamp." Wait for instructions on . See the lamp's manual for at least 1 hour. 3 Remove the outer lamp cover.
.... Align the cover, and press it aside, and take off the inner lamp cover. Please change the lamp." Wait for instructions on . See the lamp's manual for at least 1 hour. 3 Remove the outer lamp cover.


