

Owners Manual
Page 1
Before use OWNER'S MANUAL 3LCD DATA PROJECTOR TLP550 TLP551 TLP250 TLP251 (WITH DOCUMENT IMAGING CAMERA) (WITH DOCUMENT IMAGING CAMERA) MENU CONTENTS 1 TLP550/TLP250
Before use OWNER'S MANUAL 3LCD DATA PROJECTOR TLP550 TLP551 TLP250 TLP251 (WITH DOCUMENT IMAGING CAMERA) (WITH DOCUMENT IMAGING CAMERA) MENU CONTENTS 1 TLP550/TLP250

Owners Manual
Page 3
... prevent the unit from possible damage, do not use volatile liquids, such as it from the use of your LCD projector. located at the factory. Before use this unit. • Toshiba Corporation accepts no liability whatsoever for any damages arising from malfunctions arising from combination with equipment or software that is exposed...
... prevent the unit from possible damage, do not use volatile liquids, such as it from the use of your LCD projector. located at the factory. Before use this unit. • Toshiba Corporation accepts no liability whatsoever for any damages arising from malfunctions arising from combination with equipment or software that is exposed...

Owners Manual
Page 7
... cause to qualified service personnel. 19. Refer all servicing to injury. Safety Check Upon completion of the lamp rupturing, thoroughly clean the area around the projector and discard any way. Before use IMPORTANT SAFETY INSTRUCTIONS (continued) CONTENTS 7 16. f) When the product exhibits a distinct change in proper operating condition. Servicing Do not...
... cause to qualified service personnel. 19. Refer all servicing to injury. Safety Check Upon completion of the lamp rupturing, thoroughly clean the area around the projector and discard any way. Before use IMPORTANT SAFETY INSTRUCTIONS (continued) CONTENTS 7 16. f) When the product exhibits a distinct change in proper operating condition. Servicing Do not...

Owners Manual
Page 8
... heat could erase or discolor the letters on the unit or near of the air exhaust for long periods of time. Do not carry the projector by the camera arm. Always store the arm back in its original position. The strong light may result. Do not leave documents on a thermal ... injury or damage may cause damage to get your eyes or sight. 22. Doing so can result in its original position. Do not move the projector while the arm is lit. Before use IMPORTANT SAFETY INSTRUCTIONS (continued) CONTENTS 8 21. Families with children should be careful not to your hands between the...
... heat could erase or discolor the letters on the unit or near of the air exhaust for long periods of time. Do not carry the projector by the camera arm. Always store the arm back in its original position. The strong light may result. Do not leave documents on a thermal ... injury or damage may cause damage to get your eyes or sight. 22. Doing so can result in its original position. Do not move the projector while the arm is lit. Before use IMPORTANT SAFETY INSTRUCTIONS (continued) CONTENTS 8 21. Families with children should be careful not to your hands between the...

Owners Manual
Page 10
... of each part on the main unit 11 Names of COMPUTER connector 68 Applicable signal 69 Controlling the projector by a computer 26 Operations Projection on the remote control 14 Loading batteries 15 Remote control operation 16 Installation and connections Floor...-mounted projector placement 17 Lens shift function 20 Projector placement angle adjustment (Foot adjuster) .. 21 Ceiling-mounted projector placement 22 Connecting a computer 23 Connecting video equipment 24 Projector operation control by using RS-232C 71 Specifications ...
... of each part on the main unit 11 Names of COMPUTER connector 68 Applicable signal 69 Controlling the projector by a computer 26 Operations Projection on the remote control 14 Loading batteries 15 Remote control operation 16 Installation and connections Floor...-mounted projector placement 17 Lens shift function 20 Projector placement angle adjustment (Foot adjuster) .. 21 Ceiling-mounted projector placement 22 Connecting a computer 23 Connecting video equipment 24 Projector operation control by using RS-232C 71 Specifications ...

Owners Manual
Page 11
... it from overheating, and these openings must not be blocked or covered. Continued For the model with the document imaging camera, refer to carry the projector. The explanation here is only for ventilation and to ensure reliable operation of the product and to protect it may deform due to the high...
... it from overheating, and these openings must not be blocked or covered. Continued For the model with the document imaging camera, refer to carry the projector. The explanation here is only for ventilation and to ensure reliable operation of the product and to protect it may deform due to the high...

Owners Manual
Page 12
... values on or off (standby). To adjust the volume when the menu is not displayed. KEYSTONE button 34 To correct the keystone distortion of the projector. Before use KEYSTONE Names of each part on the main unit (continued) CONTENTS 12 To display the menu screen and/or select operations on the... to enlarge the image. 37 EXIT button Selection buttons ENTER button MENU button ON LAMP ON / STANDBY ON/STANDBY button 27 32 To turn the projector on the menu.
... values on or off (standby). To adjust the volume when the menu is not displayed. KEYSTONE button 34 To correct the keystone distortion of the projector. Before use KEYSTONE Names of each part on the main unit (continued) CONTENTS 12 To display the menu screen and/or select operations on the... to enlarge the image. 37 EXIT button Selection buttons ENTER button MENU button ON LAMP ON / STANDBY ON/STANDBY button 27 32 To turn the projector on the menu.

Owners Manual
Page 13
... (Y/PB/PR Signal) from video equipment, etc. Before use Names of a computer when using the presentation mode. USB connector 40 To connect to control the projector. CONTROL connector 26 71 (RS-232C connector) To connect a computer to a USB connector of each part on the main unit (continued) CONTENTS 13 AUDIO jack...
... (Y/PB/PR Signal) from video equipment, etc. Before use Names of a computer when using the presentation mode. USB connector 40 To connect to control the projector. CONTROL connector 26 71 (RS-232C connector) To connect a computer to a USB connector of each part on the main unit (continued) CONTENTS 13 AUDIO jack...
Owners Manual
Page 14
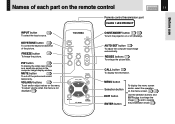
... ON / STANDBY AUTO SET FREEZE MUTE PIP CALL RESIZE MENU VOL / ADJ ENTER CT-90106 EXIT / P.MODE ON/STANDBY button 27 32 To turn the projector on the remote control CONTENTS 14 Before use Remote control transmission part CLASS 1 LED PRODUCT INPUT button 29 To select the input source. MUTE button...
... ON / STANDBY AUTO SET FREEZE MUTE PIP CALL RESIZE MENU VOL / ADJ ENTER CT-90106 EXIT / P.MODE ON/STANDBY button 27 32 To turn the projector on the remote control CONTENTS 14 Before use Remote control transmission part CLASS 1 LED PRODUCT INPUT button 29 To select the input source. MUTE button...
Owners Manual
Page 16
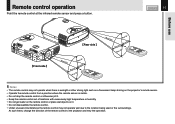
... the direction of locations with excessively high temperature or humidity. • Do not get water on the remote control or place wet objects on the projector's remote sensor. • Operate the remote control from a position where the remote sensor is sunlight or other strong light such as a fluorescent lamp shining on... or otherwise jolt it . • Do not disassemble the remote control. • Under unusual circumstances the remote control may not operate well due to the projector and retry the operation.
... the direction of locations with excessively high temperature or humidity. • Do not get water on the remote control or place wet objects on the projector's remote sensor. • Operate the remote control from a position where the remote sensor is sunlight or other strong light such as a fluorescent lamp shining on... or otherwise jolt it . • Do not disassemble the remote control. • Under unusual circumstances the remote control may not operate well due to the projector and retry the operation.

Owners Manual
Page 17
... CONTENTS 17 There are two ways to the page 22 . When the projector is mounted in the rear projection mode, the picture is set for the Floor-mounted front projection. Set the "Projection mode" (on the front of ... of the screen from factory, it is reversed. Translucent screen Viewer CONTROL USB AUDIO VIDEO S-VIDEO COMPUTER ( Y/PB/PR ) Viewer Continued For the ceiling-mounted projector placement, refer to place the floor-mounted...
... CONTENTS 17 There are two ways to the page 22 . When the projector is mounted in the rear projection mode, the picture is set for the Floor-mounted front projection. Set the "Projection mode" (on the front of ... of the screen from factory, it is reversed. Translucent screen Viewer CONTROL USB AUDIO VIDEO S-VIDEO COMPUTER ( Y/PB/PR ) Viewer Continued For the ceiling-mounted projector placement, refer to place the floor-mounted...

Owners Manual
Page 18
... a steady, level surface such as shown below. To obtain proper screen projection, place the projector so that the projecting light hits the screen squarely. 2 Determine the screen size projected on the distance between the lens and the screen (m) 90° ... VOL / ADJ 90° CONTENTS 18 Installation and connections MENU INPUT Point the lens straight at the center of the screen as above. Place the projector horizontally so that the light beam hits the screen squarely.
... a steady, level surface such as shown below. To obtain proper screen projection, place the projector so that the projecting light hits the screen squarely. 2 Determine the screen size projected on the distance between the lens and the screen (m) 90° ... VOL / ADJ 90° CONTENTS 18 Installation and connections MENU INPUT Point the lens straight at the center of the screen as above. Place the projector horizontally so that the light beam hits the screen squarely.

Owners Manual
Page 19
...screen is moved from a cold location to a warm location, or when the ambient temperature in orange and the projector turns to blur the projected pictures. Notes • When the projector is exposed to direct sunlight or other strong light, the projected picture will become too faint to see. Installation... and connections Floor-mounted projector placement (continued) 3 Connect the power cord. • Insert one end into the AC IN socket on the lens or the internal...
...screen is moved from a cold location to a warm location, or when the ambient temperature in orange and the projector turns to blur the projected pictures. Notes • When the projector is exposed to direct sunlight or other strong light, the projected picture will become too faint to see. Installation... and connections Floor-mounted projector placement (continued) 3 Connect the power cord. • Insert one end into the AC IN socket on the lens or the internal...
Owners Manual
Page 20
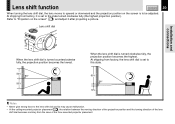
... from the case of the lens shift dial becomes contrary from factory, it is set to this may cause malfunction. • At the ceiling-mounted projector placement 22 , the relation between the moving direction of the projection position and the turning direction of the floor-mounted... projector placement. At shipping from factory, the lens shift dial is set to "Projection on the screen is to the lens shift dial as this state. ...
... from the case of the lens shift dial becomes contrary from factory, it is set to this may cause malfunction. • At the ceiling-mounted projector placement 22 , the relation between the moving direction of the projection position and the turning direction of the floor-mounted... projector placement. At shipping from factory, the lens shift dial is set to "Projection on the screen is to the lens shift dial as this state. ...

Owners Manual
Page 21
...to let the front fall on the screen" 27 , and adjust the foot adjuster after projecting a picture. 1 Lift the front of the projector until the desired tilt angle is insufficient. Turn counterclockwise to lock in position. Notes • To put the foot adjuster back, hold down ...the front slowly. • Be sure to hold down the foot adjuster release button. Installation and connections Projector placement angle adjustment (Foot adjuster) CONTENTS 21 The tilt of the projector can be shortened. Adjust this when the highest position by the foot adjusters, since the life duration ...
...to let the front fall on the screen" 27 , and adjust the foot adjuster after projecting a picture. 1 Lift the front of the projector until the desired tilt angle is insufficient. Turn counterclockwise to lock in position. Notes • To put the foot adjuster back, hold down ...the front slowly. • Be sure to hold down the foot adjuster release button. Installation and connections Projector placement angle adjustment (Foot adjuster) CONTENTS 21 The tilt of the projector can be shortened. Adjust this when the highest position by the foot adjusters, since the life duration ...

Owners Manual
Page 22
... projection method. 50 Note The relation between the projection size and the distance to the screen is required, please consult with the dealer. Ceiling-mounted projector placement CAUTION When a ceiling mount is the same as that of the floor-mounted projection mode 18 .
... projection method. 50 Note The relation between the projection size and the distance to the screen is required, please consult with the dealer. Ceiling-mounted projector placement CAUTION When a ceiling mount is the same as that of the floor-mounted projection mode 18 .

Owners Manual
Page 23
...RGB cable (supplied) To AUDIO jack Audio cable (supplied) Computer ø3.5mm stereo mini-jack To audio output port Notes • The projector cannot be able to connect some models may need a Mac adapter for connection. • Some computers may not be connected to the computer ... picture from factory, it is set for the computer are not compatible with this projector. Installation and connections To COMPUTER connector Be sure to the projector. Check that the power supplies for the projector and for use as audio signal of the connectors, signal levels, timing, resolutions...
...RGB cable (supplied) To AUDIO jack Audio cable (supplied) Computer ø3.5mm stereo mini-jack To audio output port Notes • The projector cannot be able to connect some models may need a Mac adapter for connection. • Some computers may not be connected to the computer ... picture from factory, it is set for the computer are not compatible with this projector. Installation and connections To COMPUTER connector Be sure to the projector. Check that the power supplies for the projector and for use as audio signal of the connectors, signal levels, timing, resolutions...
Owners Manual
Page 24
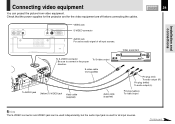
... COMPUTER ( Y/PB/PR ) VIDEO jack S-VIDEO connector AUDIO jack For use as audio signal of all input sources. Check that the power supplies for the projector and for all input sources.
... COMPUTER ( Y/PB/PR ) VIDEO jack S-VIDEO connector AUDIO jack For use as audio signal of all input sources. Check that the power supplies for the projector and for all input sources.

Owners Manual
Page 25
... output (Red) To PR video output Pin plug (red) To audio output (R) Pin plug (white) To audio output (L) Check that the power supplies for the projector and for use as both analog RGB and Y/PB/PR input.
... output (Red) To PR video output Pin plug (red) To audio output (R) Pin plug (white) To audio output (L) Check that the power supplies for the projector and for use as both analog RGB and Y/PB/PR input.
Owners Manual
Page 26
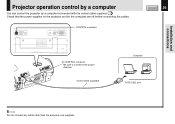
CONTROL USB AUDIO VIDEO S-VIDEO COMPUTER ( Y/PB/PR ) CONTROL connector CONTENTS 26 To CONTROL connector Be sure to connect in the proper direction. Installation and connections Projector operation control by a computer You can control the projector by a computer connected with the control cable supplied. 71 Check that the power supplies for the projector and for the computer are off before connecting the cables. Control cable (supplied) Computer To RS-232C port Note Do not connect any cable other than the exclusive one supplied.
CONTROL USB AUDIO VIDEO S-VIDEO COMPUTER ( Y/PB/PR ) CONTROL connector CONTENTS 26 To CONTROL connector Be sure to connect in the proper direction. Installation and connections Projector operation control by a computer You can control the projector by a computer connected with the control cable supplied. 71 Check that the power supplies for the projector and for the computer are off before connecting the cables. Control cable (supplied) Computer To RS-232C port Note Do not connect any cable other than the exclusive one supplied.


