

Owners Manual
Page 4
... FOR FUTURE REFERENCE. 1. The safeguards incorporated in the cabinet are not sure of the type of Light Do not look into the lens while the lamp is provided or the manufacturer's instructions have been adhered to the operating instructions. 4. For products intended to operate from the...
... FOR FUTURE REFERENCE. 1. The safeguards incorporated in the cabinet are not sure of the type of Light Do not look into the lens while the lamp is provided or the manufacturer's instructions have been adhered to the operating instructions. 4. For products intended to operate from the...

Owners Manual
Page 7
... the operating instructions. Refer all servicing to rain or water. Continued This product incorporates glass components, including a lens and a lamp. Unauthorized substitutions may result in that area. 18. f) When the product exhibits a distinct change in proper operating condition. Safety Check...the area around the projector and discard any edible items placed in fire, electric shock, or other hazards. (Replacement of the lamp only should break, please handle with care to this product yourself as the original part. Before use IMPORTANT SAFETY INSTRUCTIONS (continued)...
... the operating instructions. Refer all servicing to rain or water. Continued This product incorporates glass components, including a lens and a lamp. Unauthorized substitutions may result in that area. 18. f) When the product exhibits a distinct change in proper operating condition. Safety Check...the area around the projector and discard any edible items placed in fire, electric shock, or other hazards. (Replacement of the lamp only should break, please handle with care to this product yourself as the original part. Before use IMPORTANT SAFETY INSTRUCTIONS (continued)...

Owners Manual
Page 10
... camera .. 55 Locking the white balance 58 Correcting illuminated defects 59 Maintenance Trouble indications 60 Air filter cleaning 61 Lens and main unit cleaning 63 Lamp replacement 64 Others Before calling service personal 66 Pin assignment of each part on the screen 27 Turning the power off 32 Adjusting the picture...
... camera .. 55 Locking the white balance 58 Correcting illuminated defects 59 Maintenance Trouble indications 60 Air filter cleaning 61 Lens and main unit cleaning 63 Lamp replacement 64 Others Before calling service personal 66 Pin assignment of each part on the screen 27 Turning the power off 32 Adjusting the picture...

Owners Manual
Page 12
... set and/or adjust values on or off (standby). KEYSTONE button 34 To correct the keystone distortion of the projector. ON indicator 27 32 60 LAMP indicator 27 32 60 TEMP indicator 60 FAN indicator 27 32 60 To indicate the status of the picture. INPUT button 29 To select the... screen. 42 43 Use the selection buttons and the EXIT button to enlarge the image. 37 EXIT button Selection buttons ENTER button MENU button ON LAMP ON / STANDBY ON/STANDBY button 27 32 To turn the projector on the menu. To adjust the volume when the menu is not displayed.
... set and/or adjust values on or off (standby). KEYSTONE button 34 To correct the keystone distortion of the projector. ON indicator 27 32 60 LAMP indicator 27 32 60 TEMP indicator 60 FAN indicator 27 32 60 To indicate the status of the picture. INPUT button 29 To select the... screen. 42 43 Use the selection buttons and the EXIT button to enlarge the image. 37 EXIT button Selection buttons ENTER button MENU button ON LAMP ON / STANDBY ON/STANDBY button 27 32 To turn the projector on the menu. To adjust the volume when the menu is not displayed.
Owners Manual
Page 16
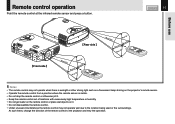
... on the projector's remote sensor. • Operate the remote control from a position where the remote sensor is sunlight or other strong light such as a fluorescent lamp shining on it . • Keep the remote control out of the remote control to the location being used or the surroundings. CONTENTS 16 Before use...
... on the projector's remote sensor. • Operate the remote control from a position where the remote sensor is sunlight or other strong light such as a fluorescent lamp shining on it . • Keep the remote control out of the remote control to the location being used or the surroundings. CONTENTS 16 Before use...

Owners Manual
Page 18
... and the screen (m) 90° Limit: 0.70m < a < 3.63m a • The values are approximations. Top view Side view Screen Screen 90° KEYSTONE ON / STANDBY ON LAMP TEMP FAN ENTER EXIT AUTO SET VOL / ADJ 90° CONTENTS 18 Installation and connections MENU INPUT Point the lens straight at the center of...
... and the screen (m) 90° Limit: 0.70m < a < 3.63m a • The values are approximations. Top view Side view Screen Screen 90° KEYSTONE ON / STANDBY ON LAMP TEMP FAN ENTER EXIT AUTO SET VOL / ADJ 90° CONTENTS 18 Installation and connections MENU INPUT Point the lens straight at the center of...

Owners Manual
Page 19
... three indicators are not installed properly, the projected picture may condense on the lens or the internal optical section to blur the projected pictures. ON LAMP ON / STANDBY TEMP FAN Light (Orange) CONTENTS 19 Power cord (Supplied) 4 Take off the lens cover. The three indicators, TEMP...
... three indicators are not installed properly, the projected picture may condense on the lens or the internal optical section to blur the projected pictures. ON LAMP ON / STANDBY TEMP FAN Light (Orange) CONTENTS 19 Power cord (Supplied) 4 Take off the lens cover. The three indicators, TEMP...

Owners Manual
Page 21
... to lock in position. The foot adjuster will extend. Adjust this when the highest position by the foot adjusters, since the life duration of the lamp may be adjusted using the foot adjuster. Installation and connections Projector placement angle adjustment (Foot adjuster) CONTENTS 21 The tilt of the projector can be...
... to lock in position. The foot adjuster will extend. Adjust this when the highest position by the foot adjusters, since the life duration of the lamp may be adjusted using the foot adjuster. Installation and connections Projector placement angle adjustment (Foot adjuster) CONTENTS 21 The tilt of the projector can be...

Owners Manual
Page 27
...procedures 2 and 3 on the screen CONTENTS 27 CAUTION - You can also set the startup screen not to be displayed on and the ON, LAMP and FAN indicators light in green. The projector turns on the menu screen. 50 • When a projector is displayed after the startup screen ...disappears. TEMP FAN (Green) MENU VOL / ADJ ENTER CT-90106 EXIT / P.MODE Operations KEYSTONE Control panel (Main unit side) 1 ON LAMP ON / STANDBY TEMP FAN MENU ENTER EXIT 1 Indicators AUTO SET INPUT VOL / ADJ Notes • The startup screen disappears when you push the EXIT...
...procedures 2 and 3 on the screen CONTENTS 27 CAUTION - You can also set the startup screen not to be displayed on and the ON, LAMP and FAN indicators light in green. The projector turns on the menu screen. 50 • When a projector is displayed after the startup screen ...disappears. TEMP FAN (Green) MENU VOL / ADJ ENTER CT-90106 EXIT / P.MODE Operations KEYSTONE Control panel (Main unit side) 1 ON LAMP ON / STANDBY TEMP FAN MENU ENTER EXIT 1 Indicators AUTO SET INPUT VOL / ADJ Notes • The startup screen disappears when you push the EXIT...

Owners Manual
Page 28
.... Press EXIT to return to step 2 if you want to re-select a ENTER language. 2,3 ENTER CT-90106 EXIT / P.MODE Control panel (Main unit side) ON LAMP ON / STANDBY TEMP FAN MENU ENTER VOL / ADJ EXIT AUTO SET 2,3 2 INPUT Notes • The language selection menu will be displayed when the power is...
.... Press EXIT to return to step 2 if you want to re-select a ENTER language. 2,3 ENTER CT-90106 EXIT / P.MODE Control panel (Main unit side) ON LAMP ON / STANDBY TEMP FAN MENU ENTER VOL / ADJ EXIT AUTO SET 2,3 2 INPUT Notes • The language selection menu will be displayed when the power is...

Owners Manual
Page 29
... menu screen, all the input sources are two kinds of input source settings on the screen. INPUT Operations KEYSTONE Control panel (Main unit side) ON LAMP ON / STANDBY TEMP FAN MENU ENTER VOL / ADJ EXIT AUTO SET INPUT 5-a,5-b 5-b Select the input source to project.
... menu screen, all the input sources are two kinds of input source settings on the screen. INPUT Operations KEYSTONE Control panel (Main unit side) ON LAMP ON / STANDBY TEMP FAN MENU ENTER VOL / ADJ EXIT AUTO SET INPUT 5-a,5-b 5-b Select the input source to project.

Owners Manual
Page 31
...this replacement be black spots (pixels that do not light) or bright spots (pixels that these are not malfunctions. • When trying to lamp characteristics, flickers may also occur. Projection on the panel. Operations KEYSTONE INPUT KEYSTONE ON / STANDBY AUTO SET FREEZE MUTE PIP CALL RESIZE MENU... VOL / ADJ 8 ENTER CT-90106 EXIT / P.MODE Control panel (Main unit side) ON LAMP ON / STANDBY TEMP FAN MENU ENTER VOL / ADJ EXIT AUTO SET 8 Notes • To change the projecting angle, adjust the foot adjuster. 21...
...this replacement be black spots (pixels that do not light) or bright spots (pixels that these are not malfunctions. • When trying to lamp characteristics, flickers may also occur. Projection on the panel. Operations KEYSTONE INPUT KEYSTONE ON / STANDBY AUTO SET FREEZE MUTE PIP CALL RESIZE MENU... VOL / ADJ 8 ENTER CT-90106 EXIT / P.MODE Control panel (Main unit side) ON LAMP ON / STANDBY TEMP FAN MENU ENTER VOL / ADJ EXIT AUTO SET 8 Notes • To change the projecting angle, adjust the foot adjuster. 21...

Owners Manual
Page 32
...AUTO SET FREEZE MUTE PIP CALL RESIZE 1,2 MENU VOL / ADJ ENTER CT-90106 EXIT / P.MODE 1,2 INPUT Control panel (Main unit side) ON LAMP ON / STANDBY TEMP FAN 2 Indicators MENU ENTER VOL / ADJ EXIT AUTO SET 2 ON/STANDBY ON/STANDBY Press ON/STANDBY again. Turning the ...power off CONTENTS 32 Remote control 1 ON/STANDBY Press ON/STANDBY after a while. C The standby mode is being cooled will shorten the lamp's duration life. Cooling starts. B The cooling fan continues to expel the heat remaining inside. Notes • The projector consumes about 15W of...
...AUTO SET FREEZE MUTE PIP CALL RESIZE 1,2 MENU VOL / ADJ ENTER CT-90106 EXIT / P.MODE 1,2 INPUT Control panel (Main unit side) ON LAMP ON / STANDBY TEMP FAN 2 Indicators MENU ENTER VOL / ADJ EXIT AUTO SET 2 ON/STANDBY ON/STANDBY Press ON/STANDBY again. Turning the ...power off CONTENTS 32 Remote control 1 ON/STANDBY Press ON/STANDBY after a while. C The standby mode is being cooled will shorten the lamp's duration life. Cooling starts. B The cooling fan continues to expel the heat remaining inside. Notes • The projector consumes about 15W of...
Owners Manual
Page 33
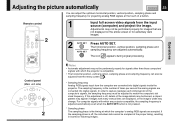
... frequency must be adjusted to capture (sample) each individual dot of a button. Operations KEYSTONE ENTER CT-90106 EXIT / P.MODE Control panel (Main unit side) ON LAMP ON / STANDBY TEMP FAN MENU ENTER VOL / ADJ EXIT AUTO SET 2 Notes • Automatic adjustment may not be adjusted from the menu screen 46 . * Sampling...
... frequency must be adjusted to capture (sample) each individual dot of a button. Operations KEYSTONE ENTER CT-90106 EXIT / P.MODE Control panel (Main unit side) ON LAMP ON / STANDBY TEMP FAN MENU ENTER VOL / ADJ EXIT AUTO SET 2 Notes • Automatic adjustment may not be adjusted from the menu screen 46 . * Sampling...

Owners Manual
Page 34
... 1 INPUT KEYSTONE ON / STANDBY AUTO SET FREEZE MUTE PIP CALL RESIZE MENU VOL / ADJ ENTER CT-90106 EXIT / P.MODE 2 3 Control panel (Main unit side) ON LAMP ON / STANDBY TEMP FAN MENU ENTER VOL / ADJ EXIT AUTO SET 2 31 1 KEYSTONE Press KEYSTONE. INPUT EXIT Notes • Turn the lens shift dial clockwise...
... 1 INPUT KEYSTONE ON / STANDBY AUTO SET FREEZE MUTE PIP CALL RESIZE MENU VOL / ADJ ENTER CT-90106 EXIT / P.MODE 2 3 Control panel (Main unit side) ON LAMP ON / STANDBY TEMP FAN MENU ENTER VOL / ADJ EXIT AUTO SET 2 31 1 KEYSTONE Press KEYSTONE. INPUT EXIT Notes • Turn the lens shift dial clockwise...

Owners Manual
Page 39
... Information Information on . • The information display turns off if any other operation is performed. • The "Lamp time" shows an approximate time for lamp replacement. (It should not be used for servicing, etc. the elapsed usage time of the firmware Shutter - the vertical... frequency of the video signal (at RGB input) Video mode - the version of the lamp Version - the vertical resolution of the Y/PB/PR signal (at document imaging camera input) Notes • The information displayed is displayed...
... Information Information on . • The information display turns off if any other operation is performed. • The "Lamp time" shows an approximate time for lamp replacement. (It should not be used for servicing, etc. the elapsed usage time of the firmware Shutter - the vertical... frequency of the video signal (at RGB input) Video mode - the version of the lamp Version - the vertical resolution of the Y/PB/PR signal (at document imaging camera input) Notes • The information displayed is displayed...
Owners Manual
Page 41
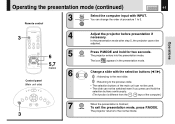
... KEYSTONE ON / STANDBY AUTO SET FREEZE MUTE PIP CALL RESIZE MENU VOL / ADJ ENTER CT-90106 EXIT / P.MODE 6 5,7 P.MODE Control panel (Main unit side) ON LAMP ON / STANDBY TEMP FAN MENU ENTER VOL / ADJ EXIT AUTO SET 3 4 Adjust the projector before presentation if necessary.
... KEYSTONE ON / STANDBY AUTO SET FREEZE MUTE PIP CALL RESIZE MENU VOL / ADJ ENTER CT-90106 EXIT / P.MODE 6 5,7 P.MODE Control panel (Main unit side) ON LAMP ON / STANDBY TEMP FAN MENU ENTER VOL / ADJ EXIT AUTO SET 3 4 Adjust the projector before presentation if necessary.

Owners Manual
Page 42
... select other items, press EXIT repeatedly until GUIDE MENU disappears. [Reset] [Default setting] [Display] [Audio] End Control panel (Main unit side) ENTER MENU Selection ON LAMP ON / STANDBY TEMP FAN EXIT MENU ENTER VOL / ADJ EXIT AUTO SET INPUT Remote control MENU MENU VOL / ADJ ENTER ENTER CT-90106 EXIT / P.MODE...
... select other items, press EXIT repeatedly until GUIDE MENU disappears. [Reset] [Default setting] [Display] [Audio] End Control panel (Main unit side) ENTER MENU Selection ON LAMP ON / STANDBY TEMP FAN EXIT MENU ENTER VOL / ADJ EXIT AUTO SET INPUT Remote control MENU MENU VOL / ADJ ENTER ENTER CT-90106 EXIT / P.MODE...
Owners Manual
Page 43
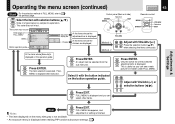
... to 42 the previous page. At the items whose [Execute] is displayed on the operation guide; Control panel (Main unit side) ENTER MENU Selection ON LAMP ON / STANDBY TEMP FAN EXIT MENU ENTER VOL / ADJ EXIT AUTO SET INPUT Remote control MENU MENU VOL / ADJ ENTER ENTER CT-90106 EXIT / P.MODE...
... to 42 the previous page. At the items whose [Execute] is displayed on the operation guide; Control panel (Main unit side) ENTER MENU Selection ON LAMP ON / STANDBY TEMP FAN EXIT MENU ENTER VOL / ADJ EXIT AUTO SET INPUT Remote control MENU MENU VOL / ADJ ENTER ENTER CT-90106 EXIT / P.MODE...
Owners Manual
Page 56
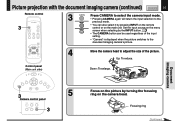
... CAMERA button can also select it by turning the focusing ring on the main unit. Up: To reduce. INPUT Control panel (Main unit side) ON LAMP ON / STANDBY TEMP FAN MENU ENTER VOL / ADJ EXIT AUTO SET 3 Camera control panel LOCK W.BALANCE ARM LIGHT CAMERA GAIN CAMERA 3 Down: To enlarge. 123...
... CAMERA button can also select it by turning the focusing ring on the main unit. Up: To reduce. INPUT Control panel (Main unit side) ON LAMP ON / STANDBY TEMP FAN MENU ENTER VOL / ADJ EXIT AUTO SET 3 Camera control panel LOCK W.BALANCE ARM LIGHT CAMERA GAIN CAMERA 3 Down: To enlarge. 123...

