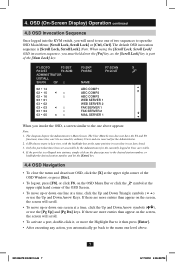
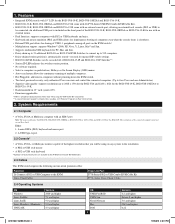
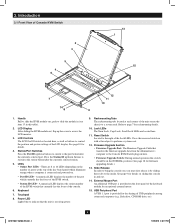
Quick Start Guide for Select Console & Rackmount KVMs 932901
Page 1
...-Coorn1s6o-PleoKrtV) M Switch cprherWaogRndiasecutregecrtriat-soontnwwrtlayiwinntweiao.ttonrFidp:RapEyliEtfeoT.rcroaipmp/Lwiaterranty or Rackmount KVM Switch (16-Port) Models: B020-U08-19-K, B020-U08-19KTAA, B020-U16-19-K or B022-U16 This Quick Start Guide will take you through basic installation, configuration and local operation. All rights reserved. Copyright © 2010 Tripp Lite. All trademarks are the property of its connected devices.
Quick Start Guide for Select Console & Rackmount KVMs 932901
Page 2
Either: 1. System Requirements 1.1 Computer • A VGA, SVGA or Multisync computer with an HD15 port Note: The max resolution for the B020-U08-19-K, B020-U08-19KTAA or B020-U16-19-K is 1280 x 1024, and 2048 x 1536 for the B022-U16. A USB Type-A port. 1.2 Console* • A VGA, SVGA, ... requires the following custom-wired premium cables: Function To Connect a PS/2 or USB Computer to the KVM Daisy-Chain Cables Tripp Lite Part P778-Series PS/2 or USB Combo KVM Cable Kit P772- A mini DIN 6 (PS/2) keyboard and mouse port. 2. Series Daisy-Chain Cables 1.4 Operating Systems OS ...
Quick Start Guide for Select Console & Rackmount KVMs 932901
Page 3
The rackmounting kit that the unit be installed by inserting user-supplied screws. 1 2 2-Post Rackmounting The NetDirector Console KVM Switch can also be opened with the drawer in a 2-post rack installation using the optional 2-Post Rackmount Kit (model: B019-000)....console in the sections that follow: Note: 1. Installation 2.1 Rackmounting Instructions for Console KVMs The NetDirector Console KVM Switch is included with the unit does not include screws or cage nuts. Contact your KVM for the power cord and cable kits. The various mounting options are explained in place...
Quick Start Guide for Select Console & Rackmount KVMs 932901
Page 4
...the unit, and then connect a monitor, mouse and keyboard to 31 B022-016 or B022-U16 KVM Switches can be daisy-chained down from the unit's integrated console in the Cables section, page 2) ... all the devices to be connected has been turned OFF. 2. The distance between any two KVM switches in the entire chain. 4 201005078 93-2901.indd 4 5/17/2010 4:35:48 PM Turn on the... cable kit. 1 2 The distance between the KVM switch and each CPU port to the computers. 2.4 Multiple Station (Daisy-Chained) Installation To control even more ...
Quick Start Guide for Select Console & Rackmount KVMs 932901
Page 5
Repeat the above steps for each connected computer must upgrade the B022-U16 firmware to be cascaded off of a B020-008-17-IP or B020-016-17-IP Console KVM Switch to expand the number of the owner's manual for the first station. b. Plug in the power adapters for any available port on its... the second station is 02, the ID for the Station ID to connect the keyboard, video and mouse ports of the B020-008-17-IP or B020-016-17-IP Console KVM Switch. 5 201005078 93-2901.indd 5 5/17/2010 4:35:48 PM In each case, wait for the third station is 03, etc...
Quick Start Guide for Select Console & Rackmount KVMs 932901
Page 6
...key twice to access all the way in . 4. If you are an Administrator accessing the KVM switch for the two-step procedure is the first screen you must release it is located under... the top cover. Once logged into the in position. 3. When logging onto the KVM switch, the OSD Main Menu is to keep the console from accidentally sliding out, the console... entering your fingers when sliding the module in . Basic Operation 3.1 Opening the NetDirector Console KVM The console is highly recommended that allows for control and administration of pinching your username and password....
Quick Start Guide for Select Console & Rackmount KVMs 932901
Page 7
The default OSD invocation sequence is part of the [Num Lock] key. If the port list is collapsed into the KVM switch, you must hold down the [Fn] key, as the [Scroll Lock] key is [Scroll Lock, Scroll Lock]. Note: When using the [Scroll Lock, Scroll ...
Owner's Manual for B020-U/B022-U Series KVM Switches 932900
Page 1
...are the property of its connected devices. or 16-Port) or Rackmount KVM Switch (16-Port) Models: B020-U08-19-K, B020-U08-19KTAA, B020-U16-19-K or B022-U16 This package should consist of: • (1) B020-U08-19-K, B020-U08-19KTAA, B020-U16-19-K or B022-U16 KVM Switch • (1) AC Power Adapter (Input: 100-240V, 50/60... to DB9 Firmware Upgrade Cable • (1) Rackmount Hardware Kit • (1) C13 to 5-15P Power Cord* • (1) Set of Rubber Feet** *B020-U08-19-K, B020-U08-19KTAA or B020-U16-19-K only **B022-U16 only Check to its contents. Copyright © 2010 Tripp Lite.
Owner's Manual for B020-U/B022-U Series KVM Switches 932900
Page 2
...You Begin 18 3.4 Rear View for B022-016 6 8.2 Starting the Upgrade 19 4. Firmware Upgrade Utility 18 3.3 Front View of Console KVM Switch 5 8. Hotkeys 11 6.1 Invoking the Hotkey Mode 11 6.2 Port ID Numbering 11 6.3 Selecting the Active Port 11 6.4 Auto ... 3 7.1 OSD Overview 14 2.1 Computer 3 7.2 Logging-In for B022-U16 8 9. Basic Operation 9 11. Warranty 22 5.1 Opening the NetDirector Console KVM 9 12. Appendix B 22 4.8 Hot Plugging 9 10.1 FCC Radio/TV Interference Notice 22 5. OSD (On-Screen Display) Operation 14 2. Warranty Registration...
Owner's Manual for B020-U/B022-U Series KVM Switches 932900
Page 3
... USB) to the KVM Daisy-Chain Cables Tripp Lite Part P778-Series PS/2 or USB Combo KVM Cable Kit P772- 1. Features • Integrated KVM console with 19" LCD for the B020-U08-19-K, B020-U08-19KTAA and B020-U16-19-K. • B020-U08-19-K, B020-U08-19KTAA and B020-U16-19-K come with (8) P778-Series USB/PS2 Combo KVM Cable Kits. • B020-U08-19-K, B020-U08-19KTAA and B020-U16-19-K come with...
Owner's Manual for B020-U/B022-U Series KVM Switches 932900
Page 4
...Port ID LED - Keyboard 7. Power LED Lights blue to indicate that transfers the firmware upgrade data from the Administrator's computer to the Console KVM Switch plugs in here. • Firmware Upgrade Switch: During normal operation this recessed switch in the NORMAL position. (See page 18 for ...Port LEDs - Rackmounting Tabs The rackmounting tabs located at the top of USB peripherals among connected computers (e.g. Refer to the right of the KVM switch. • Station ID LED - Reset Switch Located to page 7 for the sharing of the key board panel which currently has ...
Owner's Manual for B020-U/B022-U Series KVM Switches 932900
Page 5
... a standard rocker switch that link to the computers plug in here. 3. The included USB/PS2 Combo Console Cable Kit connects to the KVM switch here. 7. Lights turn on to indicate that corresponds to operate. 3. Firmware Upgrade Port The cable used to perform a firmware upgrade connects to the...4:30:12 PM Either USB or PS/2 keyboards/mice can be in the chain (see page 20 for details). 4. On a daisychained installation, the KVM auto-senses its place in the NORMAL position. This switch is semirecessed and must be pushed with a thin object, such as the end of a ...
Owner's Manual for B020-U/B022-U Series KVM Switches 932900
Page 6
...Refer all servicing to protect against circuit overloading, you are not sure of the type of power available, consult your KVM switch and connected computers into a Tripp Lite SmartPro® or SmartOnline™ UPS System. • Position system cables and power cables carefully, making sure that ...plug into or through cabinet slots. If the device falls, serious damage will block its ventilation openings. CPU Port Section Plug the KVM cable for adequate ventilation. Daisy-Chain Port • Daisy-Chain In Port - Console Port The included USB/PS2 Combo Console ...
Owner's Manual for B020-U/B022-U Series KVM Switches 932900
Page 7
... manual for quick installation. the slide rails can reasonably be installed by inserting user-supplied screws. 1 2 2-Post Rackmounting The NetDirector Console KVM Switch can also be opened with air, oxygen or nitrous oxide. Do not use this hardware. 3. The mounting hardware allows for the ...• Only adjust those controls that the full weight of a flammable anesthetic mixture with the drawer in a 1U rack system. Contact your KVM for detailed mounting instructions. 7 201011080 • 932900-EN.indd 7 11/29/2010 4:30:12 PM Heavy-duty 14-gauge steel provides stability...
Owner's Manual for B020-U/B022-U Series KVM Switches 932900
Page 8
...to the computers. 5 3 1 2 4 4.6 Multiple Station (Daisy-Chained) Installation To control even more computers, up a daisy-chained installation: 1. Use a KVM cable kit (described in the next station. 8 201011080 • 932900-EN.indd 8 11/29/2010 4:30:13 PM In each case, wait for each ...cable (described in the entire chain. 3. 4. Installation 4.3 Rackmounting for the first station. Ensure that power to the Chain In port of KVM switches in the Cables section, page 3) to connect the Chain Out port of the parent unit to all devices are properly grounded. The...
Owner's Manual for B020-U/B022-U Series KVM Switches 932900
Page 9
... down for 10 seconds, then restarted using the Power Up Sequence described on the unit's side rails toward the center of a B020-008-17-IP or B020-016-17-IP Console KVM Switch to be cascade compatible. (See Firmware Upgrade on page 18 for example), as long as you use the same mouse... back in again (to reset the mouse, for details.) For cascaded installation details, see the owner's manual of the B020-008-17-IP or B020-016-17-IP Console KVM Switch. 4.8 Hot Plugging All KVM switches support hot plugging-components can pull the console module out, you plug in position. Before you can all...
Owner's Manual for B020-U/B022-U Series KVM Switches 932900
Page 10
... 1 port USB 1.1 hub; Basic Operation 5.3 LCD OSD (On-Screen Display) Configuration The LCD OSD allows you switch to will continue to each KVM switch in the installation have the Keyboard Power ON function. After navigating to a setting choice, use the Menu button to bring up the adjustment screen...up and configure the LCD display: • To open up or down all of the screen image. Turn OFF the KVM switch (Console KVM only) and unplug the KVM switch from its power source. Once all computers connected to navigate and make adjustments. Language Selects the language that are ...
Owner's Manual for B020-U/B022-U Series KVM Switches 932900
Page 11
...(See page 15 for Hotkey Mode to invoke Hotkey Mode, both of which identifies the port number that identifies the switch's position in the KVM's OSD; Port Control Hotkeys • Selecting the active port • Auto Scan Mode port switching • Skip Mode port switching Other ...OSD default values 6.1 Invoking the Hotkey Mode All hotkey operations begin by doing the following: 1) Invoke Hotkey Mode. 2) Enter the Port ID. Hotkeys NetDirector KVM Switches can directly access a port by invoking Hotkey Mode. 6. Eg., a computer attached to Port 7 of Station 15 has a Port ID of two...
Owner's Manual for B020-U/B022-U Series KVM Switches 932900
Page 12
... as unplugging/replugging the keyboard and mouse on a particular computer either by pressing P or with the [Num Lock] + [-] combination. 2) Key in Auto Scan Mode, the KVM switch switches through each accessible port at any time (see pages 14-18 for OSD details). Invoke Hotkey Mode. 2. After you left off . Hotkeys 6.4 Auto... fail to any key or left click of the arrow keys on the installation. After pressing the [F5] key, you exit Hotkey Mode and the KVM switch performs a keyboard/mouse reset for one second;
Owner's Manual for B020-U/B022-U Series KVM Switches 932900
Page 13
...] [A], [Enter] or [Q], [Enter] [B] [Esc] or [Spacebar] [F1] [F2] [F3] [F5] [H] [R], [Enter] [T Function Switches the focus of the KVM switch. 6.12 Port OS Control In addition to the first accessible port on the monitor. Invoke Hotkey Mode. 2. Sets the Operating System to Sun. Press...port. Invoke Hotkey Mode. 2. Toggles between the [Num Lock, Minus] and [Ctrl, F12] Hotkey Mode invocation sequences. 6. Restores the KVM switches default values (Administrator-only). Invokes Skip Mode and skips to Windows. Hit the [Enter] key. Toggles between the [Scroll Lock, ...