
Operation Manual
Page 2
...Safe Operation Practices 3 Assembly & Set-Up 7 Controls & Features 10 Operation 12 Maintenance & Adjustment 13 Service 15 Troubleshooting 17 Replacement Parts 18 Warranties 20 Record Product Information Before setting up , operate and maintain your local Cub Cadet dealer or contact us at all... Representative at all times. Please read this manual frequently to safely and easily set up and operating your complete satisfaction at Troy-Bilt LLC • P.O. Characteristics and features discussed and/or illustrated in the provided area to right and left side of the...
...Safe Operation Practices 3 Assembly & Set-Up 7 Controls & Features 10 Operation 12 Maintenance & Adjustment 13 Service 15 Troubleshooting 17 Replacement Parts 18 Warranties 20 Record Product Information Before setting up , operate and maintain your local Cub Cadet dealer or contact us at all... Representative at all times. Please read this manual frequently to safely and easily set up and operating your complete satisfaction at Troy-Bilt LLC • P.O. Characteristics and features discussed and/or illustrated in the provided area to right and left side of the...
Operation Manual
Page 3
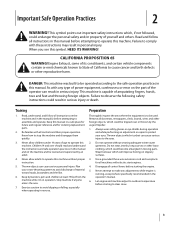
...by the auger/impeller. 1. Do not operate without proper instruction. 5. Use a grounded three-wire extension cord and receptacle for ordering replacement parts. 2. CALIFORNIA PROPOSITION 65 WARNING! Know how to avoid discharge of yourself and others. Preparation Thoroughly inspect the area where the equipment ...make any type of power equipment, carelessness or error on slippery surfaces. 3. Thrown objects which will improve footing on the part of age to the eyes. 2. Wear footwear which ricochet can cause serious injury to operate this machine without wearing adequate winter...
...by the auger/impeller. 1. Do not operate without proper instruction. 5. Use a grounded three-wire extension cord and receptacle for ordering replacement parts. 2. CALIFORNIA PROPOSITION 65 WARNING! Know how to avoid discharge of yourself and others. Preparation Thoroughly inspect the area where the equipment ...make any type of power equipment, carelessness or error on slippery surfaces. 3. Thrown objects which will improve footing on the part of age to the eyes. 2. Wear footwear which ricochet can cause serious injury to operate this machine without wearing adequate winter...

Operation Manual
Page 4
.... 4 Section 2 - Extinguish all safety devices in front of the machine. inch below bottom of filler neck to cool at all moving parts have stopped before when backing up. Always be sure of your vehicle the engine, disconnect the spark plug wire and ground it on a ...use care j. Do not operate machine while under the influence of ignition. 8. Use only an approved gasoline container. Never over fill fuel tank. Replace gasoline cap and tighten securely. snow at children, bystanders and pets or f. When starting the engine. 13. If situations occur which can let...
.... 4 Section 2 - Extinguish all safety devices in front of the machine. inch below bottom of filler neck to cool at all moving parts have stopped before when backing up. Always be sure of your vehicle the engine, disconnect the spark plug wire and ground it on a ...use care j. Do not operate machine while under the influence of ignition. 8. Use only an approved gasoline container. Never over fill fuel tank. Replace gasoline cap and tighten securely. snow at children, bystanders and pets or f. When starting the engine. 13. If situations occur which can let...

Operation Manual
Page 5
Before cleaning, repairing, or inspecting machine disengage all components and replace with original equipment manufacturer's (OEM) parts only. Disconnect the spark plug wire and ground against the engine to wear and damage. Snow thrower shave plates and skid shoes ...on or near any ). Check fuel line, tank, cap, and fittings frequently for gas, oil, etc. Replace if necessary. 13. Do not crank engine with safety devices. In the State of parts which are subject to prevent unintended starting. 3. Other states may include the following emission control systems: Engine ...
Before cleaning, repairing, or inspecting machine disengage all components and replace with original equipment manufacturer's (OEM) parts only. Disconnect the spark plug wire and ground against the engine to wear and damage. Snow thrower shave plates and skid shoes ...on or near any ). Check fuel line, tank, cap, and fittings frequently for gas, oil, etc. Replace if necessary. 13. Do not crank engine with safety devices. In the State of parts which are subject to prevent unintended starting. 3. Other states may include the following emission control systems: Engine ...
Operation Manual
Page 17
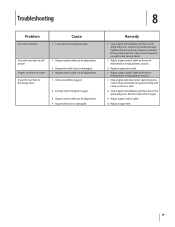
Chute assembly clogged. 2. Auger belt loose or damaged. Stop engine immediately and disconnect spark plug wire. Replace auger belt. 17 Troubleshooting 8 Problem Excessive vibration Cause 1. Snow thrower fails to selfpropel Augers continue to rotate ... Maintenance & Adjustments section. 2. Remove object from auger. 3. Auger drive belt loose or damaged. 1. Check for possible damage. Replace auger drive belt. 1. Loose parts or damaged auger. Auger control cable out of adjustment. 1. Remedy 1. Stop engine immediately and disconnect the spark plug wire. Adjust...
Chute assembly clogged. 2. Auger belt loose or damaged. Stop engine immediately and disconnect spark plug wire. Replace auger belt. 17 Troubleshooting 8 Problem Excessive vibration Cause 1. Snow thrower fails to selfpropel Augers continue to rotate ... Maintenance & Adjustments section. 2. Remove object from auger. 3. Auger drive belt loose or damaged. 1. Check for possible damage. Replace auger drive belt. 1. Loose parts or damaged auger. Auger control cable out of adjustment. 1. Remedy 1. Stop engine immediately and disconnect the spark plug wire. Adjust...

Operation Manual
Page 18
Parts Manual downloads are also available free of charge at www.mtdproducts.com. 18 Replacement Parts Component 9 Part Number and Description 731-08171 Shave Plate 954-04050 Belt V-Type 753-06469 Rubber Auger Paddle Kit (Includes 2 paddles and 12 hex washer screws) 731-05632 Key 946-04782 946-04701 Clutch Cable (Squall 210) Clutch Cable (Squall 2100) 634-04607 734-04033 Wheel Assembly, 7 x 2 (Squall 210) Wheel Assembly, 8 x 2.125 (Squall 2100) Phone (800) 800-7310 to order replacement parts or a complete Parts Manual (have your full model number and serial number ready).
Parts Manual downloads are also available free of charge at www.mtdproducts.com. 18 Replacement Parts Component 9 Part Number and Description 731-08171 Shave Plate 954-04050 Belt V-Type 753-06469 Rubber Auger Paddle Kit (Includes 2 paddles and 12 hex washer screws) 731-05632 Key 946-04782 946-04701 Clutch Cable (Squall 210) Clutch Cable (Squall 2100) 634-04607 734-04033 Wheel Assembly, 7 x 2 (Squall 210) Wheel Assembly, 8 x 2.125 (Squall 2100) Phone (800) 800-7310 to order replacement parts or a complete Parts Manual (have your full model number and serial number ready).

Operation Manual
Page 20
... REV. b. The provisions as mentioned above . A Normal wear parts include, but are not genuine Troy-Bilt parts. KITCHENER, ON N2G 4J1; Attachments - To locate the dealer in your local authorized service dealer. "Troy-Bilt" warrants this warranty provide the sole and exclusive remedy arising from state to state. Replacement parts that are not limited to items such as...
... REV. b. The provisions as mentioned above . A Normal wear parts include, but are not genuine Troy-Bilt parts. KITCHENER, ON N2G 4J1; Attachments - To locate the dealer in your local authorized service dealer. "Troy-Bilt" warrants this warranty provide the sole and exclusive remedy arising from state to state. Replacement parts that are not limited to items such as...


