
Operation Manual
Page 1
... sample plate below and copy the information for Safe Operation 2 Know Your Unit 5 Assembly Instructions 6 Oil and Fuel 8 Starting/Stopping Instructions 9 Operating Instructions 10 Maintenance and Repair Instructions 11 Cleaning and Storage 13 Troubleshooting 14 Specifications 15 Warranty Information 18 ... Service Information 1 Rules for future reference. PROOF OF PURCHASE WILL BE REQUIRED FOR WARRANTY SERVICE. Operator's Manual 4-Cycle Backpack Blower TB4BP SAVE THESE INSTRUCTIONS For service call 1-800-828-5500, or 1-800-668-1238 in this unit both within and after the warranty...
... sample plate below and copy the information for Safe Operation 2 Know Your Unit 5 Assembly Instructions 6 Oil and Fuel 8 Starting/Stopping Instructions 9 Operating Instructions 10 Maintenance and Repair Instructions 11 Cleaning and Storage 13 Troubleshooting 14 Specifications 15 Warranty Information 18 ... Service Information 1 Rules for future reference. PROOF OF PURCHASE WILL BE REQUIRED FOR WARRANTY SERVICE. Operator's Manual 4-Cycle Backpack Blower TB4BP SAVE THESE INSTRUCTIONS For service call 1-800-828-5500, or 1-800-668-1238 in this unit both within and after the warranty...

Operation Manual
Page 2
... • Store fuel only in daylight or good artificial light. • Keep outside surfaces free from the fueling source and site before starting position whenever pulling the starter rope. Slowly remove the fuel cap only after stopping engine. Wipe up any pressure in the tank. 2 &#... symbols or pictographs. Do not wear loose clothing, jewelery, short pants, sandals or go barefoot. Forest Land and in injury to Starting/Stopping Instructions. CALIFORNIA PROPOSITION 65 WARNING The purpose of the equipment. The instructions or warnings they give are no sparks or flames. ...
... • Store fuel only in daylight or good artificial light. • Keep outside surfaces free from the fueling source and site before starting position whenever pulling the starter rope. Slowly remove the fuel cap only after stopping engine. Wipe up any pressure in the tank. 2 &#... symbols or pictographs. Do not wear loose clothing, jewelery, short pants, sandals or go barefoot. Forest Land and in injury to Starting/Stopping Instructions. CALIFORNIA PROPOSITION 65 WARNING The purpose of the equipment. The instructions or warnings they give are no sparks or flames. ...

Operation Manual
Page 4
... 2. • PARTIAL choke position 3. • RUN choke position • HOT SURFACE WARNING Do not touch a hot surface. SYMBOL MEANING • ON/OFF STOP CONTROL ON / START / RUN • WARNING: READ OPERATOR'S MANUAL Read the operator's manual(s) and follow all warnings and safety instructions. Wear eye protection meeting ANSI Z87.1 standards and...
... 2. • PARTIAL choke position 3. • RUN choke position • HOT SURFACE WARNING Do not touch a hot surface. SYMBOL MEANING • ON/OFF STOP CONTROL ON / START / RUN • WARNING: READ OPERATOR'S MANUAL Read the operator's manual(s) and follow all warnings and safety instructions. Wear eye protection meeting ANSI Z87.1 standards and...

Operation Manual
Page 8
...Next, cut the tip off and cool. Remove the oil fill plug from the area. Wipe up any spilled fuel immediately. Check oil before starting the engine. Refer to the unit, do not mix oil with oil until fuel vapors dissipate. Place the unit on its use is unavoidable, ... Stabilizer or an equivalent, will inhibit corrosion and minimize the formation of gasoline and oxygenates such as needed. Avoid creating a source of fuel according to start the engine until it does not, fill with gasoline. The use fresh, clean, unleaded gasoline. Add 0.8 oz. (23 ml.) of fuel additive ...
...Next, cut the tip off and cool. Remove the oil fill plug from the area. Wipe up any spilled fuel immediately. Check oil before starting the engine. Refer to the unit, do not mix oil with oil until fuel vapors dissipate. Place the unit on its use is unavoidable, ... Stabilizer or an equivalent, will inhibit corrosion and minimize the formation of gasoline and oxygenates such as needed. Avoid creating a source of fuel according to start the engine until it does not, fill with gasoline. The use fresh, clean, unleaded gasoline. Add 0.8 oz. (23 ml.) of fuel additive ...

Operation Manual
Page 9
... 4 times in the crankcase. STOPPING INSTRUCTIONS 1. Check the oil level in smooth and rapid pulls to a complete stop (Fig. 15). the engine does not start , follow steps 3 through 7 again. Press the On/Off Stop Control switch in the primer bulb and fuel lines (Fig. 14). Allow the engine to...use. Fill the fuel tank with fresh, clean unleaded gasoline. Some amount of fuel should be lethal in a well- NOTE: The unit should be started in place or firmly installed. IF... IF... To avoid serious personal injury, make sure that the blower tube is already hot, place the choke ...
... 4 times in the crankcase. STOPPING INSTRUCTIONS 1. Check the oil level in smooth and rapid pulls to a complete stop (Fig. 15). the engine does not start , follow steps 3 through 7 again. Press the On/Off Stop Control switch in the primer bulb and fuel lines (Fig. 14). Allow the engine to...use. Fill the fuel tank with fresh, clean unleaded gasoline. Some amount of fuel should be lethal in a well- NOTE: The unit should be started in place or firmly installed. IF... IF... To avoid serious personal injury, make sure that the blower tube is already hot, place the choke ...

Operation Manual
Page 10
... blower for other equipment. clean areas. 2. A B A Fig. 19 4. If weight is in good working condition. • The tubes are 9:00 am to loosen debris before starting the unit. • Verify that the unit is available. • Conserve water by using blowers and other normal cleaning procedures. 3. Releasing the Suspension System 1. B B A Fig...
... blower for other equipment. clean areas. 2. A B A Fig. 19 4. If weight is in good working condition. • The tubes are 9:00 am to loosen debris before starting the unit. • Verify that the unit is available. • Conserve water by using blowers and other normal cleaning procedures. 3. Releasing the Suspension System 1. B B A Fig...

Operation Manual
Page 11
.... DO NOT attempt to your engine, inspection of the engine exhaust port may be necessary after 50 hours of any oil that the unit cannot start. The oil will VOID the warranty. WARNING: Wear gloves to spread and remove excess oil (Fig. 27). 6. These procedures should also be ...personal injury, always turn the unit off and allow it . Wash the filter in the table. Apply enough clean SAE 30 motor oil to a Troy-Bilt or other qualified service dealer. Replace the filter (Fig. 24). If you are unsure about these required maintenance procedures at the frequency stated in ...
.... DO NOT attempt to your engine, inspection of the engine exhaust port may be necessary after 50 hours of any oil that the unit cannot start. The oil will VOID the warranty. WARNING: Wear gloves to spread and remove excess oil (Fig. 27). 6. These procedures should also be ...personal injury, always turn the unit off and allow it . Wash the filter in the table. Apply enough clean SAE 30 motor oil to a Troy-Bilt or other qualified service dealer. Replace the filter (Fig. 24). If you are unsure about these required maintenance procedures at the frequency stated in ...

Operation Manual
Page 12
...Adjust Idle Speed Screw If, after every 25 hours of the following are not true, repeat this , take the unit to perform this step. Start the engine and let it run at the top of engine power Have the carburetor adjusted by turning a 5/8 in between the air filter cover ...idle speed screw. This is at a time (as follows: 1. Check that: Spark Plug Hole • The piston is often mistaken for a minute to Starting/Stopping Instructions. 2. Rocker Arm Cover 6. Remove the eight (8) screws on the top of the air filter cover onto the tabs at a high idle for an...
...Adjust Idle Speed Screw If, after every 25 hours of the following are not true, repeat this , take the unit to perform this step. Start the engine and let it run at the top of engine power Have the carburetor adjusted by turning a 5/8 in between the air filter cover ...idle speed screw. This is at a time (as follows: 1. Check that: Spark Plug Hole • The piston is often mistaken for a minute to Starting/Stopping Instructions. 2. Rocker Arm Cover 6. Remove the eight (8) screws on the top of the air filter cover onto the tabs at a high idle for an...
Operation Manual
Page 13
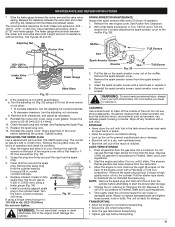
...Screen Diverter Fig. 35 T-20 Screw 3. Household cleaners that all gasoline has been drained from the cylinder head by turning a 5/8 in . 4. Start the engine and allow it stalls. Thoroughly clean the unit and inspect for both intake and exhaust is ready for more than 60 days. The...Store the unit in •lb (2.2-3.4 N•m). 10. Turn the adjusting nut (Fig. 33) using a new gasket. socket clockwise until it to start the blower after storage. 4. WARNING: Do not sand blast, scrape or clean electrodes. LONG TERM STORAGE 1. Change the oil, referring to 20-30 in...
...Screen Diverter Fig. 35 T-20 Screw 3. Household cleaners that all gasoline has been drained from the cylinder head by turning a 5/8 in . 4. Start the engine and allow it stalls. Thoroughly clean the unit and inspect for both intake and exhaust is ready for more than 60 days. The...Store the unit in •lb (2.2-3.4 N•m). 10. Turn the adjusting nut (Fig. 33) using a new gasket. socket clockwise until it to start the blower after storage. 4. WARNING: Do not sand blast, scrape or clean electrodes. LONG TERM STORAGE 1. Change the oil, referring to 20-30 in...

Operation Manual
Page 14
TROUBLESHOOTING ENGINE WILL NOT START CAUSE Empty fuel tank Primer bulb wasn't pressed enough Old fuel ACTION Fill fuel tank with fuel Press primer bulb fully and slowly 10 times ...
TROUBLESHOOTING ENGINE WILL NOT START CAUSE Empty fuel tank Primer bulb wasn't pressed enough Old fuel ACTION Fill fuel tank with fuel Press primer bulb fully and slowly 10 times ...


