
Owners Manual
Page 3
...7 • Quick Set-Up Method 7 • Three-Digit Code Entry Method 9 • Auto-Search Method 11 Programming URC-A6 Using the Learning Method 13 Special Advanced Features 15 • Programming Automated Activities ........15 • MacroPower Total System On/Off ........26 • Erasing All Learned Commands from One Component 27 • Erasing MacroPower & Other Macro Commands 28 • Erasing SimpleSound & Other "Punch Through" Commands 29 • Factory Reset 30 Finding a Component's Set-Up Code Number 31 Pre-Programmed Code Tables ...........32 • CABLE/SAT...
...7 • Quick Set-Up Method 7 • Three-Digit Code Entry Method 9 • Auto-Search Method 11 Programming URC-A6 Using the Learning Method 13 Special Advanced Features 15 • Programming Automated Activities ........15 • MacroPower Total System On/Off ........26 • Erasing All Learned Commands from One Component 27 • Erasing MacroPower & Other Macro Commands 28 • Erasing SimpleSound & Other "Punch Through" Commands 29 • Factory Reset 30 Finding a Component's Set-Up Code Number 31 Pre-Programmed Code Tables ...........32 • CABLE/SAT...

Owners Manual
Page 10
...ve entered the code number and the component has turned off, press the POWER button on the URC-A6 remote to save it does turn the component back on the remote to confirm that the code... was successfully stored. NUMBER BUTTONS If the 3-digit code number you just punched in is pressed. STEP 6: Once you program. Repeat Step 5 using the next code number until it... list until you must save the code number. STEP 5: Point the URC-A6 toward the component (in this example the TV) and punch in the first 3-digit code that you press the TV component button...
...ve entered the code number and the component has turned off, press the POWER button on the URC-A6 remote to save it does turn the component back on the remote to confirm that the code... was successfully stored. NUMBER BUTTONS If the 3-digit code number you just punched in is pressed. STEP 6: Once you program. Repeat Step 5 using the next code number until it... list until you must save the code number. STEP 5: Point the URC-A6 toward the component (in this example the TV) and punch in the first 3-digit code that you press the TV component button...
Owners Manual
Page 18
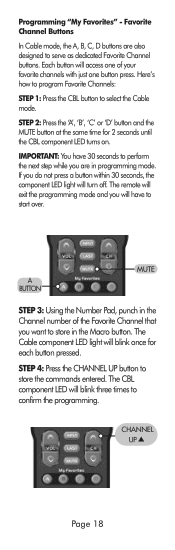
... want to serve as dedicated Favorite Channel buttons. Programming "My Favorites" - IMPORTANT: You have to confirm the programming. A BUTTON MUTE STEP 3: Using the Number Pad, punch in the Channel number of your favorite channels with just one button press.
... want to serve as dedicated Favorite Channel buttons. Programming "My Favorites" - IMPORTANT: You have to confirm the programming. A BUTTON MUTE STEP 3: Using the Number Pad, punch in the Channel number of your favorite channels with just one button press.
Owners Manual
Page 21
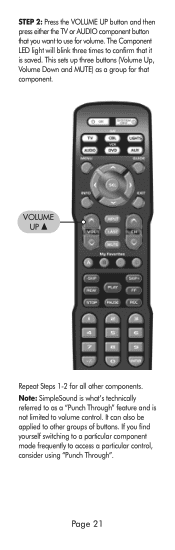
..." feature and is saved. It can also be applied to access a particular control, consider using "Punch Through". If you want to volume control. Note: SimpleSound is what's technically referred to as a group for that it is not limited to use for ...
..." feature and is saved. It can also be applied to access a particular control, consider using "Punch Through". If you want to volume control. Note: SimpleSound is what's technically referred to as a group for that it is not limited to use for ...
Owners Manual
Page 22
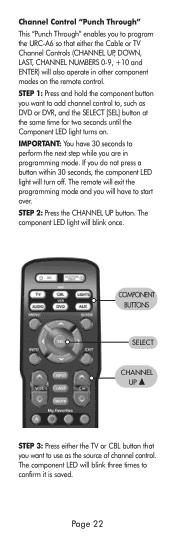
Channel Control "Punch Through" This "Punch Through" enables you to program the URC-A6 so that you will have 30 seconds to use as DVD or DVR, and the SELECT [SEL] button at the same time for two seconds ...
Channel Control "Punch Through" This "Punch Through" enables you to program the URC-A6 so that you will have 30 seconds to use as DVD or DVR, and the SELECT [SEL] button at the same time for two seconds ...
Owners Manual
Page 23
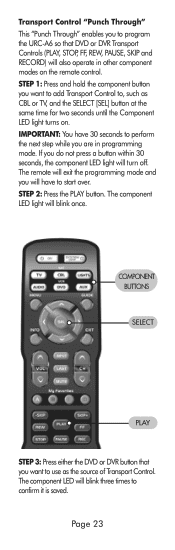
... the Component LED light turns on the remote control. STEP 1: Press and hold the component button you want to add Transport Control to program the URC-A6 so that you want to perform the next step while you are in other component modes on . The component LED will blink three times to... to , such as the source of Transport Control. Page 23 IMPORTANT: You have to confirm it is saved. STEP 2: Press the PLAY button. Transport Control "Punch Through" This "Punch Through" enables you do not press a button within 30 seconds, the component LED light will turn off.
... the Component LED light turns on the remote control. STEP 1: Press and hold the component button you want to add Transport Control to program the URC-A6 so that you want to perform the next step while you are in other component modes on . The component LED will blink three times to... to , such as the source of Transport Control. Page 23 IMPORTANT: You have to confirm it is saved. STEP 2: Press the PLAY button. Transport Control "Punch Through" This "Punch Through" enables you do not press a button within 30 seconds, the component LED light will turn off.
Owners Manual
Page 24
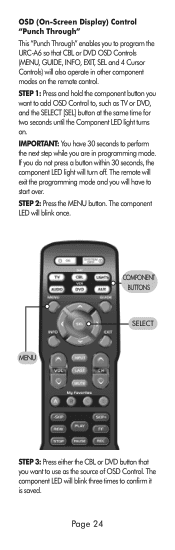
OSD (On-Screen Display) Control "Punch Through" This "Punch Through" enables you to program the URC-A6 so that you are in other component modes on . The remote will exit the programming mode and you will also operate in programming mode. The ...
OSD (On-Screen Display) Control "Punch Through" This "Punch Through" enables you to program the URC-A6 so that you are in other component modes on . The remote will exit the programming mode and you will also operate in programming mode. The ...
Owners Manual
Page 29
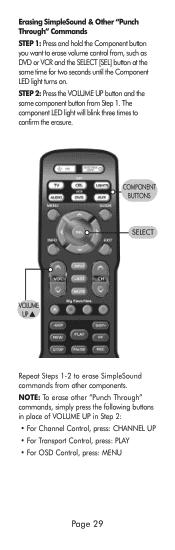
... LED light will blink three times to confirm the erasure. COMPONENT BUTTONS SELECT VOLUME UP Repeat Steps 1-2 to erase SimpleSound commands from other "Punch Through" commands, simply press the following buttons in place of VOLUME UP in Step 2: • For Channel Control, press: CHANNEL UP ... For Transport Control, press: PLAY • For OSD Control, press: MENU Page 29 NOTE: To erase other components. Erasing SimpleSound & Other "Punch Through" Commands STEP 1: Press and hold the Component button you want to erase volume control from Step 1. STEP 2: Press the VOLUME UP button and...
... LED light will blink three times to confirm the erasure. COMPONENT BUTTONS SELECT VOLUME UP Repeat Steps 1-2 to erase SimpleSound commands from other "Punch Through" commands, simply press the following buttons in place of VOLUME UP in Step 2: • For Channel Control, press: CHANNEL UP ... For Transport Control, press: PLAY • For OSD Control, press: MENU Page 29 NOTE: To erase other components. Erasing SimpleSound & Other "Punch Through" Commands STEP 1: Press and hold the Component button you want to erase volume control from Step 1. STEP 2: Press the VOLUME UP button and...