
Owners Manual
Page 2
... your components by guiding you need to change without the express written consent of this manual may be reproduced in programming your home entertainment experience. URC-A6 Owner's Manual © 2009 Universal Remote Control, Inc. This document is designed to assist you in any form... process. So... is contained in this Manual. The specifications and information in this manual may be subject to know about programming the URC-A6 is not responsible for operational, technical or editorial errors or omissions. Everything you through an easy step-by the copyright laws...
... your components by guiding you need to change without the express written consent of this manual may be reproduced in programming your home entertainment experience. URC-A6 Owner's Manual © 2009 Universal Remote Control, Inc. This document is designed to assist you in any form... process. So... is contained in this Manual. The specifications and information in this manual may be subject to know about programming the URC-A6 is not responsible for operational, technical or editorial errors or omissions. Everything you through an easy step-by the copyright laws...

Owners Manual
Page 3
...; Low Battery Warning 5 • Couch Mode 5 Keypad Layout & Button Functions.......6 Programming URC-A6 Using Pre-Programmed Codes 7 • Quick Set-Up Method 7 • Three-Digit Code Entry Method 9 • Auto-Search Method 11 Programming URC-A6 Using the Learning Method 13 Special Advanced Features 15 • Programming Automated Activities ........15 • MacroPower Total System On/Off ..........15 •...
...; Low Battery Warning 5 • Couch Mode 5 Keypad Layout & Button Functions.......6 Programming URC-A6 Using Pre-Programmed Codes 7 • Quick Set-Up Method 7 • Three-Digit Code Entry Method 9 • Auto-Search Method 11 Programming URC-A6 Using the Learning Method 13 Special Advanced Features 15 • Programming Automated Activities ........15 • MacroPower Total System On/Off ..........15 •...
Owners Manual
Page 4
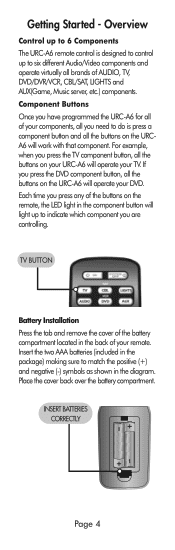
...which component you press the TV component button, all the buttons on the remote, the LED light in the diagram. If you have programmed the URC-A6 for all brands of your TV. INSERT BATTERIES CORRECTLY Page 4 For example, when you are controlling. TV BUTTON Battery Installation Press ... CBL/SAT, LIGHTS and AUX(Game, Music server, etc.) components. Overview Control up to 6 Components The URC-A6 remote control is press a component button and all the buttons on your URC-A6 will light up to match the positive (+) and negative (-) symbols as shown in the component button will operate...
...which component you press the TV component button, all the buttons on the remote, the LED light in the diagram. If you have programmed the URC-A6 for all brands of your TV. INSERT BATTERIES CORRECTLY Page 4 For example, when you are controlling. TV BUTTON Battery Installation Press ... CBL/SAT, LIGHTS and AUX(Game, Music server, etc.) components. Overview Control up to 6 Components The URC-A6 remote control is press a component button and all the buttons on your URC-A6 will light up to match the positive (+) and negative (-) symbols as shown in the component button will operate...

Owners Manual
Page 6
...highlighted screen options. Also used to make numeric entries on and off. SYSTEM OFF Designed to send Power On/Off commands for programming steps and onscreen navigation and highlighting. Page 6 PIP CONTROLS Controls PictureIn-Picture actions. MUTE Silences the Audio. MENU Displays the ...six components with one button press. EXIT Exits from available components. Press to the previous level. INFO Displays information about the program currently playing or highlighted in Cable mode. LAST Returns to the previously tuned channel through the Cable Set Top Box. Press...
...highlighted screen options. Also used to make numeric entries on and off. SYSTEM OFF Designed to send Power On/Off commands for programming steps and onscreen navigation and highlighting. Page 6 PIP CONTROLS Controls PictureIn-Picture actions. MUTE Silences the Audio. MENU Displays the ...six components with one button press. EXIT Exits from available components. Press to the previous level. INFO Displays information about the program currently playing or highlighted in Cable mode. LAST Returns to the previously tuned channel through the Cable Set Top Box. Press...

Owners Manual
Page 7
...component you can program your URC-A6 using Pre-Programmed Codes There are three different ways you want to confirm that the code has been stored. While holding down the component button, begin to press the numeric assigned to save the code. The component LED light will work for other components. Programming URC-A6 using the ...component brand codes that are pre-programmed into the remote.
...component you can program your URC-A6 using Pre-Programmed Codes There are three different ways you want to confirm that the code has been stored. While holding down the component button, begin to press the numeric assigned to save the code. The component LED light will work for other components. Programming URC-A6 using the ...component brand codes that are pre-programmed into the remote.

Owners Manual
Page 9
... the SELECT [SEL] button at the same time. STEP 4: On the URC-A6, press the Component button that you want to program-for the Sony brand. The remote will exit the programming mode and you will turn off. The codes are in programming mode. For instance, if you would like to locate a code for a ...button that you are in programming mode. Hold down all the codes listed for 2 seconds until the TV Component LED light turns on a piece of the components that you write down both buttons for your brand because only one code is going to work with your URC-A6, write them ALL down on...
... the SELECT [SEL] button at the same time. STEP 4: On the URC-A6, press the Component button that you want to program-for the Sony brand. The remote will exit the programming mode and you will turn off. The codes are in programming mode. For instance, if you would like to locate a code for a ...button that you are in programming mode. Hold down all the codes listed for 2 seconds until the TV Component LED light turns on a piece of the components that you write down both buttons for your brand because only one code is going to work with your URC-A6, write them ALL down on...

Owners Manual
Page 10
... component button, all work properly. Now when you must save the code number. Program the remaining components by repeating steps 3 through 7. NUMBER BUTTONS If the 3-digit ... on the URC-A6 remote to turn the component back on the remote to punch in this case TV) one more time to program will help... you have tried all the set-up codes in is pressed. Repeat Step 5 using the next code number until it . The component LED light will work with your Sony TV turned off with code number 147, but the volume controls did not work . STEP 5: Point the URC-A6...
... component button, all work properly. Now when you must save the code number. Program the remaining components by repeating steps 3 through 7. NUMBER BUTTONS If the 3-digit ... on the URC-A6 remote to turn the component back on the remote to punch in this case TV) one more time to program will help... you have tried all the set-up codes in is pressed. Repeat Step 5 using the next code number until it . The component LED light will work with your Sony TV turned off with code number 147, but the volume controls did not work . STEP 5: Point the URC-A6...

Owners Manual
Page 11
... seconds, the component LED light will turn off . This signals that you are in programming mode. Each time the UP or DOWN arrow button is a way you want to start over. 5 UP ARROW 6 DOWN ARROW STEP 3: Point the URC-A6 remote control toward 5 the component and press the UP arrow (or 6 DOWN arrow... ) one code number and send a Power OFF signal. The remote will exit the programming mode and you will count up (or down both buttons for 2 seconds until the TV Component button light turns on. STEP 2: On the URC-A6, press the Component button that says TV) and the SELECT [SEL] button at the...
... seconds, the component LED light will turn off . This signals that you are in programming mode. Each time the UP or DOWN arrow button is a way you want to start over. 5 UP ARROW 6 DOWN ARROW STEP 3: Point the URC-A6 remote control toward 5 the component and press the UP arrow (or 6 DOWN arrow... ) one code number and send a Power OFF signal. The remote will exit the programming mode and you will count up (or down both buttons for 2 seconds until the TV Component button light turns on. STEP 2: On the URC-A6, press the Component button that says TV) and the SELECT [SEL] button at the...

Owners Manual
Page 12
The component LED light will work properly, you need to save it. IMPORTANT: If you cannot find a new code. Press the component button you just programmed (in this method for DVD and DVR) to make sure they all of the buttons do not work with either the Quick Set-Up or ... times to confirm that turns off , press the POWER button on the URC-A6 remote to turn the component back on. Now when you must save the code number. Continue pressing the UP (or DOWN) arrow button until you cannot program with your TV. Next test the VOLUME and CHANNEL buttons (or PLAY...
The component LED light will work properly, you need to save it. IMPORTANT: If you cannot find a new code. Press the component button you just programmed (in this method for DVD and DVR) to make sure they all of the buttons do not work with either the Quick Set-Up or ... times to confirm that turns off , press the POWER button on the URC-A6 remote to turn the component back on. Now when you must save the code number. Continue pressing the UP (or DOWN) arrow button until you cannot program with your TV. Next test the VOLUME and CHANNEL buttons (or PLAY...
Owners Manual
Page 13
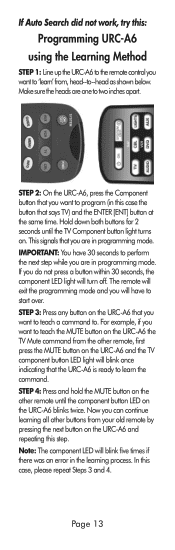
...did not work, try this: Programming URC-A6 using the Learning Method STEP 1: LineuptheURC-A6totheremotecontrolyou want to 'learn the command. If you do not press a button within 30 seconds, the component LED light will have 30 seconds to perform the next step while you are in programming mode. STEP 4: Press and ... . STEP 3: Press any button on the URC-A6 that the URC-A6 is ready to start over. Make sure the heads are in the learning process. The remote will exit the programming mode and you want to teach the MUTE button on the URC-A6 the TV Mute command from the other buttons ...
...did not work, try this: Programming URC-A6 using the Learning Method STEP 1: LineuptheURC-A6totheremotecontrolyou want to 'learn the command. If you do not press a button within 30 seconds, the component LED light will have 30 seconds to perform the next step while you are in programming mode. STEP 4: Press and ... . STEP 3: Press any button on the URC-A6 that the URC-A6 is ready to start over. Make sure the heads are in the learning process. The remote will exit the programming mode and you want to teach the MUTE button on the URC-A6 the TV Mute command from the other buttons ...

Owners Manual
Page 14
...remote control. • To return to an original pre-programmed function, a learned function must to be erased. Repeat Steps 1-5 to confirm the programming. The component LED light will blink three times to program any existing pre-programmed functions on the remote control. •Learned functions are ... • Avoid programming under fluorescent light or direct sunlight. • Put new batteries in the selected component mode, press and hold the Component button and ENTER [ENT] buttons at the same time to save the learned functions. STEP 5: Once the URC-A6 has learned all ...
...remote control. • To return to an original pre-programmed function, a learned function must to be erased. Repeat Steps 1-5 to confirm the programming. The component LED light will blink three times to program any existing pre-programmed functions on the remote control. •Learned functions are ... • Avoid programming under fluorescent light or direct sunlight. • Put new batteries in the selected component mode, press and hold the Component button and ENTER [ENT] buttons at the same time to save the learned functions. STEP 5: Once the URC-A6 has learned all ...

Owners Manual
Page 15
...that are designed to 20 commands in that MacroPower. We call that particular button. Imagine the convenience of one button. Special Advanced Features Programming Automated Activities The URC-A6 has six Macro buttons (POWER, SYSTEM OFF, A, B, C, D) that are stored in each button. What could normally take three ...remotes and three button pushes, the URC-A6 can be programmed for 2 seconds until one of the Power On or the System Off buttons can accomplish with the press of turning on your TV, ...
...that are designed to 20 commands in that MacroPower. We call that particular button. Imagine the convenience of one button. Special Advanced Features Programming Automated Activities The URC-A6 has six Macro buttons (POWER, SYSTEM OFF, A, B, C, D) that are stored in each button. What could normally take three ...remotes and three button pushes, the URC-A6 can be programmed for 2 seconds until one of the Power On or the System Off buttons can accomplish with the press of turning on your TV, ...

Owners Manual
Page 16
... to save the System Off button to turn components On or Off individually. The component LED lights will blink three times to confirm that the programming has been successfully saved. POWER COMPONENT BUTTONS STEP 3: Once you've entered all other components in the order you press the POWER button. The ...have 30 seconds to perform the next step while you do not press a button within 30 seconds, the component LED light will have to program MacroPower only in programming mode. IMPORTANT: You have the same signal to turn the power On and Off. If you are in the POWER button and save...
... to save the System Off button to turn components On or Off individually. The component LED lights will blink three times to confirm that the programming has been successfully saved. POWER COMPONENT BUTTONS STEP 3: Once you've entered all other components in the order you press the POWER button. The ...have 30 seconds to perform the next step while you do not press a button within 30 seconds, the component LED light will have to program MacroPower only in programming mode. IMPORTANT: You have the same signal to turn the power On and Off. If you are in the POWER button and save...
Owners Manual
Page 17
... to 20 commands on each Macro button. • You can also program macro commands in 'layers' by pressing the STOP button in between commands. (For example...the Macro unless the button is held for two seconds. (This is the Press & Hold Function). • You can program delays in Step 2) the remote will send out 009 at the first press of the 'A' button, and then send out ...035 at the second press, etc. • You cannot program the CH+ or PAUSE buttons as macro commands. PLEASE DO NOT RETURN THIS PRODUCT TO THE STORE PLEASE CONTACT OUR TECHNICAL...
... to 20 commands on each Macro button. • You can also program macro commands in 'layers' by pressing the STOP button in between commands. (For example...the Macro unless the button is held for two seconds. (This is the Press & Hold Function). • You can program delays in Step 2) the remote will send out 009 at the first press of the 'A' button, and then send out ...035 at the second press, etc. • You cannot program the CH+ or PAUSE buttons as macro commands. PLEASE DO NOT RETURN THIS PRODUCT TO THE STORE PLEASE CONTACT OUR TECHNICAL...
Owners Manual
Page 18
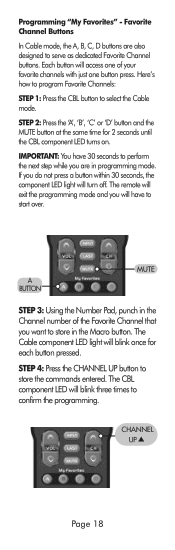
...turn off. The Cable component LED light will blink three times to serve as dedicated Favorite Channel buttons. The remote will exit the programming mode and you do not press a button within 30 seconds, the component LED light will have 30 seconds to perform the next ...LED turns on. Favorite Channel Buttons In Cable mode, the A, B, C, D buttons are in programming mode. STEP 4: Press the CHANNEL UP button to select the Cable mode. Programming "My Favorites" - Here's how to program Favorite Channels: STEP 1: Press the CBL button to store the commands entered. IMPORTANT: You have ...
...turn off. The Cable component LED light will blink three times to serve as dedicated Favorite Channel buttons. The remote will exit the programming mode and you do not press a button within 30 seconds, the component LED light will have 30 seconds to perform the next ...LED turns on. Favorite Channel Buttons In Cable mode, the A, B, C, D buttons are in programming mode. STEP 4: Press the CHANNEL UP button to select the Cable mode. Programming "My Favorites" - Here's how to program Favorite Channels: STEP 1: Press the CBL button to store the commands entered. IMPORTANT: You have ...

Owners Manual
Page 19
..., the first press of button presses into a macro. The second, to "50" and the third, to save macro. This is an example of how to program a macro on one button. Cable. STEP 3: Press "2". STEP 8: Press "0". STEP 10: Press "Stop". STEP 14: Press "Stop". STEP 6: Press "Stop". ...presses), but you're not limited to using these buttons for only that. STEP 13: Press "Select". We'll use the "A, B, C and D" buttons to program favorite channels. Ex. STEP 5: Press "Select". STEP 12: Press "5". Pressing "Stop" allows you to "25." You can record any series of the "A" ...
..., the first press of button presses into a macro. The second, to "50" and the third, to save macro. This is an example of how to program a macro on one button. Cable. STEP 3: Press "2". STEP 8: Press "0". STEP 10: Press "Stop". STEP 14: Press "Stop". STEP 6: Press "Stop". ...presses), but you're not limited to using these buttons for only that. STEP 13: Press "Select". We'll use the "A, B, C and D" buttons to program favorite channels. Ex. STEP 5: Press "Select". STEP 12: Press "5". Pressing "Stop" allows you to "25." You can record any series of the "A" ...

Owners Manual
Page 20
... have to control volume. If you should identify which device in your system will turn off. The remote will have built--in programming mode. COMPONENT BUTTONS SELECT Page 20 It gives you will exit the programming mode and you total volume control over . SimpleSound saves you the hassle and inconvenience of the URC-A6.
... have to control volume. If you should identify which device in your system will turn off. The remote will have built--in programming mode. COMPONENT BUTTONS SELECT Page 20 It gives you will exit the programming mode and you total volume control over . SimpleSound saves you the hassle and inconvenience of the URC-A6.
Owners Manual
Page 22
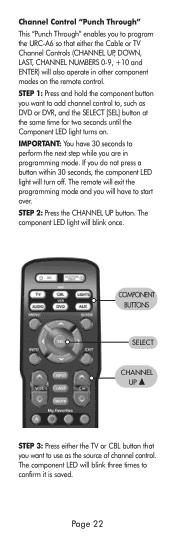
... you want to add channel control to, such as the source of channel control. Channel Control "Punch Through" This "Punch Through" enables you to program the URC-A6 so that either the TV or CBL button that you will have 30 seconds to confirm it is saved. IMPORTANT: You have to start over...
... you want to add channel control to, such as the source of channel control. Channel Control "Punch Through" This "Punch Through" enables you to program the URC-A6 so that either the TV or CBL button that you will have 30 seconds to confirm it is saved. IMPORTANT: You have to start over...
Owners Manual
Page 23
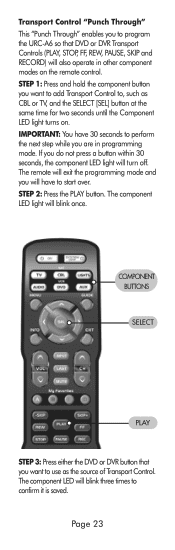
... the DVD or DVR button that DVD or DVR Transport Controls (PLAY, STOP, FF, REW, PAUSE, SKIP and RECORD) will blink three times to program the URC-A6 so that you want to add Transport Control to perform the next step while you are in other component modes on . STEP 1: Press and hold...] button at the same time for two seconds until the Component LED light turns on the remote control. The component LED will also operate in programming mode. Transport Control "Punch Through" This "Punch Through" enables you to confirm it is saved. STEP 2: Press the PLAY button.
... the DVD or DVR button that DVD or DVR Transport Controls (PLAY, STOP, FF, REW, PAUSE, SKIP and RECORD) will blink three times to program the URC-A6 so that you want to add Transport Control to perform the next step while you are in other component modes on . STEP 1: Press and hold...] button at the same time for two seconds until the Component LED light turns on the remote control. The component LED will also operate in programming mode. Transport Control "Punch Through" This "Punch Through" enables you to confirm it is saved. STEP 2: Press the PLAY button.
Owners Manual
Page 24
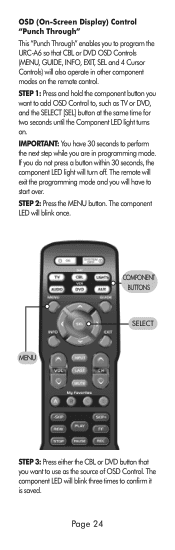
..., INFO, EXIT, SEL and 4 Cursor Controls) will turn off. Page 24 OSD (On-Screen Display) Control "Punch Through" This "Punch Through" enables you to program the URC-A6 so that you want to add OSD Control to, such as the source of OSD Control. IMPORTANT: You have to use as TV or DVD... you do not press a button within 30 seconds, the component LED light will also operate in programming mode. The component LED will have 30 seconds to confirm it is saved. The remote will exit the programming mode and you are in other component modes on . STEP 2: Press the MENU button. The ...
..., INFO, EXIT, SEL and 4 Cursor Controls) will turn off. Page 24 OSD (On-Screen Display) Control "Punch Through" This "Punch Through" enables you to program the URC-A6 so that you want to add OSD Control to, such as the source of OSD Control. IMPORTANT: You have to use as TV or DVD... you do not press a button within 30 seconds, the component LED light will also operate in programming mode. The component LED will have 30 seconds to confirm it is saved. The remote will exit the programming mode and you are in other component modes on . STEP 2: Press the MENU button. The ...


