English Owners Manual
Page 1
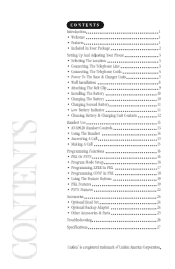
...Introduction 1 • Welcome 1 • Features 1 • Included In Your Package 2 Setting Up And Adjusting Your Phone 3 • Selecting The Location 3 • Connecting The Telephone Line 3 • Connecting The Telephone Cords 4 ...Battery 11 • Low Battery Indicator 11 • Cleaning Battery & Charging Unit Contacts 12 Handset Use 13 • ANA9620 Handset Controls 13 • Using The Handset 14 • Answering A Call 15 • Making A Call 15 ... • Other Accessories & Parts 25 Troubleshooting 26 Specifications 27 Uniden® is a registered trademark of...
...Introduction 1 • Welcome 1 • Features 1 • Included In Your Package 2 Setting Up And Adjusting Your Phone 3 • Selecting The Location 3 • Connecting The Telephone Line 3 • Connecting The Telephone Cords 4 ...Battery 11 • Low Battery Indicator 11 • Cleaning Battery & Charging Unit Contacts 12 Handset Use 13 • ANA9620 Handset Controls 13 • Using The Handset 14 • Answering A Call 15 • Making A Call 15 ... • Other Accessories & Parts 25 Troubleshooting 26 Specifications 27 Uniden® is a registered trademark of...
English Owners Manual
Page 2
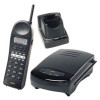
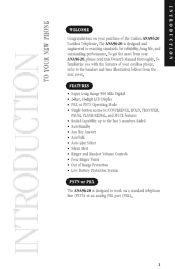
... illustration foldout from the rear cover. INTRODUCTION TO YOUR NEW PHONE INTRODUCTION Introduction WELCOME Congratulations on a standard telephone line (PSTN) or an analog PBX port (PBX). To familiarize you with the features of the Uniden ANA9620 Cordless Telephone. To get the most from your cordless phone, refer to work on your purchase of your...
... illustration foldout from the rear cover. INTRODUCTION TO YOUR NEW PHONE INTRODUCTION Introduction WELCOME Congratulations on a standard telephone line (PSTN) or an analog PBX port (PBX). To familiarize you with the features of the Uniden ANA9620 Cordless Telephone. To get the most from your cordless phone, refer to work on your purchase of your...
English Owners Manual
Page 3
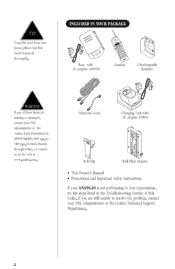
... • Precautions and Important Safety Instructions If your ANA9620 is not performing to 5:00 p.m. TIP To get the most from your PBX Administrator or the Uniden Parts Department at www.uniden.com. to your PBX Administrator or the Uniden Technical Support Department. If you are missing or damaged, contact your phone, please read this Guide.
... • Precautions and Important Safety Instructions If your ANA9620 is not performing to 5:00 p.m. TIP To get the most from your PBX Administrator or the Uniden Parts Department at www.uniden.com. to your PBX Administrator or the Uniden Technical Support Department. If you are missing or damaged, contact your phone, please read this Guide.

English Owners Manual
Page 4
.... Your Uniden telephone dealer or a telephone supply store can advise you do not have a modular jack, contact your local telephone company for your ANA9620 can also be placed on the proper adapter or converter. ! Keep the base and handset away from the base into the adapter. Setting Up and Adjusting Your Phone SELECTING...
.... Your Uniden telephone dealer or a telephone supply store can advise you do not have a modular jack, contact your local telephone company for your ANA9620 can also be placed on the proper adapter or converter. ! Keep the base and handset away from the base into the adapter. Setting Up and Adjusting Your Phone SELECTING...

English Owners Manual
Page 7
... into a standard 120V AC wall outlet. $ NOTE: DO NOT use an outlet controlled by a wall switch. 6. ! WALL INSTALLATION w Standard Wall Plate Mounting These phones are designed to the base: 1. Then place the telephone cord(s) inside the molded channel of the wall plate and push down and snap it is... firmly seated. 7. Place the base on the base. Use only the Uniden AC adapter AD9500 supplied with this base. Plug the AC adapter into the base as previously described. 3. Place the AC adapter cord inside the...
... into a standard 120V AC wall outlet. $ NOTE: DO NOT use an outlet controlled by a wall switch. 6. ! WALL INSTALLATION w Standard Wall Plate Mounting These phones are designed to the base: 1. Then place the telephone cord(s) inside the molded channel of the wall plate and push down and snap it is... firmly seated. 7. Place the base on the base. Use only the Uniden AC adapter AD9500 supplied with this base. Plug the AC adapter into the base as previously described. 3. Place the AC adapter cord inside the...
English Owners Manual
Page 8
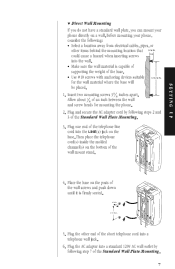
... the base. • Use #10 screws with anchoring devices suitable for mounting the phone. 2. Mounting % SETTING UP w Direct Wall Mounting If you do not have a standard wall plate, you can mount your phone, consider the following: • Select a location away from electrical cables, pipes, ... 31516 inches apart. Standard Wall Plate Mounting 3. Then place the telephone cord(s) inside the molded channel(s) on a wall. Before mounting your phone directly on the bottom of the short telephone cord into a standard 120V AC wall outlet by following step 7 of the . Plug and secure...
... the base. • Use #10 screws with anchoring devices suitable for mounting the phone. 2. Mounting % SETTING UP w Direct Wall Mounting If you do not have a standard wall plate, you can mount your phone, consider the following: • Select a location away from electrical cables, pipes, ... 31516 inches apart. Standard Wall Plate Mounting 3. Then place the telephone cord(s) inside the molded channel(s) on a wall. Before mounting your phone directly on the bottom of the short telephone cord into a standard 120V AC wall outlet by following step 7 of the . Plug and secure...

English Owners Manual
Page 9
... the wall and screw heads for the wall material where the charging unit will be wall mounted. ! Use only the Uniden AC adapter AD9500 supplied with anchoring devices suitable for mounting the phone. 3/16" 1 1/2" 2. Plug the AC adapter into a standard 120V AC wall outlet. & Insert two mounting screws 1-1/2 inches apart. w Charging Unit...
... the wall and screw heads for the wall material where the charging unit will be wall mounted. ! Use only the Uniden AC adapter AD9500 supplied with anchoring devices suitable for mounting the phone. 3/16" 1 1/2" 2. Plug the AC adapter into a standard 120V AC wall outlet. & Insert two mounting screws 1-1/2 inches apart. w Charging Unit...

English Owners Manual
Page 11
...in operation, as long as it latches into the NOTCH handset. The handset battery and the second battery may be fully charged before using your ANA9620 for the first time. 1. Slide the battery down and off , even when the charge is complete. CHARGING THE BATTERY The rechargeable ...the cover and slide the cover up until it is making good contact with the charging unit . Two charge pockets are available on the ANA9620, with this phone. Remove the battery cover by pressing the latch and sliding the cover down into the handset. ! INSTALLING THE BATTERY 1. Make sure the...
...in operation, as long as it latches into the NOTCH handset. The handset battery and the second battery may be fully charged before using your ANA9620 for the first time. 1. Slide the battery down and off , even when the charge is complete. CHARGING THE BATTERY The rechargeable ...the cover and slide the cover up until it is making good contact with the charging unit . Two charge pockets are available on the ANA9620, with this phone. Remove the battery cover by pressing the latch and sliding the cover down into the handset. ! INSTALLING THE BATTERY 1. Make sure the...
English Owners Manual
Page 14
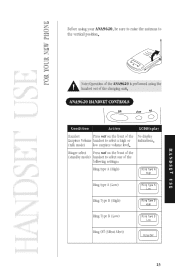
ANA9620 HANDSET CONTROLS talk chan vol Condition Action LCDDisplay Handset Press vol on the front of the (standby mode) handset to select one of the No display Earpiece Volume handset to the vertical position. HANDSET USE FOR YOUR NEW PHONE Handset Use Before using the handset out of the ... B (High) Ring Type B High Ring Type B (Low) Ring Type B Low Ring Off (Silent Alert) Ring Off ! HANDSET USE Note: Operation of the ANA9620 is performed using your ANA9620, be sure to raise the antenna to select a high or indications. (talk mode) low earpiece volume level.
ANA9620 HANDSET CONTROLS talk chan vol Condition Action LCDDisplay Handset Press vol on the front of the (standby mode) handset to select one of the No display Earpiece Volume handset to the vertical position. HANDSET USE FOR YOUR NEW PHONE Handset Use Before using the handset out of the ... B (High) Ring Type B High Ring Type B (Low) Ring Type B Low Ring Off (Silent Alert) Ring Off ! HANDSET USE Note: Operation of the ANA9620 is performed using your ANA9620, be sure to raise the antenna to select a high or indications. (talk mode) low earpiece volume level.
English Owners Manual
Page 15
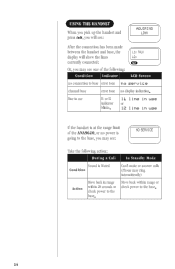
... at the range limit of the following action: During a Call In Standby Mode Sound is Muted Condition Can’t make or answer calls (Phone may see one of the ANA9620, or no power is going to the base, you may see : NO SERVICE Take the following : Condition Indicator LCD Screen no connection...
... at the range limit of the following action: During a Call In Standby Mode Sound is Muted Condition Can’t make or answer calls (Phone may see one of the ANA9620, or no power is going to the base, you may see : NO SERVICE Take the following : Condition Indicator LCD Screen no connection...

English Owners Manual
Page 16
... an available line. To hang up the handset. AutoStandby automatically hangs up the phone. —OR– Press talk to hang up to the last three phone numbers you finish the call immediately. REDIAL FUNCTION The ANA9620 stores up the phone. When the desired number appears, press talk , L1 or L2 to Or ... 2. HANDSET USE # OR Press L1 or L2. 5551212 talk When you hear a dial tone, enter the number you to redial. To redial these numbers: 1. The ANA9620 selects the last line used. MAKING A CALL Press talk. The Press talk . AutoTalk feature allows you are calling.
... an available line. To hang up the handset. AutoStandby automatically hangs up the phone. —OR– Press talk to hang up to the last three phone numbers you finish the call immediately. REDIAL FUNCTION The ANA9620 stores up the phone. When the desired number appears, press talk , L1 or L2 to Or ... 2. HANDSET USE # OR Press L1 or L2. 5551212 talk When you hear a dial tone, enter the number you to redial. To redial these numbers: 1. The ANA9620 selects the last line used. MAKING A CALL Press talk. The Press talk . AutoTalk feature allows you are calling.
English Owners Manual
Page 17
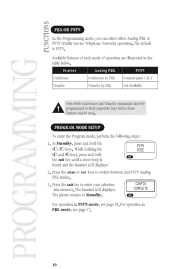
... be programmed to switch between and PSTN Analog PBX modes. 3. While holding the # and keys, press and hold the # , keys. The handset LCD displays: The phone returns to enter your selection into memory. Standby For operation in PSTN mode, see page 17. $ Press the talk key to . Press the chan or...
... be programmed to switch between and PSTN Analog PBX modes. 3. While holding the # and keys, press and hold the # , keys. The handset LCD displays: The phone returns to enter your selection into memory. Standby For operation in PSTN mode, see page 17. $ Press the talk key to . Press the chan or...

English Owners Manual
Page 25
... backup adapter into the DC IN jack of the base. To Base Unit From AC Adapter Backup AC Adapter " ACCESSORIES FOR YOUR NEW PHONE Accessories OPTIONAL HEAD SET The optional headset (EXP9530) provides a “Hands-Free” Option for you to carry the handset, and conduct...power failure. OPTIONAL BACKUP ADAPTER The optional backup adapter (EXP9505) provides protection against losing a call and hang up. Plug the wire from the ANA9620 base. 2. With the headset installed, you will hear through the head set earphone, and talk through the headset microphone. The backup adapter ...
... backup adapter into the DC IN jack of the base. To Base Unit From AC Adapter Backup AC Adapter " ACCESSORIES FOR YOUR NEW PHONE Accessories OPTIONAL HEAD SET The optional headset (EXP9530) provides a “Hands-Free” Option for you to carry the handset, and conduct...power failure. OPTIONAL BACKUP ADAPTER The optional backup adapter (EXP9505) provides protection against losing a call and hang up. Plug the wire from the ANA9620 base. 2. With the headset installed, you will hear through the head set earphone, and talk through the headset microphone. The backup adapter ...

English Owners Manual
Page 27
... the base antenna is not performing to your PBX Administrator or the Uniden Technical Support Department. Warning tone and • Move closer to service this unit yourself. If you are clean. NO SERVICE message. TROUBLESHOOTING FOR YOUR PHONE Troubleshooting If your ANA9620 Cordless Telephone is fully vertical. • Move closer to the base...
... the base antenna is not performing to your PBX Administrator or the Uniden Technical Support Department. Warning tone and • Move closer to service this unit yourself. If you are clean. NO SERVICE message. TROUBLESHOOTING FOR YOUR PHONE Troubleshooting If your ANA9620 Cordless Telephone is fully vertical. • Move closer to the base...
English Owners Manual
Page 28
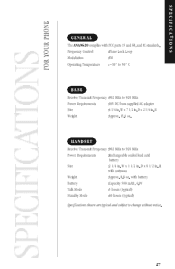
... MHz to 928 MHz Power Requirements :Rechargeable sealed lead acid battery Size :2 1/4 in . D x 2 1/4 in . W x 1 1/2 in . with antenna Weight :Approx. 8.8 oz. SPECIFICATIONS FOR YOUR PHONE SPECIFICATIONS Specifications GENERAL The ANA9620 complies with FCC parts 15 and 68, and IC standards. HANDSET Receive/Transmit Frequency :902 MHz to 928 MHz Power Requirements :10V DC...
... MHz to 928 MHz Power Requirements :Rechargeable sealed lead acid battery Size :2 1/4 in . D x 2 1/4 in . W x 1 1/2 in . with antenna Weight :Approx. 8.8 oz. SPECIFICATIONS FOR YOUR PHONE SPECIFICATIONS Specifications GENERAL The ANA9620 complies with FCC parts 15 and 68, and IC standards. HANDSET Receive/Transmit Frequency :902 MHz to 928 MHz Power Requirements :10V DC...

