
Owners Manual
Page 3
... Information 11 Connect Power 11 MARINE INSTALLATION 12 CONNECT ANTENNA 12 Safety Notice 13 INSTALL MICROPHONE HANGER/ CONNECT MICROPHONE 14 Install Microphone Hanger 14 Connect Microphone 14 Disconnect the Microphone 15 INSTALL RADIO BRACKET/INSTALL RADIO 15 Attach Side Rails 15 Attach Bracket/Install Radio 16 EMERGENCY OPERATION 17 USING YOUR CMX660 17 LCD DISPLAY 17 BASIC...
... Information 11 Connect Power 11 MARINE INSTALLATION 12 CONNECT ANTENNA 12 Safety Notice 13 INSTALL MICROPHONE HANGER/ CONNECT MICROPHONE 14 Install Microphone Hanger 14 Connect Microphone 14 Disconnect the Microphone 15 INSTALL RADIO BRACKET/INSTALL RADIO 15 Attach Side Rails 15 Attach Bracket/Install Radio 16 EMERGENCY OPERATION 17 USING YOUR CMX660 17 LCD DISPLAY 17 BASIC...

Owners Manual
Page 10
... unit are: • Connect Power • Connect Antenna • Install Microphone Hanger/Connect Microphone • Install Radio Bracket/Install Radio CONNECT POWER Uniden recommends connecting the power lead to create a short circuit. This way, the radio is automatically turned off . ...convenient for information. 10 If in doubt, contact your vehicle dealer for operating the radio but does not interfere with bracket installation. INSTALLATION You can install the CMX660 either on the fuse block or to a point in a vehicle. However, be connected to an available terminal on top/...
... unit are: • Connect Power • Connect Antenna • Install Microphone Hanger/Connect Microphone • Install Radio Bracket/Install Radio CONNECT POWER Uniden recommends connecting the power lead to create a short circuit. This way, the radio is automatically turned off . ...convenient for information. 10 If in doubt, contact your vehicle dealer for operating the radio but does not interfere with bracket installation. INSTALLATION You can install the CMX660 either on the fuse block or to a point in a vehicle. However, be connected to an available terminal on top/...

Owners Manual
Page 11
...cord from the radio. 2. Then connect the black power cord to the Ignition Switch Accessory Terminal or the positive (+) battery terminal. 3. The CMX660 can operate on 12VDC power supply. Connect Power 1. Connect the power cord to the power connector from the radio to the positive (+) battery terminal... connected to the Ignition Switch Accessory Terminal, the vehicle chassis, or negative (-) battery terminal. 11 Ground Information This radio may be installed and used in any 12volt DC negative ground system vehicle. Next, connect the black power cord to the vehicle motor block.
...cord from the radio. 2. Then connect the black power cord to the Ignition Switch Accessory Terminal or the positive (+) battery terminal. 3. The CMX660 can operate on 12VDC power supply. Connect Power 1. Connect the power cord to the power connector from the radio to the positive (+) battery terminal... connected to the Ignition Switch Accessory Terminal, the vehicle chassis, or negative (-) battery terminal. 11 Ground Information This radio may be installed and used in any 12volt DC negative ground system vehicle. Next, connect the black power cord to the vehicle motor block.

Owners Manual
Page 12
...antenna. This can damage the radio. 12 Start the vehicle. To achieve the maximum transmission distance, Uniden strongly recommends that you select the proper antenna for automobile installation. Only a properly matched antenna system will allow maximum power transfer from the 50-ohm transmission line ...to prevent electrolysis between the fittings in the hull and the water. Your Uniden dealer is important to adequately ground...
...antenna. This can damage the radio. 12 Start the vehicle. To achieve the maximum transmission distance, Uniden strongly recommends that you select the proper antenna for automobile installation. Only a properly matched antenna system will allow maximum power transfer from the 50-ohm transmission line ...to prevent electrolysis between the fittings in the hull and the water. Your Uniden dealer is important to adequately ground...
Owners Manual
Page 13
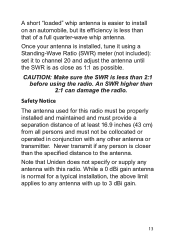
... limit applies to any other antenna or transmitter. Once your antenna is installed, tune it to the antenna. Never transmit if any person is closer than that Uniden does not specify or supply any antenna with any antenna with up to install on an automobile, but its efficiency is less than the specified... with this radio. A short "loaded" whip antenna is easier to 3 dBi gain. 13 While a 0 dBi gain antenna is normal for this radio must be properly installed and maintained and must provide a separation distance of a full quarter-wave whip antenna.
... limit applies to any other antenna or transmitter. Once your antenna is installed, tune it to the antenna. Never transmit if any person is closer than that Uniden does not specify or supply any antenna with any antenna with up to install on an automobile, but its efficiency is less than the specified... with this radio. A short "loaded" whip antenna is easier to 3 dBi gain. 13 While a 0 dBi gain antenna is normal for this radio must be properly installed and maintained and must provide a separation distance of a full quarter-wave whip antenna.
Owners Manual
Page 14
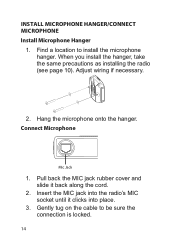
Pull back the MIC jack rubber cover and slide it clicks into place. 3. Adjust wiring if necessary. 2. Insert the MIC jack into the radio's MIC socket until it back along the cord. 2. INSTALL MICROPHONE HANGER/CONNECT MICROPHONE Install Microphone Hanger 1. Find a location to be sure the connection is locked. 14 Hang the microphone onto the hanger. Connect Microphone Mic Jack 1. When you install the hanger, take the same precautions as installing the radio (see page 10). Gently tug on the cable to install the microphone hanger.
Pull back the MIC jack rubber cover and slide it clicks into place. 3. Adjust wiring if necessary. 2. Insert the MIC jack into the radio's MIC socket until it back along the cord. 2. INSTALL MICROPHONE HANGER/CONNECT MICROPHONE Install Microphone Hanger 1. Find a location to be sure the connection is locked. 14 Hang the microphone onto the hanger. Connect Microphone Mic Jack 1. When you install the hanger, take the same precautions as installing the radio (see page 10). Gently tug on the cable to install the microphone hanger.

Owners Manual
Page 15
... the MIC jack's lock tab; Pull back the MIC jack rubber cover and slide it back along the sides of the extension cable. INSTALL RADIO BRACKET/INSTALL RADIO The CMX660 uses a slide mount assembly to the other end of the radio and insert L-tabs into the L-tab slots. It can be mounted either...
... the MIC jack's lock tab; Pull back the MIC jack rubber cover and slide it back along the sides of the extension cable. INSTALL RADIO BRACKET/INSTALL RADIO The CMX660 uses a slide mount assembly to the other end of the radio and insert L-tabs into the L-tab slots. It can be mounted either...
Owners Manual
Page 16
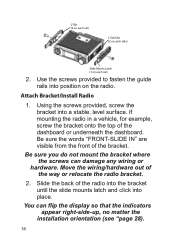
..., screw the bracket onto the top of the way or relocate the radio bracket. 2. Using the screws provided, screw the bracket into place. Attach Bracket/Install Radio 1. Move the wiring/hardware out of the dashboard or underneath the dashboard. You can damage any wiring or hardware. Be sure you do not... mount the bracket where the screws can flip the display so that the indicators appear right-side-up, no matter the installation orientation (see "page 28). 16 Slide the back of the bracket. Be sure the words "FRONT-SLIDE IN" are visible from the front of the...
..., screw the bracket onto the top of the way or relocate the radio bracket. 2. Using the screws provided, screw the bracket into place. Attach Bracket/Install Radio 1. Move the wiring/hardware out of the dashboard or underneath the dashboard. You can damage any wiring or hardware. Be sure you do not... mount the bracket where the screws can flip the display so that the indicators appear right-side-up, no matter the installation orientation (see "page 28). 16 Slide the back of the bracket. Be sure the words "FRONT-SLIDE IN" are visible from the front of the...

Owners Manual
Page 36
...free from defects in materials and craftsmanship with the performance of this warranty. Uniden Product to be of no further effect one year after the date of any system not manufactured by Uniden, or (F) installed or programmed by anyone other than as detailed by the owner's manual for ... with only the limitations or exclusions set out below. The warranty is invalid if the Product is in any configurations not sold by Uniden, (C) improperly installed, (D) serviced or repaired by someone other cost (except shipping and handling) incurred by warrantor or its option, repair or replace the...
...free from defects in materials and craftsmanship with the performance of this warranty. Uniden Product to be of no further effect one year after the date of any system not manufactured by Uniden, or (F) installed or programmed by anyone other than as detailed by the owner's manual for ... with only the limitations or exclusions set out below. The warranty is invalid if the Product is in any configurations not sold by Uniden, (C) improperly installed, (D) serviced or repaired by someone other cost (except shipping and handling) incurred by warrantor or its option, repair or replace the...

