
English Owners Manual
Page 2
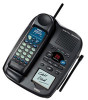
INTRODUCTION TO YOUR NEW PHONE Introduction Thank you for explanation purposes. Features • 900 MHz Extended range • Secure Digital Transmission • Integrated Answering Device • Long Distance Manager • ... Volume Control • Speakerphone • 3-Way Conference Operation • Intercom Note: Some illustrations in this manual may differ from the actual unit for choosing the Uniden EXLA 8950 cordless telephone. This phone is designed to exacting standards that provide reliability, long life and outstanding performance.
INTRODUCTION TO YOUR NEW PHONE Introduction Thank you for explanation purposes. Features • 900 MHz Extended range • Secure Digital Transmission • Integrated Answering Device • Long Distance Manager • ... Volume Control • Speakerphone • 3-Way Conference Operation • Intercom Note: Some illustrations in this manual may differ from the actual unit for choosing the Uniden EXLA 8950 cordless telephone. This phone is designed to exacting standards that provide reliability, long life and outstanding performance.

English Owners Manual
Page 4
.... Delete key 29. Answer on/off key 32. LED display 38. Flash key 10. Ringer select key 21. Play/Stop key 39. Skip key 41. Phone jack ANN/4/1 RING TIME REC TIME 2/4/TS 43 44 45 46 47 48 Handset retainer clip storage 26. Ring time switch 45. Handset antenna 2. Memory...
.... Delete key 29. Answer on/off key 32. LED display 38. Flash key 10. Ringer select key 21. Play/Stop key 39. Skip key 41. Phone jack ANN/4/1 RING TIME REC TIME 2/4/TS 43 44 45 46 47 48 Handset retainer clip storage 26. Ring time switch 45. Handset antenna 2. Memory...

English Owners Manual
Page 5
... a call 15 Adjusting ringer and earpiece volume 16 Redialing a call 17 Using the speakerphone 17 Mute 18 Memory Dialing Storing phone numbers 19 Making calls with memory dialing 20 Erasing a stored phone number 21 3-way Conference Features 3-way conferencing 22 Using your EXLA 8950 intercom 23 Transferring a call 24 The Integrated Answering...
... a call 15 Adjusting ringer and earpiece volume 16 Redialing a call 17 Using the speakerphone 17 Mute 18 Memory Dialing Storing phone numbers 19 Making calls with memory dialing 20 Erasing a stored phone number 21 3-way Conference Features 3-way conferencing 22 Using your EXLA 8950 intercom 23 Transferring a call 24 The Integrated Answering...

English Owners Manual
Page 6
... base unit and handset when you want to reset the security code, see page 36. 3 A random security code will be set up before using the phone.
... base unit and handset when you want to reset the security code, see page 36. 3 A random security code will be set up before using the phone.
English Owners Manual
Page 8
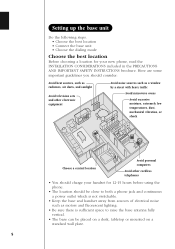
...• Connect the base unit • Choose the dialing mode Choose the best location Before choosing a location for 12-15 hours before using the phone. • The location should be close to raise the base antenna fully vertical. • The base can be placed on a desk, tabletop or... television sets and other electronic equipment Avoid noise sources such as motors and fluorescent lighting. • Be sure there is sufficient space to both a phone jack and continuous a power outlet which is not switchable. • Keep the base and handset away from sources of electrical noise such as a...
...• Connect the base unit • Choose the dialing mode Choose the best location Before choosing a location for 12-15 hours before using the phone. • The location should be close to raise the base antenna fully vertical. • The base can be placed on a desk, tabletop or... television sets and other electronic equipment Avoid noise sources such as motors and fluorescent lighting. • Be sure there is sufficient space to both a phone jack and continuous a power outlet which is not switchable. • Keep the base and handset away from sources of electrical noise such as a...

English Owners Manual
Page 11
... firmly seated. 8 Mounting the base unit on a wall Standard wall plate mounting This phone can be mounted on any standard telephone wall plate. 1 1 Snap the wall mount adapter into the telephone outlet. 2 - 7 4 Wrap the AC adapter 6 2 cord inside the ...
... firmly seated. 8 Mounting the base unit on a wall Standard wall plate mounting This phone can be mounted on any standard telephone wall plate. 1 1 Snap the wall mount adapter into the telephone outlet. 2 - 7 4 Wrap the AC adapter 6 2 cord inside the ...

English Owners Manual
Page 12
... material is down. Handset retainer 8 On the base unit, pull the handset retainer out of an inch between the wall and screwheads for mounting the phone. 2 Refer to steps 1 through 9 on pages 8 and 9 to mount the telephone. 9 The retainer holds the handset in . 1 Insert two mounting ...screws into the wall. • Try to mount your phone directly to back. That could cause a hazard when inserting screws into the wall, (with their appropriate anchoring device), 3-15/16 inches apart. Allow about 3/...
... material is down. Handset retainer 8 On the base unit, pull the handset retainer out of an inch between the wall and screwheads for mounting the phone. 2 Refer to steps 1 through 9 on pages 8 and 9 to mount the telephone. 9 The retainer holds the handset in . 1 Insert two mounting ...screws into the wall. • Try to mount your phone directly to back. That could cause a hazard when inserting screws into the wall, (with their appropriate anchoring device), 3-15/16 inches apart. Allow about 3/...

English Owners Manual
Page 13
... of the base unit lights, and charging begins. You can place either side up for more than 12-15 hours before you start using your phone. 1 Press the battery cover release. Charge the battery for at least 12-15 hours. status LED 10 Red 3 Slide the battery cover forward until it...
... of the base unit lights, and charging begins. You can place either side up for more than 12-15 hours before you start using your phone. 1 Press the battery cover release. Charge the battery for at least 12-15 hours. status LED 10 Red 3 Slide the battery cover forward until it...
English Owners Manual
Page 14
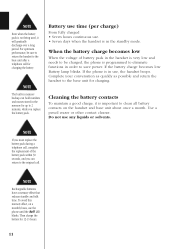
...• Seven hours coutinuous use , the handset beeps. If the phone is in use . • Seven days when the handset is in the memory for charging the battery. Use a pencil eraser or other contact cleaner. Do not use the phone until the batt LED blinks. For optimum performance, be charged, the... phone is programmed to eliminate functions in memory backup can return to the base unit for 12-15 hours. 11 When...
...• Seven hours coutinuous use , the handset beeps. If the phone is in use . • Seven days when the handset is in the memory for charging the battery. Use a pencil eraser or other contact cleaner. Do not use the phone until the batt LED blinks. For optimum performance, be charged, the... phone is programmed to eliminate functions in memory backup can return to the base unit for 12-15 hours. 11 When...

English Owners Manual
Page 15
... Other Operations To To improve reception To adjust the earpiecer volume To temporarily switch to tone dial (When base is set to the base. The phone number can be sent as tone dialing. Press * tone . Press redial/p . Press flash when a new call comes in during the call From the handset 1 Pick... pulse mode) To enter a pause within the numbers dialed To use Call Waiting service Do this Press chan . The "talk/batt " LED blinks. 3 Dial the phone number. 4 To hang up handset. 2 Press talk . Press • or ª during a conversation. 12
... Other Operations To To improve reception To adjust the earpiecer volume To temporarily switch to tone dial (When base is set to the base. The phone number can be sent as tone dialing. Press * tone . Press redial/p . Press flash when a new call comes in during the call From the handset 1 Pick... pulse mode) To enter a pause within the numbers dialed To use Call Waiting service Do this Press chan . The "talk/batt " LED blinks. 3 Dial the phone number. 4 To hang up handset. 2 Press talk . Press • or ª during a conversation. 12

English Owners Manual
Page 16
... calling 1-800-458-2682. 2. Placing a call from the handset 1 Pick up and Registration 1. You must register your phone. 2 Press LongDst . Each month you must dial a "1" or "011" when using the LDM feature. 4 To complete, press talk or return the handset on the base....dialing a long distance (1+) or international (011+) number. LDM call using the LDM feature, you will be asked a few simple questions, such as name, address, and phone number. 3. You will receive an itemized bill for calls placed through the LDM service. The "talk/batt " LED blinks. 3 Enter the long distance...
... calling 1-800-458-2682. 2. Placing a call from the handset 1 Pick up and Registration 1. You must register your phone. 2 Press LongDst . Each month you must dial a "1" or "011" when using the LDM feature. 4 To complete, press talk or return the handset on the base....dialing a long distance (1+) or international (011+) number. LDM call using the LDM feature, you will be asked a few simple questions, such as name, address, and phone number. 3. You will receive an itemized bill for calls placed through the LDM service. The "talk/batt " LED blinks. 3 Enter the long distance...

English Owners Manual
Page 17
... BUTTON TO DIAL 911 BECAUSE IT WILL NOT ACCESS EMERGENCY SERVICE. • Do not use the LongDst key for placing local calls, contacting your local phone company for repair or customer service, accessing emergency service or for toll free numbers. • All calls placed through the LDM feature will be charged...
... BUTTON TO DIAL 911 BECAUSE IT WILL NOT ACCESS EMERGENCY SERVICE. • Do not use the LongDst key for placing local calls, contacting your local phone company for repair or customer service, accessing emergency service or for toll free numbers. • All calls placed through the LDM feature will be charged...

English Owners Manual
Page 18
The status LED on the base flashes. 2 Press speaker . 3 Press speaker to finish the call From the handset Handset on the base 1 Phone rings. Receiving a call . From the base 1 The phone rings. status LED 15 The "talk/batt " LED flashes. 2 Pick up the handset and speak. 3 Press talk or return the handset to the base to finish the call . The "talk/batt " LED flashes. 2 Press any key (except mute ) and speak. 3 Press talk or return the handset to the base to finish the call . Handset off the base 1 Phone rings.
The status LED on the base flashes. 2 Press speaker . 3 Press speaker to finish the call From the handset Handset on the base 1 Phone rings. Receiving a call . From the base 1 The phone rings. status LED 15 The "talk/batt " LED flashes. 2 Pick up the handset and speak. 3 Press talk or return the handset to the base to finish the call . The "talk/batt " LED flashes. 2 Press any key (except mute ) and speak. 3 Press talk or return the handset to the base to finish the call . Handset off the base 1 Phone rings.

English Owners Manual
Page 21
Ringer mute Press mute when phone is ringing to turn off the handset microphone. 2 To cancel mute, press mute or talk . When speaking on the handset 1 Press mute during a telephone call, to immediately mute the ring. 18 Mute You can turn off the sound from the handset microphone.
Ringer mute Press mute when phone is ringing to turn off the handset microphone. 2 To cancel mute, press mute or talk . When speaking on the handset 1 Press mute during a telephone call, to immediately mute the ring. 18 Mute You can turn off the sound from the handset microphone.

English Owners Manual
Page 22
.... 5 The confirmation beep indicates the number has been stored. You must press a key within 20 seconds or the phone will return to 10 numbers in handset plus 10. Press redial/p to standby. Storing phone numbers Your EXLA 8950 stores up to 20 digits). 3 Press mem again. 4 Press the keypad 0 to 9 ... any time. The "talk/batt " LED flashes. 2 Enter the number you return the handset to the cradle, the phone will return to place a pause in the standby mode. On the handset 1 Press mem in the phone number sequence. If you wish to store (up to standby too. MEMORY DIALING 19
.... 5 The confirmation beep indicates the number has been stored. You must press a key within 20 seconds or the phone will return to 10 numbers in handset plus 10. Press redial/p to standby. Storing phone numbers Your EXLA 8950 stores up to 20 digits). 3 Press mem again. 4 Press the keypad 0 to 9 ... any time. The "talk/batt " LED flashes. 2 Enter the number you return the handset to the cradle, the phone will return to place a pause in the standby mode. On the handset 1 Press mem in the phone number sequence. If you wish to store (up to standby too. MEMORY DIALING 19

English Owners Manual
Page 24
A confirmation tone indicates the memory has been erased. 21 The "talk/batt " LED blinks. 2 Press mem again. 3 Enter the memory location number 0 - 9 of the number you wish to delete. Erasing a stored phone number From the handset 1 Press mem .
A confirmation tone indicates the memory has been erased. 21 The "talk/batt " LED blinks. 2 Press mem again. 3 Enter the memory location number 0 - 9 of the number you wish to delete. Erasing a stored phone number From the handset 1 Press mem .

English Owners Manual
Page 28
... Day Stamp • Remote Message Retrieval and Room Monitor • Toll Saver • Conversation Recording Digital Tapeless Recording allows you 're away from your phone. You'll never have to callers when you to use the phone, or to announce a special message to worry about a tape wearing out, jamming, or resetting improperly.
... Day Stamp • Remote Message Retrieval and Room Monitor • Toll Saver • Conversation Recording Digital Tapeless Recording allows you 're away from your phone. You'll never have to callers when you to use the phone, or to announce a special message to worry about a tape wearing out, jamming, or resetting improperly.

English Owners Manual
Page 30
... 30 second. Start recording your message immediately after the tone." ª Recording your outgoing message. A long tone sounds and your message plays back on the phone. ª Choosing between your message, press greeting or play the outgoing message. 2 While the message is available to take your call. You can record a greeting...
... 30 second. Start recording your message immediately after the tone." ª Recording your outgoing message. A long tone sounds and your message plays back on the phone. ª Choosing between your message, press greeting or play the outgoing message. 2 While the message is available to take your call. You can record a greeting...

English Owners Manual
Page 38
...sounds in the room where your base is installed. 1 Call your telephone number. 2 While the answering machine is activated, press # and your phone is installed. Or select another 15 seconds. The answering system automatically returns to monitor the room for another remote function. After 15 seconds, the... * Press # then to standby. 35 Or hang up to exit the system. Remote room monitor You can call your answering system from any touch-tone phone and monitor sounds in the room where your PIN code. 3 The answering system begins announcing the time and day. 4 Press # then 5 to stop ...
...sounds in the room where your base is installed. 1 Call your telephone number. 2 While the answering machine is activated, press # and your phone is installed. Or select another 15 seconds. The answering system automatically returns to monitor the room for another remote function. After 15 seconds, the... * Press # then to standby. 35 Or hang up to exit the system. Remote room monitor You can call your answering system from any touch-tone phone and monitor sounds in the room where your PIN code. 3 The answering system begins announcing the time and day. 4 Press # then 5 to stop ...

English Owners Manual
Page 40
Installing the beltclip To attach the beltclip To remove the beltclip Insert the beltclip into the headset jack. Headset installation Your phone may be used with an optional headset. Your phone is ready for hands-free conversation. headset jack 37 To use this feature, simply plug any standard 2.5mm headset plug into the holes on each side of the beltclip to release the tabs from the holes. Pull both sides of the handset. Press down until it clicks.
Installing the beltclip To attach the beltclip To remove the beltclip Insert the beltclip into the headset jack. Headset installation Your phone may be used with an optional headset. Your phone is ready for hands-free conversation. headset jack 37 To use this feature, simply plug any standard 2.5mm headset plug into the holes on each side of the beltclip to release the tabs from the holes. Pull both sides of the handset. Press down until it clicks.

