English Owners Manual
Page 2
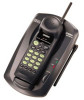
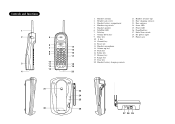
... 1. Handset antenna 2. Handset ring switch 5. Handset microphone 14. Tone key 20. Handset speaker 6. Flash key 16. Handset retainer clip 22. Page/Find key 27. Handset battery charging contacts 21. Phone jack 21 22 status power page/find 23 24 25 26 27 28 29 Redial key 17. Status LED 25. Handset...
... 1. Handset antenna 2. Handset ring switch 5. Handset microphone 14. Tone key 20. Handset speaker 6. Flash key 16. Handset retainer clip 22. Page/Find key 27. Handset battery charging contacts 21. Phone jack 21 22 status power page/find 23 24 25 26 27 28 29 Redial key 17. Status LED 25. Handset...
English Owners Manual
Page 3
...Checking the package contents 3 Step 2: Setting up the base unit 4 Mounting the base unit on a wall ...........7 Step 3: Installing the handset battery pack..........9 Automatic digital code security 10 Basics Making a call 11 Receiving a call 12 Ringer mute 12 Flash and Call Waiting 13 Adjusting the............13 Redialing a call 14 Mute 15 Using page feature 16 Memory Dialing Storing phone numbers 17 Making calls with memory dialing 18 Chain dialing 18 Erasing a stored phone number 19 Additional Information Installing the beltclip 20 Headset installation 20 Note on power sources...
...Checking the package contents 3 Step 2: Setting up the base unit 4 Mounting the base unit on a wall ...........7 Step 3: Installing the handset battery pack..........9 Automatic digital code security 10 Basics Making a call 11 Receiving a call 12 Ringer mute 12 Flash and Call Waiting 13 Adjusting the............13 Redialing a call 14 Mute 15 Using page feature 16 Memory Dialing Storing phone numbers 17 Making calls with memory dialing 18 Chain dialing 18 Erasing a stored phone number 19 Additional Information Installing the beltclip 20 Headset installation 20 Note on power sources...
English Owners Manual
Page 4
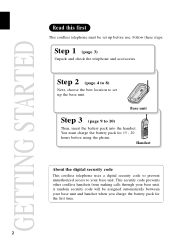
This security code prevents other cordless handsets from making calls through your base unit and handset when you charge the battery pack for 15 - 20 hours before use. SPSECPDTRRI GAEMIATDA L 900MHz status power page/find Base unit Step 3 (page 9 to your base unit.... A random security code will be set up before using the phone. Handset About the digital security code This cordless telephone uses a digital security code to prevent unauthorized access to 10) Then, insert the battery pack into the handset. GETTING STARTED Read this first This cordless telephone must...
This security code prevents other cordless handsets from making calls through your base unit and handset when you charge the battery pack for 15 - 20 hours before use. SPSECPDTRRI GAEMIATDA L 900MHz status power page/find Base unit Step 3 (page 9 to your base unit.... A random security code will be set up before using the phone. Handset About the digital security code This cordless telephone uses a digital security code to prevent unauthorized access to 10) Then, insert the battery pack into the handset. GETTING STARTED Read this first This cordless telephone must...
English Owners Manual
Page 11
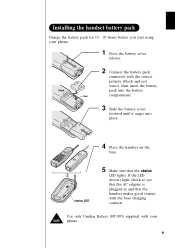
Installing the handset battery pack Charge the battery pack for 15 - 20 hours before you start using your phone. 9 If the LED doesn't light, check to see that the AC adapter is plugged in and that the status LED lights. ...black and red wires), then insert the battery Black pack into the battery Red compartment. 3 Slide the battery cover forward until it snaps into place. 4 Place the handset on the base. Use only Uniden Battery (BT-905) supplied with your phone. 1 Press the battery cover release. 2 Connect the battery pack connector with the base charging contacts....
Installing the handset battery pack Charge the battery pack for 15 - 20 hours before you start using your phone. 9 If the LED doesn't light, check to see that the AC adapter is plugged in and that the status LED lights. ...black and red wires), then insert the battery Black pack into the battery Red compartment. 3 Slide the battery cover forward until it snaps into place. 4 Place the handset on the base. Use only Uniden Battery (BT-905) supplied with your phone. 1 Press the battery cover release. 2 Connect the battery pack connector with the base charging contacts....
English Owners Manual
Page 12
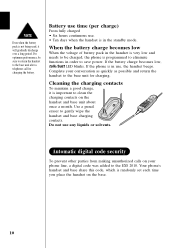
... on the base. 10 Use a pencil eraser to save power. Complete your phone line, a digital code was added to the EXS 2010. If the battery charge becomes low, talk/batt LED blinks. Your phone's handset and base share this code, which is randomly set each time you ...charge, it will gradually discharge over a long period. For optimum performance, be charged, the phone is in order to gently wipe the handset and base charging SPSECPDTRRI GAEMIATDA L 900MHz status power page/find contacts. Battery use time (per charge) From fully charged • Six hours coutinuous use. •...
... on the base. 10 Use a pencil eraser to save power. Complete your phone line, a digital code was added to the EXS 2010. If the battery charge becomes low, talk/batt LED blinks. Your phone's handset and base share this code, which is randomly set each time you ...charge, it will gradually discharge over a long period. For optimum performance, be charged, the phone is in order to gently wipe the handset and base charging SPSECPDTRRI GAEMIATDA L 900MHz status power page/find contacts. Battery use time (per charge) From fully charged • Six hours coutinuous use. •...
English Owners Manual
Page 24
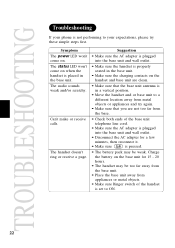
.... • Make sure Ringer switch of the handset is placed in the base unit. The handset doesn't ring or receive a page. TROUBLESHOOTING Troubleshooting If your phone is not performing to a different location away from metal objects or appliances and try again. • Make sure that you are clean. • Make sure... unit antenna is in a vertical position. • Move the handset and or base unit to your expectations, please try these simple steps first. Charge the battery on the base unit for a few minutes, then reconnect it. • Make sure talk is pressed. • The...
.... • Make sure Ringer switch of the handset is placed in the base unit. The handset doesn't ring or receive a page. TROUBLESHOOTING Troubleshooting If your phone is not performing to a different location away from metal objects or appliances and try again. • Make sure that you are clean. • Make sure... unit antenna is in a vertical position. • Move the handset and or base unit to your expectations, please try these simple steps first. Charge the battery on the base unit for a few minutes, then reconnect it. • Make sure talk is pressed. • The...
English Owners Manual
Page 26
...Battery pack Preparing and charging 9 Replacement and handling 21 Beltclip installation 20 S Setup Base unit 4 Handset 9 T, U, V, W, X, Y, Z Troubleshooting 22 C Chain dialing 18 Connection 5 D Dialing mode 6 Digital security code ........2, 10 E, F, G Earpiece volume 13 H, I, J, K, L Handset ringer tone and volume 13 Headset installation 20 M, N, O Maintenance 21 Making a call 11 Memory dialing Erasing a stored phone... number 19 Making calls with memory dialing......18 Storing phone numbers 17 Mounting the base unit to a ...
...Battery pack Preparing and charging 9 Replacement and handling 21 Beltclip installation 20 S Setup Base unit 4 Handset 9 T, U, V, W, X, Y, Z Troubleshooting 22 C Chain dialing 18 Connection 5 D Dialing mode 6 Digital security code ........2, 10 E, F, G Earpiece volume 13 H, I, J, K, L Handset ringer tone and volume 13 Headset installation 20 M, N, O Maintenance 21 Making a call 11 Memory dialing Erasing a stored phone... number 19 Making calls with memory dialing......18 Storing phone numbers 17 Mounting the base unit to a ...


