
English Owners Manual
Page 3
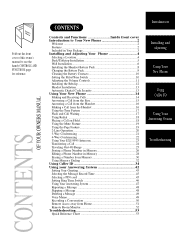
...2 Features 2 Included in Your Package 3 Installing and Adjusting Your Phone 4 Selecting a Location 4 Desk/Tabletop Installation 5 Wall Installation 6 Installing the Handset Battery Pack 8 Charging the Battery Pack 9 Cleaning the Battery Contacts 10 Setting the Pulse/Tone Switch 10 Adjusting the Volume Controls 11 Installing the Beltclip... New Phone 14 Making and Receiving Calls 14 Answering a Call from the Base 15 Answering a Call from the Handset 16 Making a Call from the Handset 16 Using the Tone Feature 17 Flash and Call Waiting 17 Using Redial 18 Placing a Call on Hold 18...
...2 Features 2 Included in Your Package 3 Installing and Adjusting Your Phone 4 Selecting a Location 4 Desk/Tabletop Installation 5 Wall Installation 6 Installing the Handset Battery Pack 8 Charging the Battery Pack 9 Cleaning the Battery Contacts 10 Setting the Pulse/Tone Switch 10 Adjusting the Volume Controls 11 Installing the Beltclip... New Phone 14 Making and Receiving Calls 14 Answering a Call from the Base 15 Answering a Call from the Handset 16 Making a Call from the Handset 16 Using the Tone Feature 17 Flash and Call Waiting 17 Using Redial 18 Placing a Call on Hold 18...
English Owners Manual
Page 4
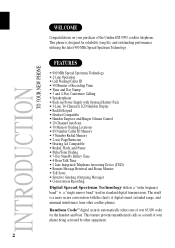
... of the Uniden EXS 9995 cordless telephone. Random CodeTM digital security automatically selects one of digital sound, extended range, and minimal interference from other equipment. 2 This phone is a more secure conversation with Optional Battery Pack • 3-Line, 16-Character LCD Handset Display •...reliability, long life, and outstanding performance utilizing the latest 900 MHz Spread Spectrum Technology. The result is designed for the handset and base. INTRODUCTION TO YOUR NEW PHONE WELCOME Congratulations on your phone being activated by other cordless phones. a "single...
... of the Uniden EXS 9995 cordless telephone. Random CodeTM digital security automatically selects one of digital sound, extended range, and minimal interference from other equipment. 2 This phone is a more secure conversation with Optional Battery Pack • 3-Line, 16-Character LCD Handset Display •...reliability, long life, and outstanding performance utilizing the latest 900 MHz Spread Spectrum Technology. The result is designed for the handset and base. INTRODUCTION TO YOUR NEW PHONE WELCOME Congratulations on your phone being activated by other cordless phones. a "single...
English Owners Manual
Page 5
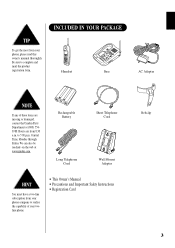
... phone. • This Owner's Manual • Precautions and Important Safety Instructions • Registration Card Beltclip 3 INCLUDED IN YOUR PACKAGE To get the most from 8:30 a.m. Handset Base AC Adapter If any of your phone, please read this owner's manual thoroughly. Be sure to 5:00 p.m. We can also be reached on the...
... phone. • This Owner's Manual • Precautions and Important Safety Instructions • Registration Card Beltclip 3 INCLUDED IN YOUR PACKAGE To get the most from 8:30 a.m. Handset Base AC Adapter If any of your phone, please read this owner's manual thoroughly. Be sure to 5:00 p.m. We can also be reached on the...
English Owners Manual
Page 6
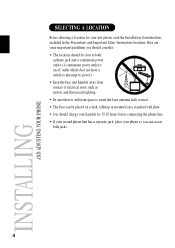
... outlet. (A continuous power outlet is an AC outlet which does not have a switch to interrupt its power.) • Keep the base and handset away from sources of electrical noise such as motors and fluorescent lighting. • Be sure there is sufficient space to rotate the base antenna fully... vertical. • The base can be placed on a desk, tabletop or mounted on a standard wall plate. • You should charge your handset for your phone so you can access both jacks. 4 INSTALLING AND ADJUSTING YOUR PHONE SELECTING A LOCATION Before choosing a location for 15-20 hours before ...
... outlet. (A continuous power outlet is an AC outlet which does not have a switch to interrupt its power.) • Keep the base and handset away from sources of electrical noise such as motors and fluorescent lighting. • Be sure there is sufficient space to rotate the base antenna fully... vertical. • The base can be placed on a desk, tabletop or mounted on a standard wall plate. • You should charge your handset for your phone so you can access both jacks. 4 INSTALLING AND ADJUSTING YOUR PHONE SELECTING A LOCATION Before choosing a location for 15-20 hours before ...
English Owners Manual
Page 7
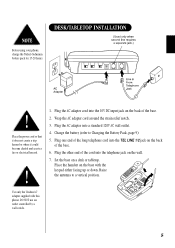
... trip hazard or where it could become chafed and create a fire or electrical hazard. 1. Plug the other end of the base. 2. Place the handset on the base with this phone. Plug the AC adapter into the telephone jack on a desk or tabletop. Raise the antenna to Charging the Battery... Pack, page 9). 5. Use only the Uniden AC adapter supplied with the keypad either facing up or down. DESK/TABLETOP INSTALLATION Before using your phone, charge the Nickel-Cadmium battery pack for...
... trip hazard or where it could become chafed and create a fire or electrical hazard. 1. Plug the other end of the base. 2. Place the handset on the base with this phone. Plug the AC adapter into the telephone jack on a desk or tabletop. Raise the antenna to Charging the Battery... Pack, page 9). 5. Use only the Uniden AC adapter supplied with the keypad either facing up or down. DESK/TABLETOP INSTALLATION Before using your phone, charge the Nickel-Cadmium battery pack for...
English Owners Manual
Page 9
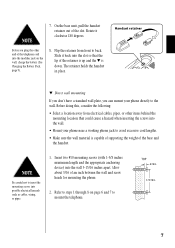
Rotate it back into the wall 3-15/16 inches apart. The retainer holds the handset in place. Insert two #10 mounting screws (with 1-3/8 inches minimum length and the appropriate anchoring device) into the slot...a hazard when inserting the screws into the wall. • Mount your phone directly to the wall. On the base unit, pull the handset retainer out of an inch between the wall and screw heads for mounting the phone. 2. Before doing this, consider the following: •... and 7 to back. 7. Flip the retainer from electrical cables, pipes, or other end of the base and the handset.
Rotate it back into the wall 3-15/16 inches apart. The retainer holds the handset in place. Insert two #10 mounting screws (with 1-3/8 inches minimum length and the appropriate anchoring device) into the slot...a hazard when inserting the screws into the wall. • Mount your phone directly to the wall. On the base unit, pull the handset retainer out of an inch between the wall and screw heads for mounting the phone. 2. Before doing this, consider the following: •... and 7 to back. 7. Flip the retainer from electrical cables, pipes, or other end of the base and the handset.

English Owners Manual
Page 10
INSTALLING THE HANDSET BATTERY PACK 1. Install the nickel-cadmium battery with your phone. Slide the battery cover forward until it snaps into place 8 Slide cover off. 2. Use only Uniden Battery (model BT-999) supplied with the label down. 3. Press the battery cover release.
INSTALLING THE HANDSET BATTERY PACK 1. Install the nickel-cadmium battery with your phone. Slide the battery cover forward until it snaps into place 8 Slide cover off. 2. Use only Uniden Battery (model BT-999) supplied with the label down. 3. Press the battery cover release.
English Owners Manual
Page 11
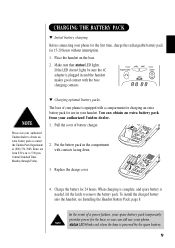
... Installing the Handset Battery Pack, page 8. Make sure that status LED lights. If the LED doesn't light, be sure the AC adapter is powered by the spare battery. 9 Hours are from your authorized Uniden dealer. 1. When charging is complete, and spare battery is equipped with contacts facing... interruption. 1. Charge the battery for use your authorized Uniden dealer to obtain an extra battery pack or contact the Uniden Parts Department at (800) 554-3988. CHARGING THE BATTERY PACK w Initial battery charging Before connecting your handset. You can still use in the compartment with a ...
... Installing the Handset Battery Pack, page 8. Make sure that status LED lights. If the LED doesn't light, be sure the AC adapter is powered by the spare battery. 9 Hours are from your authorized Uniden dealer. 1. When charging is complete, and spare battery is equipped with contacts facing... interruption. 1. Charge the battery for use your authorized Uniden dealer to obtain an extra battery pack or contact the Uniden Parts Department at (800) 554-3988. CHARGING THE BATTERY PACK w Initial battery charging Before connecting your handset. You can still use in the compartment with a ...
English Owners Manual
Page 12
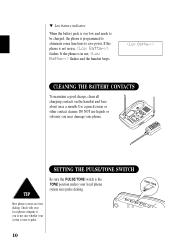
... the battery pack is very low and needs to save power. CLEANING THE BATTERY CONTACTS To maintain a good charge, clean all charging contacts on the handset and base about once a month. If the phone is programmed to eliminate some functions to be charged, the phone is not in use, flashes and...
... the battery pack is very low and needs to save power. CLEANING THE BATTERY CONTACTS To maintain a good charge, clean all charging contacts on the handset and base about once a month. If the phone is programmed to eliminate some functions to be charged, the phone is not in use, flashes and...
English Owners Manual
Page 13
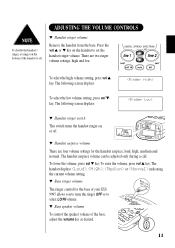
.... There are four volume settings for the base of your EXS 9995 allows you to turn the ringer OFF or to set ringer on the handset to select LO/HI volume. To select the high volume setting, press vol v key. The following screen displays: To select the low volume... setting, press vol w key. To disable the handset's ringer, set the handset ringer volume. w Handset earpiece volume There are two ringer volume settings; To raise the volume, press vol v key. Press the vol v or w key on ...
.... There are four volume settings for the base of your EXS 9995 allows you to turn the ringer OFF or to set ringer on the handset to select LO/HI volume. To select the high volume setting, press vol v key. The following screen displays: To select the low volume... setting, press vol w key. To disable the handset's ringer, set the handset ringer volume. w Handset earpiece volume There are two ringer volume settings; To raise the volume, press vol v key. Press the vol v or w key on ...
English Owners Manual
Page 14
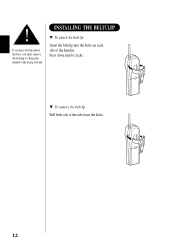
w To remove the beltclip Pull both side of the handset. Press down until it clicks. w To attach the beltclip Insert the beltclip into the holes on each side of the tabs from the holes. 12 INSTALLING THE BELTCLIP If you have wall mounted the base, you must remove the beltclip to charge the handset with facing forward.
w To remove the beltclip Pull both side of the handset. Press down until it clicks. w To attach the beltclip Insert the beltclip into the holes on each side of the tabs from the holes. 12 INSTALLING THE BELTCLIP If you have wall mounted the base, you must remove the beltclip to charge the handset with facing forward.
English Owners Manual
Page 15
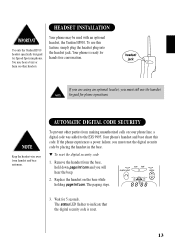
...'com and you will hear the beep. 2. If the phone experiences a power failure, you must reset the digital security code by placing the handset in the base. The paging stops. 3. The status LED flashes to the EXS 9995. Your phone may hear a buzz or hum on other...com. You may be used with an optional headset, the Uniden HS910. Your phone is reset. 13 HEADSET INSTALLATION Use only the Uniden HS910 headset specifically designed for 5 seconds. To use the handset keypad for hands-free conversation. Replace the handset on your phone line, a digital code was added to ...
...'com and you will hear the beep. 2. If the phone experiences a power failure, you must reset the digital security code by placing the handset in the base. The paging stops. 3. The status LED flashes to the EXS 9995. Your phone may hear a buzz or hum on other...com. You may be used with an optional headset, the Uniden HS910. Your phone is reset. 13 HEADSET INSTALLATION Use only the Uniden HS910 headset specifically designed for 5 seconds. To use the handset keypad for hands-free conversation. Replace the handset on your phone line, a digital code was added to ...
English Owners Manual
Page 16
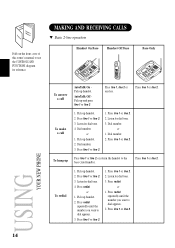
...want to use the CONTROLS AND FUNCTIONS diagram for reference. Press line 1, line 2 or any key. Pick up handset. Listen for dial tone. 4. or 1. or 1. Press redial. Handset On Base Handset Off Base Base Only USING YOUR NEW PHONE To answer a call 1. Press line 1 or line 2. 3. Listen... for dial tone. 4. To make a call AutoTalk On Pick up handset. 2. Press redial. Pick up and press line 1 or line 2. MAKING AND RECEIVING CALLS w Basic 2-line operation Fold out the front cover of ...
...want to use the CONTROLS AND FUNCTIONS diagram for reference. Press line 1, line 2 or any key. Pick up handset. Listen for dial tone. 4. or 1. or 1. Press redial. Handset On Base Handset Off Base Base Only USING YOUR NEW PHONE To answer a call 1. Press line 1 or line 2. 3. Listen... for dial tone. 4. To make a call AutoTalk On Pick up handset. 2. Press redial. Pick up and press line 1 or line 2. MAKING AND RECEIVING CALLS w Basic 2-line operation Fold out the front cover of ...
English Owners Manual
Page 18
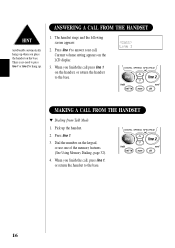
... There is no need to press line 1 or line 2 to hang up when you place the handset on the handset, or return the handset to the base. When you finish the call, press line 1, or return the handset to answer your call press line 1 on the base. Current volume setting appears on the keypad... memory features. (See Using Memory Dialing, page 32). 4. Press line 1. 3. When you finish the call . Dial the number on the LCD display. 3. Pick up the handset. 2. The handset rings and the following screen appears: 2. Line 1 MAKING A CALL FROM THE...
... There is no need to press line 1 or line 2 to hang up when you place the handset on the handset, or return the handset to the base. When you finish the call, press line 1, or return the handset to answer your call press line 1 on the base. Current volume setting appears on the keypad... memory features. (See Using Memory Dialing, page 32). 4. Press line 1. 3. When you finish the call . Dial the number on the LCD display. 3. Pick up the handset. 2. The handset rings and the following screen appears: 2. Line 1 MAKING A CALL FROM THE...
English Owners Manual
Page 19
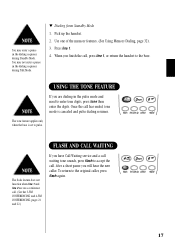
Pick up the handset. 2. The tone feature applies only when the base is canceled and pulse dialing resumes. w Dialing from Standby Mode 1. Use one of the memory features. (See ... new caller. FLASH AND CALL WAITING The flash feature does not function when line 1 and line 2 are on a conference call , press line 1, or return the handset to accept the call has ended, tone mode is set to the original caller, press flash again. 17 USING THE TONE FEATURE If you have...
Pick up the handset. 2. The tone feature applies only when the base is canceled and pulse dialing resumes. w Dialing from Standby Mode 1. Use one of the memory features. (See ... new caller. FLASH AND CALL WAITING The flash feature does not function when line 1 and line 2 are on a conference call , press line 1, or return the handset to accept the call has ended, tone mode is set to the original caller, press flash again. 17 USING THE TONE FEATURE If you have...
English Owners Manual
Page 20
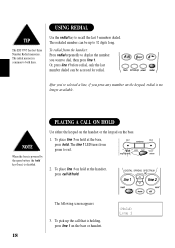
... the keypad on hold at the base, press hold key (base) is holding, press line 1 on the base or handset. The following screen appears: 3. The EXS 9995 has last three Number Redial memories. To redial from green to 32 digits long. Line 1 18 The redial ... the spare battery, the hold . To place line 1 on the base. 1. The line 1 LED turns from the handset: Press redial repeatedly to display the number you press any number on hold at the handset, press call that is disabled. To pick up to red. 2. USING REDIAL Use the redial key to dial...
... the keypad on hold at the base, press hold key (base) is holding, press line 1 on the base or handset. The following screen appears: 3. The EXS 9995 has last three Number Redial memories. To redial from green to 32 digits long. Line 1 18 The redial ... the spare battery, the hold . To place line 1 on the base. 1. The line 1 LED turns from the handset: Press redial repeatedly to display the number you press any number on hold at the handset, press call that is disabled. To pick up to red. 2. USING REDIAL Use the redial key to dial...
English Owners Manual
Page 21
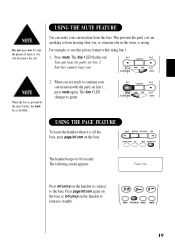
... for 60 seconds. The line 1 LED changes to standby. 19 Press mute. USING THE PAGE FEATURE To locate the handset when it is off mute or you are ready to continue your conversation from hearing what you, or someone else in the room, is disabled. 2. ...Press page/int'com again on the base or int'com/p on the handset to return to green. USING THE MUTE FEATURE You can hear the party on line 1, but they cannot hear you are speaking to from the...
... for 60 seconds. The line 1 LED changes to standby. 19 Press mute. USING THE PAGE FEATURE To locate the handset when it is off mute or you are ready to continue your conversation from hearing what you, or someone else in the room, is disabled. 2. ...Press page/int'com again on the base or int'com/p on the handset to return to green. USING THE MUTE FEATURE You can hear the party on line 1, but they cannot hear you are speaking to from the...
English Owners Manual
Page 22
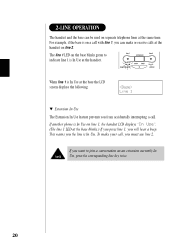
... interrupting a call , you must use line 2. If another phone is In Use at the handset. If you want to indicate line 1 is In Use on line 1, the handset LCD displays "In Use". (The line 1 LED at the handset on line 2. To make or receive calls at the base blinks.) If you press line... 1, you will hear a beep. 2-LINE OPERATION The handset and the base can make your call . When line 1 is In Use. The line 1 LED on the base blinks green to join a conversation on an ...
... interrupting a call , you must use line 2. If another phone is In Use at the handset. If you want to indicate line 1 is In Use on line 1, the handset LCD displays "In Use". (The line 1 LED at the handset on line 2. To make or receive calls at the base blinks.) If you press line... 1, you will hear a beep. 2-LINE OPERATION The handset and the base can make your call . When line 1 is In Use. The line 1 LED on the base blinks green to join a conversation on an ...
English Owners Manual
Page 23
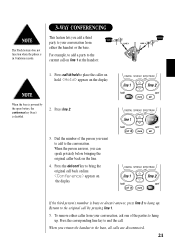
...is powered by pressing line 1. 5. Dial the number of the parties to hang up . If the third person's number is disabled. 2. To remove either the handset or the base. Press line 2. 3. Return to end the call. appears on the line. 4. Press the corresponding line key to the original call id/hold... spare battery, the conference key (base) is busy or doesn't answer, press line 2 to hang up . When you return the handset to place the caller on line 1 at the handset: 1. Press the del/conf key to the current call back on the display. The Flash feature does not function when the...
...is powered by pressing line 1. 5. Dial the number of the parties to hang up . If the third person's number is disabled. 2. To remove either the handset or the base. Press line 2. 3. Return to end the call. appears on the line. 4. Press the corresponding line key to the original call id/hold... spare battery, the conference key (base) is busy or doesn't answer, press line 2 to hang up . When you return the handset to place the caller on line 1 at the handset: 1. Press the del/conf key to the current call back on the display. The Flash feature does not function when the...
English Owners Manual
Page 24
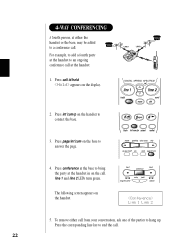
.... 22 The following screen appears on the display. 2. Press conference at the base to bring the party at the handset in on the handset to answer the page. 4. appears on the handset. Line 1 Line 2 5. Press int'com/p on the call from your conversation, ask one of the parties to ...hang up. Press call at the handset: 1. For example, to add a fourth party at the handset to an ongoing conference call id/hold. 4-WAY CONFERENCING A fourth person, at either call . Press the corresponding line ...
.... 22 The following screen appears on the display. 2. Press conference at the base to bring the party at the handset in on the handset to answer the page. 4. appears on the handset. Line 1 Line 2 5. Press int'com/p on the call from your conversation, ask one of the parties to ...hang up. Press call at the handset: 1. For example, to add a fourth party at the handset to an ongoing conference call id/hold. 4-WAY CONFERENCING A fourth person, at either call . Press the corresponding line ...


