English Owners Manual
Page 2
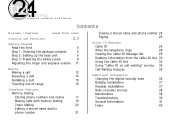
... ringer and earpiece volume 11 Basics Making a call 12 Receiving a call 14 Redialing a call 15 Traveling out-of-range 16 Telephone Features Memory dialing Storing phone numbers and names 17 Making calls with memory dialing 19 Chain dialing 20 Editing a stored name and/or... phone number 21 Erasing a stored name and phone number 24 Paging 25 Caller ID Features Caller ID 26 When the telephone rings 28 Viewing the Caller ID Message list 29 Deleting information from ...
... ringer and earpiece volume 11 Basics Making a call 12 Receiving a call 14 Redialing a call 15 Traveling out-of-range 16 Telephone Features Memory dialing Storing phone numbers and names 17 Making calls with memory dialing 19 Chain dialing 20 Editing a stored name and/or... phone number 21 Erasing a stored name and phone number 24 Paging 25 Caller ID Features Caller ID 26 When the telephone rings 28 Viewing the Caller ID Message list 29 Deleting information from ...
English Owners Manual
Page 3
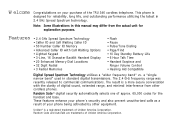
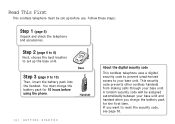
.... W elcome Congratulations on your purchase of Uniden America Corporation. Uniden® is designed for the handset and base. This phone is a registered trademark of your phone´s security and also prevent unauthorized calls as a result of Uniden America Corporation. These features enhance your phone being activated by other cordless phones. Note: Some illustrations in standard digital transmissions...
.... W elcome Congratulations on your purchase of Uniden America Corporation. Uniden® is designed for the handset and base. This phone is a registered trademark of your phone´s security and also prevent unauthorized calls as a result of Uniden America Corporation. These features enhance your phone being activated by other cordless phones. Note: Some illustrations in standard digital transmissions...
English Owners Manual
Page 5
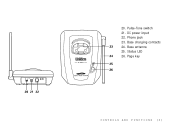
Base charging contacts 24. Phone jack 23. Status LED 26. DC power input 22. Base antenna 25. Page key C O N T R O L S A N D F U N C T I O N S [3 ] 20. Pulse-Tone switch 21.
Base charging contacts 24. Phone jack 23. Status LED 26. DC power input 22. Base antenna 25. Page key C O N T R O L S A N D F U N C T I O N S [3 ] 20. Pulse-Tone switch 21.
English Owners Manual
Page 6
... must be assigned automatically between your base unit. Base Step 3 (page 9 to your base unit. A random security code will be set up before using the phone. This security code prevents other cordless handsets from making calls through your base unit and handset when you want to set up the base unit...
... must be assigned automatically between your base unit. Base Step 3 (page 9 to your base unit. A random security code will be set up before using the phone. This security code prevents other cordless handsets from making calls through your base unit and handset when you want to set up the base unit...
English Owners Manual
Page 8
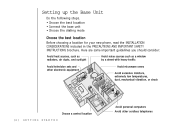
.... • Choose the best location • Connect the base unit • Choose the dialing mode Choose the best location Before choosing a location for your new phone, read the INSTALLATION CONSIDERATIONS included in the PRECAUTIONS AND IMPORTANT SAFET Y INSTRUCTIONS brochure. Here are some important guidelines you should consider: Avoid heat sources, such...
.... • Choose the best location • Connect the base unit • Choose the dialing mode Choose the best location Before choosing a location for your new phone, read the INSTALLATION CONSIDERATIONS included in the PRECAUTIONS AND IMPORTANT SAFET Y INSTRUCTIONS brochure. Here are some important guidelines you should consider: Avoid heat sources, such...
English Owners Manual
Page 9
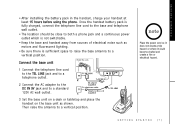
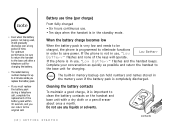
... battery pack is fully charged, connect the telephone line cord to the base and telephone wall outlet. • The location should be close to both a phone jack and a continuous power outlet which is not switchable. • Keep the base and handset away from sources of electrical noise such as shown. Place... a fire or electrical hazard. G E T T I N G S TA R T E D • Af ter installing the batter y pack in the handset, charge your handset at least 15 hours before using the phone.
... battery pack is fully charged, connect the telephone line cord to the base and telephone wall outlet. • The location should be close to both a phone jack and a continuous power outlet which is not switchable. • Keep the base and handset away from sources of electrical noise such as shown. Place... a fire or electrical hazard. G E T T I N G S TA R T E D • Af ter installing the batter y pack in the handset, charge your handset at least 15 hours before using the phone.
English Owners Manual
Page 11
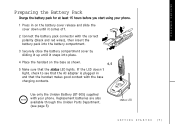
... up until it snaps into place. 4 Place the handset on the base as shown. 4, 5 5 Make sure that the handset makes good contact with your phone. Use only the Uniden Battery (BT-905) supplied with the base charging contacts. G E T T I N G S TA R T E D [9 ] If the LED doesn´t light, check to see page 5) status LED G E T T I N G S TA...
... up until it snaps into place. 4 Place the handset on the base as shown. 4, 5 5 Make sure that the handset makes good contact with your phone. Use only the Uniden Battery (BT-905) supplied with the base charging contacts. G E T T I N G S TA R T E D [9 ] If the LED doesn´t light, check to see page 5) status LED G E T T I N G S TA...
English Owners Manual
Page 12
... can return to the base unit after a telephone call for charging the battery. • The redial memory numbers backup for charging. If the phone is completely discharged. Do not use any liquids or solvents. [ 10 ] G E T T I N G S T A R T E D contacts For optimum performance, be ...charged, the phone is in the standby mode. If the phone is impor tant to 2 minutes while you replace the battery pack. • If you can hold numbers and names stored in the memory even if ...
... can return to the base unit after a telephone call for charging the battery. • The redial memory numbers backup for charging. If the phone is completely discharged. Do not use any liquids or solvents. [ 10 ] G E T T I N G S T A R T E D contacts For optimum performance, be ...charged, the phone is in the standby mode. If the phone is impor tant to 2 minutes while you replace the battery pack. • If you can hold numbers and names stored in the memory even if ...
English Owners Manual
Page 13
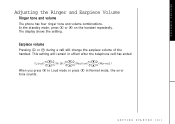
Earpiece volume Pressing or during a call has ended. G E T T I N G S TA R T E D Adjusting the Ringer and Earpiece Volume Ringer tone and volume The phone has four ringer tone and volume combinations. G E T T I N G S T A R T E D [ 11 ] In the standby mode, press or on the handset repeatedly. The display shows the setting. When you press in Loud mode or press in effect after the telephone call will remain in Normal mode, the error tone sounds. This setting will change the earpiece volume of the handset.
Earpiece volume Pressing or during a call has ended. G E T T I N G S TA R T E D Adjusting the Ringer and Earpiece Volume Ringer tone and volume The phone has four ringer tone and volume combinations. G E T T I N G S T A R T E D [ 11 ] In the standby mode, press or on the handset repeatedly. The display shows the setting. When you press in Loud mode or press in effect after the telephone call will remain in Normal mode, the error tone sounds. This setting will change the earpiece volume of the handset.
English Owners Manual
Page 14
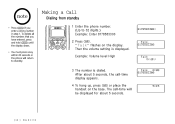
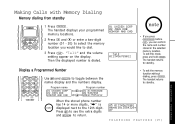
... level High 3 The number is displayed. To delete all the numbers that you enter a wrong number in step 1. Making a Call Dialing from standby 1 Enter the phone number. (Up to standby. The call -time display appears. 4 To hang up, press or place the handset on the display. Then the volume setting is... dialed. • Press if you have entered, press and hold until the display clears. • You must press a key within 20 seconds or the phone will be displayed for about 5 seconds, the call -time will return to 32 digits.) Example: Enter 8178583300 2 Press .
... level High 3 The number is displayed. To delete all the numbers that you enter a wrong number in step 1. Making a Call Dialing from standby 1 Enter the phone number. (Up to standby. The call -time display appears. 4 To hang up, press or place the handset on the display. Then the volume setting is... dialed. • Press if you have entered, press and hold until the display clears. • You must press a key within 20 seconds or the phone will be displayed for about 5 seconds, the call -time will return to 32 digits.) Example: Enter 8178583300 2 Press .
English Owners Manual
Page 15
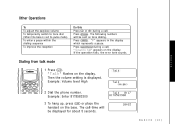
... . " Scanning" appears on the display. " Talk" flashes on the display. The following numbers will be sent as tone dialing. Example: Volume level High 2 Dial the phone number. B A S I C S [ 13 ] BASICS Press . The call . Example: Enter 8178583300 3 To hang up, press or place the handset on the base. Press during a call -time will...
... . " Scanning" appears on the display. " Talk" flashes on the display. The following numbers will be sent as tone dialing. Example: Volume level High 2 Dial the phone number. B A S I C S [ 13 ] BASICS Press . The call . Example: Enter 8178583300 3 To hang up, press or place the handset on the base. Press during a call -time will...
English Owners Manual
Page 16
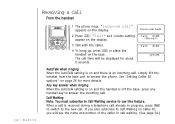
... ringing When the AutoTalk setting is on and the handset is of the caller in call already in progress, press to switch to answer the phone. When a call is an incoming call, simply lif t the handset from the base unit to the new call . "Talk" and volume setting ... details. Call Waiting Note: You must subscribe to Call Waiting service to answer the incoming call . Receiving a Call From the handset [ 14 ] B A S I C S 1 The phone rings. Any key answer when ringing When the AutoTalk setting is on and there is received during a telephone call waiting. (See page 34.) If you...
... ringing When the AutoTalk setting is on and the handset is of the caller in call already in progress, press to switch to answer the phone. When a call is an incoming call, simply lif t the handset from the base unit to the new call . "Talk" and volume setting ... details. Call Waiting Note: You must subscribe to Call Waiting service to answer the incoming call . Receiving a Call From the handset [ 14 ] B A S I C S 1 The phone rings. Any key answer when ringing When the AutoTalk setting is on and there is received during a telephone call waiting. (See page 34.) If you...
English Owners Manual
Page 17
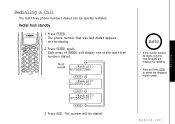
Most recent • If the number exceeds 32 digits, only the first 32 digits are retained for redialing. • Press and hold to delete the displayed redial number. Each press of the last three numbers dialed. B A S I C S [ 15 ] The phone number that was last dialed appears on the display. 2 Press again. BASICS 3 Press . Redial from standby 1 Press . The number will display one of will be quickly redialed. Redialing a Call The last three phone numbers dialed can be dialed.
Most recent • If the number exceeds 32 digits, only the first 32 digits are retained for redialing. • Press and hold to delete the displayed redial number. Each press of the last three numbers dialed. B A S I C S [ 15 ] The phone number that was last dialed appears on the display. 2 Press again. BASICS 3 Press . Redial from standby 1 Press . The number will display one of will be quickly redialed. Redialing a Call The last three phone numbers dialed can be dialed.
English Owners Manual
Page 19
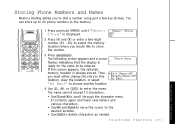
You can store up to 20 phone numbers in this screen appears, the selected memory location is ready for the name to store the number. 3 Press . T E L E P H O N E F E A T U R E S [ 17 ] T E L E P H O N E F E AT U R E S Then, you must either ... and various characters. • Use and to move the cursor to the desired location. • Use to dial a number using just a few key strokes. Storing Phone Numbers and Names Memory Dialing allows you would like to be entered. The name cannot exceed 13 characters. • Use and to enter the name...
You can store up to 20 phone numbers in this screen appears, the selected memory location is ready for the name to store the number. 3 Press . T E L E P H O N E F E A T U R E S [ 17 ] T E L E P H O N E F E AT U R E S Then, you must either ... and various characters. • Use and to move the cursor to the desired location. • Use to dial a number using just a few key strokes. Storing Phone Numbers and Names Memory Dialing allows you would like to be entered. The name cannot exceed 13 characters. • Use and to enter the name...
English Owners Manual
Page 20
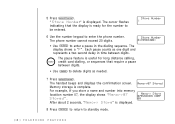
... displayed. 8 Press to return to delete digits as needed. 7 Press . The cursor flashes indicating that require a pause between digits. The phone number cannot exceed 20 digits. • Use to enter the phone number. The handset beeps and displays the confirmation screen. Each pause counts as one digit and represents a two second delay...
... displayed. 8 Press to return to delete digits as needed. 7 Press . The cursor flashes indicating that require a pause between digits. The phone number cannot exceed 20 digits. • Use to enter the phone number. The handset beeps and displays the confirmation screen. Each pause counts as one digit and represents a two second delay...
English Owners Manual
Page 21
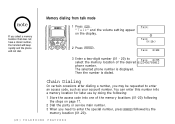
... and the numbers display. Then the displayed number is displayed next to dial. 3 Press . Display a Programmed Number Use and to standby. T E L E P H O N E F E AT U R E S When the stored phone number has 14 or more digits, "\" is dialed. The handset displays your programmed memory locations. 2 Press and or enter a two-digit number (01 - 20) to...
... and the numbers display. Then the displayed number is displayed next to dial. 3 Press . Display a Programmed Number Use and to standby. T E L E P H O N E F E AT U R E S When the stored phone number has 14 or more digits, "\" is dialed. The handset displays your programmed memory locations. 2 Press and or enter a two-digit number (01 - 20) to...
English Owners Manual
Page 22
... number. 3 When you need to enter the special number, press followed by the memory location (01-20). [ 20 ] T E L E P H O N E F E A T U R E S The selected phone number is dialed. You can enter this number into a memory location for later use by doing the following: 1 Store the access code into one of... occasions af ter dialing a number, you select a memory location that does not have a stored number, the handset will beep rapidly and the phone will not dial. 1 Press . Then the number is displayed. Memory dialing from talk mode If you may be requested to select the memory...
... number. 3 When you need to enter the special number, press followed by the memory location (01-20). [ 20 ] T E L E P H O N E F E A T U R E S The selected phone number is dialed. You can enter this number into a memory location for later use by doing the following: 1 Store the access code into one of... occasions af ter dialing a number, you select a memory location that does not have a stored number, the handset will beep rapidly and the phone will not dial. 1 Press . Then the number is displayed. Memory dialing from talk mode If you may be requested to select the memory...
English Owners Manual
Page 23
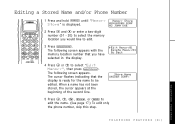
... at the beginning of the second line. 5 Press , , , , or to edit the name. (See page 17.) To edit only the phone number, skip this step. The following screen appears. T E L E P H O N E F E AT U R E S T E L E P H O N E F E A T U R E S [ 21 ] Editing a Stored Name and/or Phone Number 1 Press and hold until "Memory Store" is ready for the name to be edited.
... at the beginning of the second line. 5 Press , , , , or to edit the name. (See page 17.) To edit only the phone number, skip this step. The following screen appears. T E L E P H O N E F E AT U R E S T E L E P H O N E F E A T U R E S [ 21 ] Editing a Stored Name and/or Phone Number 1 Press and hold until "Memory Store" is ready for the name to be edited.

English Owners Manual
Page 24
The following screens appears. For example, if you don´t want to change the phone number, skip this step. 8 Press . Af ter about 2 seconds, "Memory Store" is ready for the number to be edited. 7 Use the number keypad, ...or to standby mode. [ 22 ] T E L E P H O N E F E A T U R E S The cursor flashes indicating that the display is displayed. 9 Press to return to edit the phone number. The phone number cannot exceed 20 digits. (See page 18.) If you store a name and number into memory location number 01, the display shows " Memory01 Stored...
The following screens appears. For example, if you don´t want to change the phone number, skip this step. 8 Press . Af ter about 2 seconds, "Memory Store" is ready for the number to be edited. 7 Use the number keypad, ...or to standby mode. [ 22 ] T E L E P H O N E F E A T U R E S The cursor flashes indicating that the display is displayed. 9 Press to return to edit the phone number. The phone number cannot exceed 20 digits. (See page 18.) If you store a name and number into memory location number 01, the display shows " Memory01 Stored...
English Owners Manual
Page 25
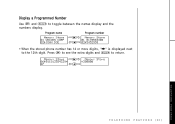
Press to see the extra digits and to the 12th digit. Program name Program number • When the stored phone number has 14 or more digits, "\" is displayed next to return. T E L E P H O N E F E AT U R E S T E L E P H O N E F E A T U R E S [ 23 ] Display a Programmed Number Use and to toggle between the names display and the numbers display.
Press to see the extra digits and to the 12th digit. Program name Program number • When the stored phone number has 14 or more digits, "\" is displayed next to return. T E L E P H O N E F E AT U R E S T E L E P H O N E F E A T U R E S [ 23 ] Display a Programmed Number Use and to toggle between the names display and the numbers display.

