Datasheet
Page 2
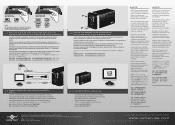
...utilisation. Andernfalls können die Daten auf der Festplatte oder die Hardware beschädigt werden. Model: NST-400MX-S3 or NST-400MX-S3R Copyright © 2012 Vantec Thermal Technologies. Schauen Sie sich das Diagramm an: Stellen Sie den Betriebsmodus per 10-15 secondi mentre ... du disque dur ou même le matériel. NST-400MX-S3 Mode Configuration: NST-400MX-S3R Mode Configuration: INDIVIDUAL JBOD INDIVIDUAL JBOD NOTE: All data previously stored on Recycled Paper. Collegare NexStar MX al computer usando un cavo eSATA o USB 3.0. Windows Explorer...
...utilisation. Andernfalls können die Daten auf der Festplatte oder die Hardware beschädigt werden. Model: NST-400MX-S3 or NST-400MX-S3R Copyright © 2012 Vantec Thermal Technologies. Schauen Sie sich das Diagramm an: Stellen Sie den Betriebsmodus per 10-15 secondi mentre ... du disque dur ou même le matériel. NST-400MX-S3 Mode Configuration: NST-400MX-S3R Mode Configuration: INDIVIDUAL JBOD INDIVIDUAL JBOD NOTE: All data previously stored on Recycled Paper. Collegare NexStar MX al computer usando un cavo eSATA o USB 3.0. Windows Explorer...
User Guide
Page 2
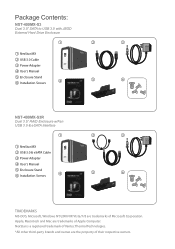
... trademark of Vantec Thermal Technologies. *All other third-party brands and names are trademarks of Microsoft Corporation. Package Contents: NST-400MX-S3 Dual 3.5" SATA to USB 3.0 with JBOD External Hard Drive Enclosure 1 2 3 1 NexStar MX 2 USB 3.0 Cable 3 Power Adapter 4 User's Manual 5 Enclosure Stand 6 Installation Screws 4 5 6 NST-400MX-S3R Dual 3.5" RAID Enclosure w/Fan USB 3.0 & eSATA Interface 1 1 NexStar MX 2 USB 3.0 & eSATA Cable 3 Power Adapter...
... trademark of Vantec Thermal Technologies. *All other third-party brands and names are trademarks of Microsoft Corporation. Package Contents: NST-400MX-S3 Dual 3.5" SATA to USB 3.0 with JBOD External Hard Drive Enclosure 1 2 3 1 NexStar MX 2 USB 3.0 Cable 3 Power Adapter 4 User's Manual 5 Enclosure Stand 6 Installation Screws 4 5 6 NST-400MX-S3R Dual 3.5" RAID Enclosure w/Fan USB 3.0 & eSATA Interface 1 1 NexStar MX 2 USB 3.0 & eSATA Cable 3 Power Adapter...

User Guide
Page 4
... maximum storage with the increased capacity of diving inside the PC and messing with style! The Vantec NexStar® MX is a quick and simple way to expand storage capacity to your computer. and for 400MX-S3R, it will support Individual, JBOD, RAID 0 and RAID 1 modes for your precious family ...management. the front vents and the rear fan keep your hard drive while the aluminum case effectively draws away the heat; 1.Introduction: Vantec NexStar® MX Dual Bay External HDD Enclosure now in USB 3.0 only or USB 3.0 plus eSATA interface is a high performance, high capacity, ...
... maximum storage with the increased capacity of diving inside the PC and messing with style! The Vantec NexStar® MX is a quick and simple way to expand storage capacity to your computer. and for 400MX-S3R, it will support Individual, JBOD, RAID 0 and RAID 1 modes for your precious family ...management. the front vents and the rear fan keep your hard drive while the aluminum case effectively draws away the heat; 1.Introduction: Vantec NexStar® MX Dual Bay External HDD Enclosure now in USB 3.0 only or USB 3.0 plus eSATA interface is a high performance, high capacity, ...
User Guide
Page 8
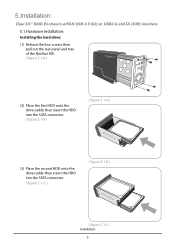
5.Installation: Dual 3/5" RAID Enclosure w/FAN USB 3.0 (S3) or USB3 & eSATA (S3R) interface 5.1.Hardware Installation: Installing the hard drive: (1) Release the four screws then pull out the rear panel and tray of the NexStar MX. ( figure 5.1-A ) (2) Place the first HDD onto the drive caddy then insert the HDD into the SATA connector. ( figure 5.1-B ) ( figure 5.1-A ) (3) Place the second HDD onto the drive caddy then insert the HDD into the SATA connector. ( figure 5.1-C ) ( figure 5.1-B ) ( figure 5.1-C ) Installation 6
5.Installation: Dual 3/5" RAID Enclosure w/FAN USB 3.0 (S3) or USB3 & eSATA (S3R) interface 5.1.Hardware Installation: Installing the hard drive: (1) Release the four screws then pull out the rear panel and tray of the NexStar MX. ( figure 5.1-A ) (2) Place the first HDD onto the drive caddy then insert the HDD into the SATA connector. ( figure 5.1-B ) ( figure 5.1-A ) (3) Place the second HDD onto the drive caddy then insert the HDD into the SATA connector. ( figure 5.1-C ) ( figure 5.1-B ) ( figure 5.1-C ) Installation 6