Datasheet
Page 2
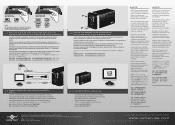
... . Model: NST-400MX-S3 or NST-400MX-S3R Copyright © 2012 Vantec Thermal Technologies. NST-400MX-S3 Mode Configuration: NST-400MX-S3R Mode Configuration: INDIVIDUAL JBOD INDIVIDUAL JBOD NOTE: All data previously stored on . Asegúrese de alinear y asegurar la unidad con los tornillos proporcionados. Achten Sie auf bündigen Sitz, anschließend mit den mitgelieferten Schrauben fixieren. Ihr NexStar MX ist nun...
... . Model: NST-400MX-S3 or NST-400MX-S3R Copyright © 2012 Vantec Thermal Technologies. NST-400MX-S3 Mode Configuration: NST-400MX-S3R Mode Configuration: INDIVIDUAL JBOD INDIVIDUAL JBOD NOTE: All data previously stored on . Asegúrese de alinear y asegurar la unidad con los tornillos proporcionados. Achten Sie auf bündigen Sitz, anschließend mit den mitgelieferten Schrauben fixieren. Ihr NexStar MX ist nun...
User Guide
Page 8
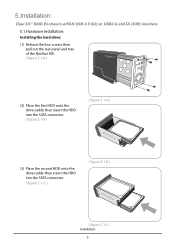
5.Installation: Dual 3/5" RAID Enclosure w/FAN USB 3.0 (S3) or USB3 & eSATA (S3R) interface 5.1.Hardware Installation: Installing the hard drive: (1) Release the four screws then pull out the rear panel and tray of the NexStar MX. ( figure 5.1-A ) (2) Place the first HDD onto the drive caddy then insert the HDD into the SATA connector. ( figure 5.1-B ) ( figure 5.1-A ) (3) Place the second HDD onto the drive caddy then insert the HDD into the SATA connector. ( figure 5.1-C ) ( figure 5.1-B ) ( figure 5.1-C ) Installation 6
5.Installation: Dual 3/5" RAID Enclosure w/FAN USB 3.0 (S3) or USB3 & eSATA (S3R) interface 5.1.Hardware Installation: Installing the hard drive: (1) Release the four screws then pull out the rear panel and tray of the NexStar MX. ( figure 5.1-A ) (2) Place the first HDD onto the drive caddy then insert the HDD into the SATA connector. ( figure 5.1-B ) ( figure 5.1-A ) (3) Place the second HDD onto the drive caddy then insert the HDD into the SATA connector. ( figure 5.1-C ) ( figure 5.1-B ) ( figure 5.1-C ) Installation 6