

User Guide
Page 1
PT775 Color Monitor User's Guide with Plug and Play 17" (16.0" Viewable Diagonal) PT775-3
PT775 Color Monitor User's Guide with Plug and Play 17" (16.0" Viewable Diagonal) PT775-3

User Guide
Page 6
... of moisture. Save the original box and all packing material for operation in this user guide refers to direct sunlight or another heat source. NEVER REMOVE THE REAR COVER. Package Contents ViewSonic PT775 monitor Video cable (15 pin HD D-sub) Power cord USB (Universal Serial Bus...) cable Macintosh® adapter Windows '95 installation file (VS*.inf) on diskette or CD-ROM • User's guide Precautions For the best viewing conditions, ...
... of moisture. Save the original box and all packing material for operation in this user guide refers to direct sunlight or another heat source. NEVER REMOVE THE REAR COVER. Package Contents ViewSonic PT775 monitor Video cable (15 pin HD D-sub) Power cord USB (Universal Serial Bus...) cable Macintosh® adapter Windows '95 installation file (VS*.inf) on diskette or CD-ROM • User's guide Precautions For the best viewing conditions, ...

User Guide
Page 7
...plug the other end to your computer. 3b Macintosh® users: A Macintosh computer requires a Macintosh adapter 4 Attach the power cord to the back of the monitor. Basic installation is complete! to computer) Video cable 6 Getting Started ViewSonic PT775 For a list of Preset Timing Modes and the pre-...Operation section (page 7). If there are both turned off before installing the monitor. Enjoy your computer's graphic card for this monitor, see user's guide of your new monitor! Quick Installation 1 Write the serial number on the back of the monitor in the space provided on page 1 ...
...plug the other end to your computer. 3b Macintosh® users: A Macintosh computer requires a Macintosh adapter 4 Attach the power cord to the back of the monitor. Basic installation is complete! to computer) Video cable 6 Getting Started ViewSonic PT775 For a list of Preset Timing Modes and the pre-...Operation section (page 7). If there are both turned off before installing the monitor. Enjoy your computer's graphic card for this monitor, see user's guide of your new monitor! Quick Installation 1 Write the serial number on the back of the monitor in the space provided on page 1 ...
User Guide
Page 10
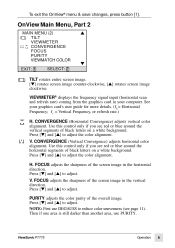
...(see red or blue around the horizontal segments of the overall image. NOTE: First use PURITY. VIEWMETER® displays the frequency signal input (horizontal scan and refresh rate) coming from the graphics card in the vertical direction. Press...ViewSonic PT775 Operation 9 OnView Main Menu, Part 2 MAIN MENU [ 2 ] TILT VIEWMETER CONVERGENCE FOCUS PURITY VIEWMATCH COLOR EXIT: 1 SELECT: 2 TILT rotates entire screen image. [w] rotates screen image counter-clockwise, [v] rotates screen image clockwise. V. FOCUS adjusts the sharpness of the screen image in your graphics card's user guide...
...(see red or blue around the horizontal segments of the overall image. NOTE: First use PURITY. VIEWMETER® displays the frequency signal input (horizontal scan and refresh rate) coming from the graphics card in the vertical direction. Press...ViewSonic PT775 Operation 9 OnView Main Menu, Part 2 MAIN MENU [ 2 ] TILT VIEWMETER CONVERGENCE FOCUS PURITY VIEWMATCH COLOR EXIT: 1 SELECT: 2 TILT rotates entire screen image. [w] rotates screen image counter-clockwise, [v] rotates screen image clockwise. V. FOCUS adjusts the sharpness of the screen image in your graphics card's user guide...

User Guide
Page 14
... ain y34.7(eourcomputer)carnusernotn-ntormlace mone tt ViewSonic PT775 Other Information 13 Connect monitor to different outlet. If using surge protector, reduce number of video cable is not attached permanently to monitor, tightly secure it to monitor. • Adjust brightness and contrast. • Check this user's guide to see if an adapter is required...
... ain y34.7(eourcomputer)carnusernotn-ntormlace mone tt ViewSonic PT775 Other Information 13 Connect monitor to different outlet. If using surge protector, reduce number of video cable is not attached permanently to monitor, tightly secure it to monitor. • Adjust brightness and contrast. • Check this user's guide to see if an adapter is required...


