
User Guide
Page 1
... en este manual" Model No. Warranty information contained in this User Guide to obtain important information on our web site at http://www.viewsonic.com in English, or in specific languages using your product for future service. VS17425 P/N: VX3211-4K-MHD VX3211-4K-mhd LCD Monitor User... Guide IMPORTANT: Please read this User Guide will describe your limited coverage from ViewSonic® Corporation, which is also found on installing and using the Regional ...
... en este manual" Model No. Warranty information contained in this User Guide to obtain important information on our web site at http://www.viewsonic.com in English, or in specific languages using your product for future service. VS17425 P/N: VX3211-4K-MHD VX3211-4K-mhd LCD Monitor User... Guide IMPORTANT: Please read this User Guide will describe your limited coverage from ViewSonic® Corporation, which is also found on installing and using the Regional ...
User Guide
Page 17
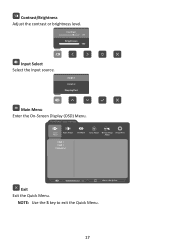
NOTE: Use the 5 key to exit the Quick Menu. 17 VX3211-4K-mhd Input Select Audio Adjust ViewMode Color Adjust Manual Image Setup Menu Adjust HDMI 1 HDMI 2 DisplayPort 75% 3840 x 2160 @ 60Hz Exit Exit the Quick Menu. mode ast/Brightness Select Menu Contrast 70 Brightness 100 Input Select Select the input source. HDMI 1 s HDMI 2 DisplayPort Main Menu Enter the On-Screen Display (OSD) Menu. Main Menu Exit Contrast/Brightness Adjust the contrast or brightness level.
NOTE: Use the 5 key to exit the Quick Menu. 17 VX3211-4K-mhd Input Select Audio Adjust ViewMode Color Adjust Manual Image Setup Menu Adjust HDMI 1 HDMI 2 DisplayPort 75% 3840 x 2160 @ 60Hz Exit Exit the Quick Menu. mode ast/Brightness Select Menu Contrast 70 Brightness 100 Input Select Select the input source. HDMI 1 s HDMI 2 DisplayPort Main Menu Enter the On-Screen Display (OSD) Menu. Main Menu Exit Contrast/Brightness Adjust the contrast or brightness level.
User Guide
Page 20
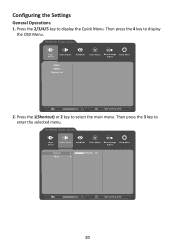
Configuring the Settings General Operations 1. VX3211-4K-mhd Input Select Audio Adjust ViewMode Color Adjust Manual Image Setup Menu Adjust HDMI 1 HDMI 2 DisplayPort 75% 3840 x 2160 @ 60Hz 2. Press the 1(Shortcut) or 2 key to enter the selected menu. Then press the 3 key to select the main menu. Then press the 4 key to display the Quick Menu. VX3211-4K-mhd Input Select Audio Adjust ViewMode Color Adjust Manual Image Setup Menu Adjust Volume 50 Mute 75% 3840 x 2160 @ 60Hz 20 Press the 2/3/4/5 key to display the OSD Menu.
Configuring the Settings General Operations 1. VX3211-4K-mhd Input Select Audio Adjust ViewMode Color Adjust Manual Image Setup Menu Adjust HDMI 1 HDMI 2 DisplayPort 75% 3840 x 2160 @ 60Hz 2. Press the 1(Shortcut) or 2 key to enter the selected menu. Then press the 3 key to select the main menu. Then press the 4 key to display the Quick Menu. VX3211-4K-mhd Input Select Audio Adjust ViewMode Color Adjust Manual Image Setup Menu Adjust Volume 50 Mute 75% 3840 x 2160 @ 60Hz 20 Press the 2/3/4/5 key to display the OSD Menu.
User Guide
Page 21
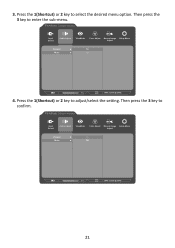
3. Press the 1(Shortcut) or 2 key to confirm. Then press the 3 key to adjust/select the setting. VX3211-4K-mhd Input Select Audio Adjust ViewMode Color Adjust Manual Image Setup Menu Adjust Volume On Mute Off 75% 3840 x 2160 @ 60Hz 21 VX3211-4K-mhd Input Select Audio Adjust ViewMode Color Adjust Manual Image Setup Menu Adjust Volume On Mute Off 75% 3840 x 2160 @ 60Hz 4. Then press the 3 key to select the desired menu option. Press the 1(Shortcut) or 2 key to enter the sub-menu.
3. Press the 1(Shortcut) or 2 key to confirm. Then press the 3 key to adjust/select the setting. VX3211-4K-mhd Input Select Audio Adjust ViewMode Color Adjust Manual Image Setup Menu Adjust Volume On Mute Off 75% 3840 x 2160 @ 60Hz 21 VX3211-4K-mhd Input Select Audio Adjust ViewMode Color Adjust Manual Image Setup Menu Adjust Volume On Mute Off 75% 3840 x 2160 @ 60Hz 4. Then press the 3 key to select the desired menu option. Press the 1(Shortcut) or 2 key to enter the sub-menu.
User Guide
Page 22
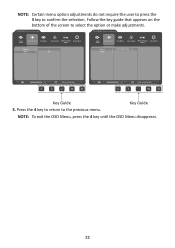
... the option or make adjustments. Press the 4 key to return to the previous menu. VX3211-4K-mhd VX3211-4K-mhd Input Select Audio Adjust ViewMode Color Adjust Manual Image Setup Menu Adjust Volume On Mute Off Input Select Audio Adjust ViewMode Color Adjust Manual Image Setup Menu Adjust Volume 50 Mute 75% 3840 x 2160 @ 60Hz 75% 3840 x 2160...
... the option or make adjustments. Press the 4 key to return to the previous menu. VX3211-4K-mhd VX3211-4K-mhd Input Select Audio Adjust ViewMode Color Adjust Manual Image Setup Menu Adjust Volume On Mute Off Input Select Audio Adjust ViewMode Color Adjust Manual Image Setup Menu Adjust Volume 50 Mute 75% 3840 x 2160 @ 60Hz 75% 3840 x 2160...

User Guide
Page 25
Main Menu Sub-menu Menu Option Manual Image Sharpness (-/+, 0/25/50/75/100) Adjust Blue Light Filter (-/+, 0~100) Aspect Ratio 1:1 4:3 Fill Aspect Ratio Full Screen Overscan On Off Black Stabilization (-/+, 0/10/20/30/40/ 50/60/70/80/90/100) Advanced DCR (-/+, 0/25/50/75/100) Response Time Standard Advanced Ultra Fast 25
Main Menu Sub-menu Menu Option Manual Image Sharpness (-/+, 0/25/50/75/100) Adjust Blue Light Filter (-/+, 0~100) Aspect Ratio 1:1 4:3 Fill Aspect Ratio Full Screen Overscan On Off Black Stabilization (-/+, 0/10/20/30/40/ 50/60/70/80/90/100) Advanced DCR (-/+, 0/25/50/75/100) Response Time Standard Advanced Ultra Fast 25
User Guide
Page 28
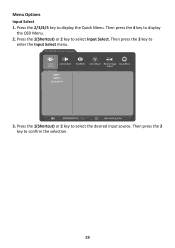
Press the 1(Shortcut) or 2 key to select the desired input source. Press the 1(Shortcut) or 2 key to select Input Select. Menu Options Input Select 1. Then press the 3 key to confirm the selection. 28 VX3211-4K-mhd Input Select Audio Adjust ViewMode Color Adjust Manual Image Setup Menu Adjust HDMI 1 HDMI 2 DisplayPort 75% 3840 x 2160 @ 60Hz 3. Then press the 3 key to enter the Input Select menu. Then press the 4 key to display the Quick Menu. Press the 2/3/4/5 key to display the OSD Menu. 2.
Press the 1(Shortcut) or 2 key to select the desired input source. Press the 1(Shortcut) or 2 key to select Input Select. Menu Options Input Select 1. Then press the 3 key to confirm the selection. 28 VX3211-4K-mhd Input Select Audio Adjust ViewMode Color Adjust Manual Image Setup Menu Adjust HDMI 1 HDMI 2 DisplayPort 75% 3840 x 2160 @ 60Hz 3. Then press the 3 key to enter the Input Select menu. Then press the 4 key to display the Quick Menu. Press the 2/3/4/5 key to display the OSD Menu. 2.
User Guide
Page 29
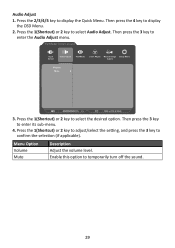
... Menu. 2. Then press the 4 key to confirm the selection (if applicable). Press the 1(Shortcut) or 2 key to display the Quick Menu. VX3211-4K-mhd Input Select Audio Adjust ViewMode Color Adjust Manual Image Setup Menu Adjust Volume Mute 75% 3840 x 2160 @ 60Hz 3. Press the 2/3/4/5 key to select the desired option. Then press the 3 key...
... Menu. 2. Then press the 4 key to confirm the selection (if applicable). Press the 1(Shortcut) or 2 key to display the Quick Menu. VX3211-4K-mhd Input Select Audio Adjust ViewMode Color Adjust Manual Image Setup Menu Adjust Volume Mute 75% 3840 x 2160 @ 60Hz 3. Press the 2/3/4/5 key to select the desired option. Then press the 3 key...
User Guide
Page 30
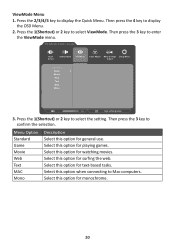
... press the 3 key to display the Quick Menu. Select this option for general use. Press the 2/3/4/5 key to enter the ViewMode menu. VX3211-4K-mhd Input Select Audio Adjust ViewMode Color Adjust Manual Image Setup Menu Adjust Standard Game Movie Web Text MAC Mono 75% 3840 x 2160 @ 60Hz 3. Select this option for playing games...
... press the 3 key to display the Quick Menu. Select this option for general use. Press the 2/3/4/5 key to enter the ViewMode menu. VX3211-4K-mhd Input Select Audio Adjust ViewMode Color Adjust Manual Image Setup Menu Adjust Standard Game Movie Web Text MAC Mono 75% 3840 x 2160 @ 60Hz 3. Select this option for playing games...
User Guide
Page 31
.... NOTE: Some sub-menu options may not be adjustable depending on the bottom of the screen to select the option or make adjustments. VX3211-4K-mhd Input Select Audio Adjust ViewMode Color Adjust Manual Image Setup Menu Adjust Contrast/Brightness 6-axis Color Color Temperature Color Space Color Range Gamma HDR10 75% 3840 x 2160 @ 60Hz 3.
.... NOTE: Some sub-menu options may not be adjustable depending on the bottom of the screen to select the option or make adjustments. VX3211-4K-mhd Input Select Audio Adjust ViewMode Color Adjust Manual Image Setup Menu Adjust Contrast/Brightness 6-axis Color Color Temperature Color Space Color Range Gamma HDR10 75% 3840 x 2160 @ 60Hz 3.

User Guide
Page 32
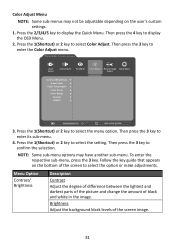
... use. • Warm: Set the color temperature to 5000K. • User Color: Adjust red, green, and blue values as desired. Gamma Manually adjust the brightness level of a given scene so that detail in the highlights and shadows can be seen. 32 Saturation Adjust the color depth of...white levels. • RGB: The input signal color is RGB. • YUV: The input signal color is YUV. Color Range The monitor can manually change the color range options to 7500K. • Native: Default color temperature. HDR10 Reduce the overall contrast of the monitor's grayscale levels. Menu ...
... use. • Warm: Set the color temperature to 5000K. • User Color: Adjust red, green, and blue values as desired. Gamma Manually adjust the brightness level of a given scene so that detail in the highlights and shadows can be seen. 32 Saturation Adjust the color depth of...white levels. • RGB: The input signal color is RGB. • YUV: The input signal color is YUV. Color Range The monitor can manually change the color range options to 7500K. • Native: Default color temperature. HDR10 Reduce the overall contrast of the monitor's grayscale levels. Menu ...
User Guide
Page 33
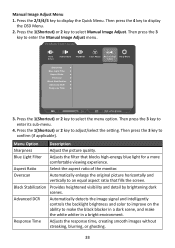
VX3211-4K-mhd Input Select Audio Adjust ViewMode Color Adjust Manual Image Setup Menu Adjust Sharpness Blue Light Filter Aspect Ratio Overscan Black Stabilization Advanced DCR Response Time 75% 3840 x 2160 @ 60Hz 3. Overscan Automatically ...and make the white whiter in a bright environment. Press the 1(Shortcut) or 2 key to enter its sub-menu. 4. Then press the 3 key to select Manual Image Adjust. Press the 1(Shortcut) or 2 key to display the OSD Menu. 2. Black Stabilization Provides heightened visibility and detail by brightening dark scenes. Menu Option...
VX3211-4K-mhd Input Select Audio Adjust ViewMode Color Adjust Manual Image Setup Menu Adjust Sharpness Blue Light Filter Aspect Ratio Overscan Black Stabilization Advanced DCR Response Time 75% 3840 x 2160 @ 60Hz 3. Overscan Automatically ...and make the white whiter in a bright environment. Press the 1(Shortcut) or 2 key to enter its sub-menu. 4. Then press the 3 key to select Manual Image Adjust. Press the 1(Shortcut) or 2 key to display the OSD Menu. 2. Black Stabilization Provides heightened visibility and detail by brightening dark scenes. Menu Option...
User Guide
Page 34
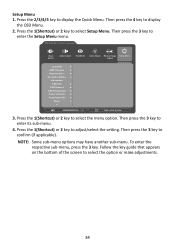
NOTE: Some sub-menu options may have another sub-menu. VX3211-4K-mhd Input Select Audio Adjust ViewMode Color Adjust Manual Image Setup Menu Adjust Language AMD Freesync Shortcut Key 1 Resolution Notice Information OSD Size OSD Timeout OSD Background Power Indicator Auto Power Off Sleep 75% ...
NOTE: Some sub-menu options may have another sub-menu. VX3211-4K-mhd Input Select Audio Adjust ViewMode Color Adjust Manual Image Setup Menu Adjust Language AMD Freesync Shortcut Key 1 Resolution Notice Information OSD Size OSD Timeout OSD Background Power Indicator Auto Power Off Sleep 75% ...
User Guide
Page 38
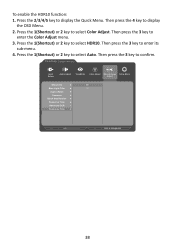
... the 3 key to display the OSD Menu. 2. To enable the HDR10 function: 1. Then press the 4 key to enter its sub-menu. 4. VX3211-4K-mhd Input Select Audio Adjust ViewMode Color Adjust Manual Image Setup Menu Adjust Sharpness On Blue Light Filter Off Aspect Ratio Overscan Black Stabilization Response Time Advanced DCR Response Time 1920...
... the 3 key to display the OSD Menu. 2. To enable the HDR10 function: 1. Then press the 4 key to enter its sub-menu. 4. VX3211-4K-mhd Input Select Audio Adjust ViewMode Color Adjust Manual Image Setup Menu Adjust Sharpness On Blue Light Filter Off Aspect Ratio Overscan Black Stabilization Response Time Advanced DCR Response Time 1920...
User Guide
Page 39
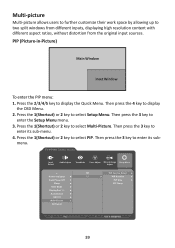
...-Picture. menu. Then press the 3 key to display the OSD Menu. 2. Then press the 4 key to enter the Setup Menu menu. 3. VX3211-4K-mhd Input Select Audio Adjust ViewMode Color Adjust Manual Image Setup Menu Adjust Power Indicator Auto Power Off Sleep ECO Mode DisplayPort 1.1 Auto Detect DDC/CI Multi-Picture All Recall Off...
...-Picture. menu. Then press the 3 key to display the OSD Menu. 2. Then press the 4 key to enter the Setup Menu menu. 3. VX3211-4K-mhd Input Select Audio Adjust ViewMode Color Adjust Manual Image Setup Menu Adjust Power Indicator Auto Power Off Sleep ECO Mode DisplayPort 1.1 Auto Detect DDC/CI Multi-Picture All Recall Off...

User Guide
Page 45
... the input signal color range automatically. Color Space Allows users to choose which color space they would like to use . Color Range The monitor can manually change the color range options to 7500K. Native Default color temperature. Contrast Adjusts the difference between the image background (black level) and the foreground (white...
... the input signal color range automatically. Color Space Allows users to choose which color space they would like to use . Color Range The monitor can manually change the color range options to 7500K. Native Default color temperature. Contrast Adjusts the difference between the image background (black level) and the foreground (white...
User Guide
Page 46
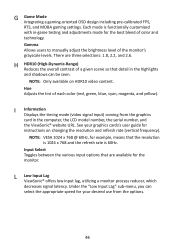
...game testing and adjustments made for instructions on HDR10 video content. Hue Adjusts the tint of the monitor's grayscale levels. Gamma Allows users to manually adjust the brightness level of each color (red, green, blue, cyan, magenta, and yellow). NOTE: Only available on changing the resolution and...resolution is 1024 x 768 and the refresh rate is functionally customized with in the computer, the LCD model number, the serial number, and the ViewSonic® website URL. Under the "Low Input Lag" sub-menu, you can be seen. I Information Displays the timing mode (video signal input...
...game testing and adjustments made for instructions on HDR10 video content. Hue Adjusts the tint of the monitor's grayscale levels. Gamma Allows users to manually adjust the brightness level of each color (red, green, blue, cyan, magenta, and yellow). NOTE: Only available on changing the resolution and...resolution is 1024 x 768 and the refresh rate is functionally customized with in the computer, the LCD model number, the serial number, and the ViewSonic® website URL. Under the "Low Input Lag" sub-menu, you can be seen. I Information Displays the timing mode (video signal input...

User Guide
Page 47
... a factory preset timing mode listed in the display settings window when setting up the display resolution. The user can manually set a variety of this manual. PIP Swap This exchanges the main-picture source with the sub-picture source. This notice will appear in the "...Specifications" of image quality adjustments. M Manual Image Adjust Displays the "Manual Image Adjust" menu. O Overscan Refers to factory settings if the display is not the correct native resolution. Response Time Adjusts...
... a factory preset timing mode listed in the display settings window when setting up the display resolution. The user can manually set a variety of this manual. PIP Swap This exchanges the main-picture source with the sub-picture source. This notice will appear in the "...Specifications" of image quality adjustments. M Manual Image Adjust Displays the "Manual Image Adjust" menu. O Overscan Refers to factory settings if the display is not the correct native resolution. Response Time Adjusts...


