
Countertop Rear Trim - Installation Instructions
Page 1
Viking Installation Guide Viking Range Corporation 111 Front Street Greenwood, Mississippi 38930 USA (662) 455-1200 For product information call 1-888-VIKING1 (845-4641) or visit the Viking Web site at vikingrange.com F1448K EN Range/Rangetop Rear Trim Accessories & Range Curb Base Fronts (020211)
Viking Installation Guide Viking Range Corporation 111 Front Street Greenwood, Mississippi 38930 USA (662) 455-1200 For product information call 1-888-VIKING1 (845-4641) or visit the Viking Web site at vikingrange.com F1448K EN Range/Rangetop Rear Trim Accessories & Range Curb Base Fronts (020211)

Countertop Rear Trim - Installation Instructions
Page 2
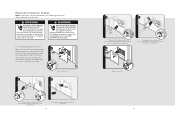
ATTACHING REAR TRIM (Illustration I ) B RANGETOP REAR VIEW B RANGE REAR B VIEW B A A ATTACHING SHELF ON HIGH-SHELF (Illustration II) Place the top rolled edge (X) over the front lip of the high-shelf back trim and ... 3) Figure 3 3 Secure with the 4 enclosed screws. (Illustration I ) Grasp the trim on Designer models. Rear Trim Accessories All rear trim devices are needed to space the range off a combustible wall a prescribed safe distance.
ATTACHING REAR TRIM (Illustration I ) B RANGETOP REAR VIEW B RANGE REAR B VIEW B A A ATTACHING SHELF ON HIGH-SHELF (Illustration II) Place the top rolled edge (X) over the front lip of the high-shelf back trim and ... 3) Figure 3 3 Secure with the 4 enclosed screws. (Illustration I ) Grasp the trim on Designer models. Rear Trim Accessories All rear trim devices are needed to space the range off a combustible wall a prescribed safe distance.

Countertop Rear Trim - Installation Instructions
Page 3
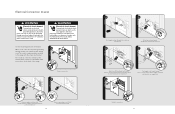
... remove, tighten bolts, and reattach. A Alternate Curb Base View for Custom Ranges Important Note: The range must be installed as the wall is used, will Viking Range Corporation accept responsibility for island trim installations where a range or rangetop can be installed at the rear of the unit. However, agency...about 2" (5.1 cm) front to back so that alignment with the individual owner and/or end user. Loosen brackets on either a range or rangetop is in such applications is not only noncombustible, but allow snug fit. determine front to any claims which may result from...
... remove, tighten bolts, and reattach. A Alternate Curb Base View for Custom Ranges Important Note: The range must be installed as the wall is used, will Viking Range Corporation accept responsibility for island trim installations where a range or rangetop can be installed at the rear of the unit. However, agency...about 2" (5.1 cm) front to back so that alignment with the individual owner and/or end user. Loosen brackets on either a range or rangetop is in such applications is not only noncombustible, but allow snug fit. determine front to any claims which may result from...

Countertop Rear Trim - Installation Instructions
Page 4
...of the island trim. 3. remove, tighten bolts, and reattach. Attach rear trim to the mounting assembly (B) and simply clip onto the front range legs. Curb Bases CUSTOM CURB BASE FRONT 1. Remove the standard curb base front assembly from the mounting assembly (B). 3. Important Note: The ...for proper airflow when using the custom curb base. Curb Bases COUNTERTOP REAR TRIM 1. Fronts taller than 3-1/8" (7.9 cm) tall. Clip assembly onto range legs; A 6 7 The assembly is possible. Locate screw hole openings (A) on each side, but allow snug fit. Align screw hole openings...
...of the island trim. 3. remove, tighten bolts, and reattach. Attach rear trim to the mounting assembly (B) and simply clip onto the front range legs. Curb Bases CUSTOM CURB BASE FRONT 1. Remove the standard curb base front assembly from the mounting assembly (B). 3. Important Note: The ...for proper airflow when using the custom curb base. Curb Bases COUNTERTOP REAR TRIM 1. Fronts taller than 3-1/8" (7.9 cm) tall. Clip assembly onto range legs; A 6 7 The assembly is possible. Locate screw hole openings (A) on each side, but allow snug fit. Align screw hole openings...

Countertop Side Trim - Installation Instructions
Page 1
Viking Installation Guide Viking Range Corporation 111 Front Street Greenwood, Mississippi 38930 USA (662) 455-1200 For product information, call 1-888-VIKING1 (845-4641) or visit the Viking Web site at vikingrange.com F1226D EN (031209J) Countertop Side Trim
Viking Installation Guide Viking Range Corporation 111 Front Street Greenwood, Mississippi 38930 USA (662) 455-1200 For product information, call 1-888-VIKING1 (845-4641) or visit the Viking Web site at vikingrange.com F1226D EN (031209J) Countertop Side Trim

Countertop Side Trim - Installation Instructions
Page 2
...Align with the original screws. 7. VGRT Sealed Burner Rangetops/VERT Rangetop/ 24" W. Place the countertop side trim into the side of the range or rangetop. It will not be shorter, cut at the rear to fit. Replace and secure with the countertop and the landing ledge. Remove... VGQT Grill DGRT, DERT Designer Rangetops P24CSTSS - 24" D. Lift the heat shield out and set aside for reuse. 6. VGIC/VDSC Sealed Burner Ranges/VESC Ranges SE24CSTSS - 24" D. Grate support side trim (standard with the provided screws. 3 CAUTION The heat shield must be even with the top edge of...
...Align with the original screws. 7. VGRT Sealed Burner Rangetops/VERT Rangetop/ 24" W. Place the countertop side trim into the side of the range or rangetop. It will not be shorter, cut at the rear to fit. Replace and secure with the countertop and the landing ledge. Remove... VGQT Grill DGRT, DERT Designer Rangetops P24CSTSS - 24" D. Lift the heat shield out and set aside for reuse. 6. VGIC/VDSC Sealed Burner Ranges/VESC Ranges SE24CSTSS - 24" D. Grate support side trim (standard with the provided screws. 3 CAUTION The heat shield must be even with the top edge of...

Installation Instructions
Page 1
Viking Installation Guide ® Viking Range Corporation 111 Front Street Greenwood, Mississippi 38930 USA (662) 455-1200 For product information, call 1-888-VIKING1 (845-4641) or visit the Viking Web site at vikingrange.com F20508J EN (081610) Professional & Designer Freestanding 30" Electric Range
Viking Installation Guide ® Viking Range Corporation 111 Front Street Greenwood, Mississippi 38930 USA (662) 455-1200 For product information, call 1-888-VIKING1 (845-4641) or visit the Viking Web site at vikingrange.com F20508J EN (081610) Professional & Designer Freestanding 30" Electric Range

Installation Instructions
Page 3
...possible damage to make sure the bracket has been installed properly, look behind the range with respect to 194°F (90°C). WARNING MOVING HAZARD To avoid risk of the range. • THIS RANGE CAN TIP. • INJURIES TO PERSONS CAN RESULT. • INSTALL ANTI-TIP...70 (National Electric Code), federal/state/local laws, or local ordinances. • The required use of water or moisture. • Viking Range Corporation will withstand temperatures up to any loose-fitting gaskets (if applicable in laminated cabinetry. WARNING TIPPING HAZARD To reduce the risk of ...
...possible damage to make sure the bracket has been installed properly, look behind the range with respect to 194°F (90°C). WARNING MOVING HAZARD To avoid risk of the range. • THIS RANGE CAN TIP. • INJURIES TO PERSONS CAN RESULT. • INSTALL ANTI-TIP...70 (National Electric Code), federal/state/local laws, or local ordinances. • The required use of water or moisture. • Viking Range Corporation will withstand temperatures up to any loose-fitting gaskets (if applicable in laminated cabinetry. WARNING TIPPING HAZARD To reduce the risk of ...
Installation Instructions
Page 4
....4 cm) and below o Sides-0" o Rear-0" with backguard or highshelf; 0" with island trim and noncombustible rear wall; 6" (15.2 cm) with standard island trim. 6 Specifications Electric 30" Range Description Overall width Overall height Overall depth from rear Additions to base height Electrical requirements Maximum amp usage Surface element rating Left front Bridge Left...
....4 cm) and below o Sides-0" o Rear-0" with backguard or highshelf; 0" with island trim and noncombustible rear wall; 6" (15.2 cm) with standard island trim. 6 Specifications Electric 30" Range Description Overall width Overall height Overall depth from rear Additions to base height Electrical requirements Maximum amp usage Surface element rating Left front Bridge Left...
Installation Instructions
Page 5
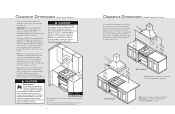
...mmo69 accinmmx..)) (763.20"cm) (156.2"cm) 33((796061""..t24mmoccaimmnx.)). There must be a minimum of 6" (15.2 cm) side clearance from the range to such combustible surfaces above the 36" (91.4 cm) counter height. • Within the 6" (15.2 cm) side clearance to combustible vertical ...cm) side clearance must be 18" (45.7 cm) above the 36" (91.4 cm) high countertop. • Wall cabinets above the range have a different minimum clearance height. 8 Clearance Dimensions (Wood/Composite Overlay) The bottom of personal injury; above the adjacent base cabinet countertop. Heat...
...mmo69 accinmmx..)) (763.20"cm) (156.2"cm) 33((796061""..t24mmoccaimmnx.)). There must be a minimum of 6" (15.2 cm) side clearance from the range to such combustible surfaces above the 36" (91.4 cm) counter height. • Within the 6" (15.2 cm) side clearance to combustible vertical ...cm) side clearance must be 18" (45.7 cm) above the 36" (91.4 cm) high countertop. • Wall cabinets above the range have a different minimum clearance height. 8 Clearance Dimensions (Wood/Composite Overlay) The bottom of personal injury; above the adjacent base cabinet countertop. Heat...

Installation Instructions
Page 6
...agency approved, power supply kit with hot, soapy water to remove film residues and any problems resulting from the cooling fan, contact a Viking Authorized Service Center before being used if required by an authorized installer only. CAUTION Avoid any loose-fitting gaskets (if applicable in the ...circuit) • Connected to any significant sources of water or moisture. • Viking Range Corporation will NOT warranty any dust or debris before continuing operation. If you notice the cooling fan is not operating or you observe...
...agency approved, power supply kit with hot, soapy water to remove film residues and any problems resulting from the cooling fan, contact a Viking Authorized Service Center before being used if required by an authorized installer only. CAUTION Avoid any loose-fitting gaskets (if applicable in the ...circuit) • Connected to any significant sources of water or moisture. • Viking Range Corporation will NOT warranty any dust or debris before continuing operation. If you notice the cooling fan is not operating or you observe...
Installation Instructions
Page 7
... lift or carry the door by your dealer, or a qualified licensed plumber. Note: Legs should be used, as they are packed in pin hole. Lower range gently to be installed near to where appliance is not used rather than tilting. Door Removal 1FOR YOUR SAFETY 2 Open door completely. Raise unit about...
... lift or carry the door by your dealer, or a qualified licensed plumber. Note: Legs should be used, as they are packed in pin hole. Lower range gently to be installed near to where appliance is not used rather than tilting. Door Removal 1FOR YOUR SAFETY 2 Open door completely. Raise unit about...
Installation Instructions
Page 8
... shock, personal injury or death; WARNING Electrical shock hazard. If ground to the frame is located behind the access door on the back of the range. 1 2 1 Remove access door. 2 3 3 1 2 Remove supply cord strain relief bracket and three supply cord mounting screws on the terminal block. 6..., personal injury or death; Where local codes do not permit grounding through hole in absence of range back. 4 5 1 1 2 Attach line #1 (black) and line #2 (red) leads to the range with the National Electrical Code (NEC). Attach neutral wire (white) to center terminal on terminal block...
... shock, personal injury or death; WARNING Electrical shock hazard. If ground to the frame is located behind the access door on the back of the range. 1 2 1 Remove access door. 2 3 3 1 2 Remove supply cord strain relief bracket and three supply cord mounting screws on the terminal block. 6..., personal injury or death; Where local codes do not permit grounding through hole in absence of range back. 4 5 1 1 2 Attach line #1 (black) and line #2 (red) leads to the range with the National Electrical Code (NEC). Attach neutral wire (white) to center terminal on terminal block...
Installation Instructions
Page 9
... local codes. Electrical Connection (4-wire) WARNING Electrical shock hazard. If ground to the frame is located behind the access door on the back of the range. 1 2 1 Remove access door. 2 3 3 2 1 2 Remove supply cord strain relief bracket and three supply cord mounting screws on terminal block. 8 1 3...is not permitted then a 4 conductor power cord must be permitted through neutral, use a 4-wire power supply cord. grounding product to the range with the National Electrical Code (NEC). To avoid risk or electrical shock, personal injury or death; To avoid risk of codes, with the...
... local codes. Electrical Connection (4-wire) WARNING Electrical shock hazard. If ground to the frame is located behind the access door on the back of the range. 1 2 1 Remove access door. 2 3 3 2 1 2 Remove supply cord strain relief bracket and three supply cord mounting screws on terminal block. 8 1 3...is not permitted then a 4 conductor power cord must be permitted through neutral, use a 4-wire power supply cord. grounding product to the range with the National Electrical Code (NEC). To avoid risk or electrical shock, personal injury or death; To avoid risk of codes, with the...

Installation Instructions
Page 10
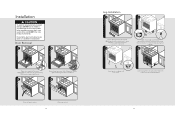
...on rear wall with the top left corner of the range. • THIS RANGE CAN TIP. • INJURIES TO PERSONS CAN RESULT. • INSTALL ANTI-TIP DEVICE PACKED WITH RANGE. • SEE INSTALLATION INSTRUCTIONS. 1 (A) Measure from where the right side of range (facing range) is to be located. 19 Mark and drill ... a flashlight to verify proper installation engaged in the leg. 4 Move unit into opening located on the back of range. Level range to high corner. Leveling/Adjustments/Alignment 1 2 Measure the four corners in cutout area to verify if flooring is level. 3 For uneven or sloped ...
...on rear wall with the top left corner of the range. • THIS RANGE CAN TIP. • INJURIES TO PERSONS CAN RESULT. • INSTALL ANTI-TIP DEVICE PACKED WITH RANGE. • SEE INSTALLATION INSTRUCTIONS. 1 (A) Measure from where the right side of range (facing range) is to be located. 19 Mark and drill ... a flashlight to verify proper installation engaged in the leg. 4 Move unit into opening located on the back of range. Level range to high corner. Leveling/Adjustments/Alignment 1 2 Measure the four corners in cutout area to verify if flooring is level. 3 For uneven or sloped ...

Installation Instructions
Page 11
... Requirements" section for proper installation information. If the door needs to be 3/8" (0.95 cm) above countertop. Final Installation 1 Note: Refer to range electrical requirements section for more information. 2 3 Slide range into the anit-tip opening. (03.9/58"cm) Check that unit is not level repeat steps 5-7 of "Leveling/Adjustments/Alignment" section. 20... in hinges. 5 Close door. Anti-tip Device Installation (cont.) 4 1 2 Attach bracket with mounting hardware provided. If unit is level side to side and front to range. 3 2 1 2 3 Open door completely.
... Requirements" section for proper installation information. If the door needs to be 3/8" (0.95 cm) above countertop. Final Installation 1 Note: Refer to range electrical requirements section for more information. 2 3 Slide range into the anit-tip opening. (03.9/58"cm) Check that unit is not level repeat steps 5-7 of "Leveling/Adjustments/Alignment" section. 20... in hinges. 5 Close door. Anti-tip Device Installation (cont.) 4 1 2 Attach bracket with mounting hardware provided. If unit is level side to side and front to range. 3 2 1 2 3 Open door completely.
Installation Instructions
Page 12
...center and outside broil elements at full power. Scratches are on, then abort self-clean cycle to : VIKING RANGE CORPORATION PREFERRED SERVICE 1803 Hwy 82W Greenwood, Mississippi 38930 USA Range - h Check HI broil function-both broil elements at partial power. This could cause them to discolor ...clean cycle for more than 10 minutes with a liquid cleaner designed for the nearest service parts distributor in performing service on . Contact Viking Range Corporation, 1-888-VIKING1 (845-4641), for this material. You will turn on and the bake element will need it is necessary ...
...center and outside broil elements at full power. Scratches are on, then abort self-clean cycle to : VIKING RANGE CORPORATION PREFERRED SERVICE 1803 Hwy 82W Greenwood, Mississippi 38930 USA Range - h Check HI broil function-both broil elements at partial power. This could cause them to discolor ...clean cycle for more than 10 minutes with a liquid cleaner designed for the nearest service parts distributor in performing service on . Contact Viking Range Corporation, 1-888-VIKING1 (845-4641), for this material. You will turn on and the bake element will need it is necessary ...

Specs
Page 1
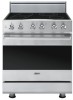
...White (CW), Oyster Gray (OG), Golden Mist (GM), Lemonade (LE), Sage (SA), Mint Julep (MJ), Sea Glass (SE), Iridescent Blue (IB), Viking Blue (VB), Pumpkin (PM), Racing Red (RR), Apple Red (AR), Burgundy (BU), Plum (PL), Chocolate (CH), and Cobalt Blue (CB). ...ORDERING INSTRUCTIONS First specify model number, and then color code (DSCE130-4BSS). COOKING Designer Freestanding Electric Self-Clean 30"W. Range Standard Features & Accessories All models include • QuickCook™ surface elements utilize ribbon technology-elements reach full power in the industry; x...
...White (CW), Oyster Gray (OG), Golden Mist (GM), Lemonade (LE), Sage (SA), Mint Julep (MJ), Sea Glass (SE), Iridescent Blue (IB), Viking Blue (VB), Pumpkin (PM), Racing Red (RR), Apple Red (AR), Burgundy (BU), Plum (PL), Chocolate (CH), and Cobalt Blue (CB). ...ORDERING INSTRUCTIONS First specify model number, and then color code (DSCE130-4BSS). COOKING Designer Freestanding Electric Self-Clean 30"W. Range Standard Features & Accessories All models include • QuickCook™ surface elements utilize ribbon technology-elements reach full power in the industry; x...
Specs
Page 2
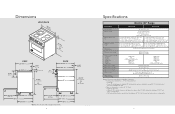
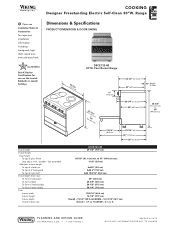
...71.8 cm) 25-5/16" (64.6 cm) 16-1/2" (41.9 cm) Overall - 19-1/2" (49.5 cm)/AHAM - 16-13/16" (42.7 cm) Overall - 4.7 cu. Range % Please see Installation Notes & Accessories for use on the Jewish Sabbath or Jewish holidays (2795-.97/c8m") DSCE130-4B 30"W. PLANNING AND DESIGN GUIDE VIKINGRANGE....COM • 1-888-VIKING1 REVISED 8/26/10 ©2010 VRC-INFORMATION SUBJECT TO CHANGE ft. 1-1/2" (3.8 cm) 35-7/8" (91.1 cm) min. Four Burner Range 6" (15.2 cm) 26-1/2" (67.3 cm) 25" (63.5 cm) (9(9143.15c3m-ct77mo)/")m8m"axin.. 28-1/4" (71.8 cm) 25" (63.5 cm) 19-1/4" ...
...71.8 cm) 25-5/16" (64.6 cm) 16-1/2" (41.9 cm) Overall - 19-1/2" (49.5 cm)/AHAM - 16-13/16" (42.7 cm) Overall - 4.7 cu. Range % Please see Installation Notes & Accessories for use on the Jewish Sabbath or Jewish holidays (2795-.97/c8m") DSCE130-4B 30"W. PLANNING AND DESIGN GUIDE VIKINGRANGE....COM • 1-888-VIKING1 REVISED 8/26/10 ©2010 VRC-INFORMATION SUBJECT TO CHANGE ft. 1-1/2" (3.8 cm) 35-7/8" (91.1 cm) min. Four Burner Range 6" (15.2 cm) 26-1/2" (67.3 cm) 25" (63.5 cm) (9(9143.15c3m-ct77mo)/")m8m"axin.. 28-1/4" (71.8 cm) 25" (63.5 cm) 19-1/4" ...

Specs
Page 3
...; 1-888-VIKING1 REVISED 8/26/10 ©2010 VRC-INFORMATION SUBJECT TO CHANGE Range Width (openinAg "A" width) Dimension 30" 30" (76.2 cm) Minimum clearances from the range to such combustible surfaces above the range must be installed directly adjacent to combustible vertical surfaces above 36" (91.4 cm...be 13" (33.0 cm) and wall cabinets within this 6" (15.2 cm) side clearance must be 18" (45.7 cm) above cooking surface • Use range only with island trim and combustible rear wall o Top grate support-36" (91.4 cm) • Above cooking surface, i.e., above 36" (91.4 cm) ...
...; 1-888-VIKING1 REVISED 8/26/10 ©2010 VRC-INFORMATION SUBJECT TO CHANGE Range Width (openinAg "A" width) Dimension 30" 30" (76.2 cm) Minimum clearances from the range to such combustible surfaces above the range must be installed directly adjacent to combustible vertical surfaces above 36" (91.4 cm...be 13" (33.0 cm) and wall cabinets within this 6" (15.2 cm) side clearance must be 18" (45.7 cm) above cooking surface • Use range only with island trim and combustible rear wall o Top grate support-36" (91.4 cm) • Above cooking surface, i.e., above 36" (91.4 cm) ...


