

Countertop Rear Trim - Installation Instructions
Page 1
Viking Installation Guide Viking Range Corporation 111 Front Street Greenwood, Mississippi 38930 USA (662) 455-1200 For product information call 1-888-VIKING1 (845-4641) or visit the Viking Web site at vikingrange.com F1448K EN Range/Rangetop Rear Trim Accessories & Range Curb Base Fronts (020211)
Viking Installation Guide Viking Range Corporation 111 Front Street Greenwood, Mississippi 38930 USA (662) 455-1200 For product information call 1-888-VIKING1 (845-4641) or visit the Viking Web site at vikingrange.com F1448K EN Range/Rangetop Rear Trim Accessories & Range Curb Base Fronts (020211)

Countertop Rear Trim - Installation Instructions
Page 2
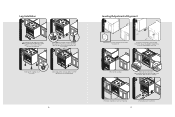
... MATERIAL IS REMOVED FROM INSIDE THE HIGH SHELF. Note: If the back wall is Non-Combustible, these models, the spacers are needed to space the range off a combustible wall a prescribed safe distance. WARNING (Illustration II) To reduce the risk of fire or injury to HIGH SHELF persons, check to..., even if with the holes (A) in each end and carefully place in the same basic way. ATTACHING REAR TRIM (Illustration I ) B RANGETOP REAR VIEW B RANGE REAR B VIEW B A A ATTACHING SHELF ON HIGH-SHELF (Illustration II) Place the top rolled edge (X) over the front lip of the product.
... MATERIAL IS REMOVED FROM INSIDE THE HIGH SHELF. Note: If the back wall is Non-Combustible, these models, the spacers are needed to space the range off a combustible wall a prescribed safe distance. WARNING (Illustration II) To reduce the risk of fire or injury to HIGH SHELF persons, check to..., even if with the holes (A) in each end and carefully place in the same basic way. ATTACHING REAR TRIM (Illustration I ) B RANGETOP REAR VIEW B RANGE REAR B VIEW B A A ATTACHING SHELF ON HIGH-SHELF (Illustration II) Place the top rolled edge (X) over the front lip of the product.

Countertop Rear Trim - Installation Instructions
Page 3
...(15.2 cm) of minimum clearance to a rear wall, or when a truly non-combustible material is used, will Viking Range Corporation accept responsibility for island trim installations where a range or rangetop can be installed at the rear of the unit. remove, tighten bolts, and reattach. Remove the assembly ... Curb Bases STANDARD CURB BASE FRONT 1. Normal installation for island trim on each side, but is in the range installation guide for Custom Ranges Important Note: The range must be installed as the wall is ready to be attached. A Alternate Curb Base View for proper airflow when...
...(15.2 cm) of minimum clearance to a rear wall, or when a truly non-combustible material is used, will Viking Range Corporation accept responsibility for island trim installations where a range or rangetop can be installed at the rear of the unit. remove, tighten bolts, and reattach. Remove the assembly ... Curb Bases STANDARD CURB BASE FRONT 1. Normal installation for island trim on each side, but is in the range installation guide for Custom Ranges Important Note: The range must be installed as the wall is ready to be attached. A Alternate Curb Base View for proper airflow when...

Countertop Rear Trim - Installation Instructions
Page 4
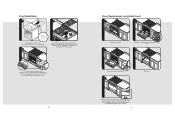
Attach locally supplied front (C) to back setting; determine front to the mounting assembly (B) and simply clip onto the front range legs. Remove the standard curb base front assembly from the mounting assembly (B). 3. The assembly is adjustable about 2" (5.1 cm) ...front to island trim with the cabinet toe front is possible. Clip assembly onto range legs; Attach rear trim to back so that alignment with enclosed screws. Important Note: The locally supplied front must be any taller than 3-1/8" (7.9...
Attach locally supplied front (C) to back setting; determine front to the mounting assembly (B) and simply clip onto the front range legs. Remove the standard curb base front assembly from the mounting assembly (B). 3. The assembly is adjustable about 2" (5.1 cm) ...front to island trim with the cabinet toe front is possible. Clip assembly onto range legs; Attach rear trim to back so that alignment with enclosed screws. Important Note: The locally supplied front must be any taller than 3-1/8" (7.9...

Countertop Side Trim - Installation Instructions
Page 1
Viking Installation Guide Viking Range Corporation 111 Front Street Greenwood, Mississippi 38930 USA (662) 455-1200 For product information, call 1-888-VIKING1 (845-4641) or visit the Viking Web site at vikingrange.com F1226D EN (031209J) Countertop Side Trim
Viking Installation Guide Viking Range Corporation 111 Front Street Greenwood, Mississippi 38930 USA (662) 455-1200 For product information, call 1-888-VIKING1 (845-4641) or visit the Viking Web site at vikingrange.com F1226D EN (031209J) Countertop Side Trim

Countertop Side Trim - Installation Instructions
Page 2
... holes with the screw holes in place. CAUTION The heat shield must be even with the provided screws. 3 VGGT Griddle/24" W. VGIC Ranges R27CSTSS - 27" D. Remove the outside grates and grate supports next to accommodate most installations. If the trim needs to fit. VGIC/VDSC Sealed ...Burner Ranges/VESC Ranges SE24CSTSS - 24" D. Lift the grate support side trim out. It will not be shorter, cut at the rear to be reinstalled. 4. Lift...
... holes with the screw holes in place. CAUTION The heat shield must be even with the provided screws. 3 VGGT Griddle/24" W. VGIC Ranges R27CSTSS - 27" D. Remove the outside grates and grate supports next to accommodate most installations. If the trim needs to fit. VGIC/VDSC Sealed ...Burner Ranges/VESC Ranges SE24CSTSS - 24" D. Lift the grate support side trim out. It will not be shorter, cut at the rear to be reinstalled. 4. Lift...

Two-Page Specifications Sheet
Page 1
...; Natural conversion kit (RDNKR3) Finishes • Available in Stainless Steel (SS), Black (BK), and White (WH) 30" Wide Gas Self-Clean Range (Shown with optional 6" H. surface burners light at any position on the knob and re-light if extinguished, even on lowest setting • Large-...year full - cosmetic parts such as glass, painted items, and decorative items • Lifetime limited - Center - 9,000 BTU - GAS SELF-CLEAN RANGE RVGR330-5B - 30" WIDE Features and Functions • Wide variety of BTU ratings to accommodate all types of single 30,000 BTU U-shaped burner...
...; Natural conversion kit (RDNKR3) Finishes • Available in Stainless Steel (SS), Black (BK), and White (WH) 30" Wide Gas Self-Clean Range (Shown with optional 6" H. surface burners light at any position on the knob and re-light if extinguished, even on lowest setting • Large-...year full - cosmetic parts such as glass, painted items, and decorative items • Lifetime limited - Center - 9,000 BTU - GAS SELF-CLEAN RANGE RVGR330-5B - 30" WIDE Features and Functions • Wide variety of BTU ratings to accommodate all types of single 30,000 BTU U-shaped burner...

Two-Page Specifications Sheet
Page 2
...(46.2 cm) Gas Requirements Ships Natural or LP/Propane; accepts standard residential 1/2" (1.3 cm) ID gas service line. F60255 ® | Viking Range, LLC 1-888-845-4641 or 662-455-1200 For detailed product information, model numbers, or to request a quote visit vikingrange.com | © 2013... Viking Range, LLC Specifications subject to change without notice. 0713 ft. DESCRIPTION GAS SELF-CLEAN 30" WIDE RANGE RVGR330-5B Overall Width 29 7/8" (75.9 cm) Overall Height To top of side trim -...
...(46.2 cm) Gas Requirements Ships Natural or LP/Propane; accepts standard residential 1/2" (1.3 cm) ID gas service line. F60255 ® | Viking Range, LLC 1-888-845-4641 or 662-455-1200 For detailed product information, model numbers, or to request a quote visit vikingrange.com | © 2013... Viking Range, LLC Specifications subject to change without notice. 0713 ft. DESCRIPTION GAS SELF-CLEAN 30" WIDE RANGE RVGR330-5B Overall Width 29 7/8" (75.9 cm) Overall Height To top of side trim -...
Installation Instructions
Page 1
Installation ® Viking Range, LLC 111 Front Street Greenwood, Mississippi 38930 USA (662) 455-1200 For product information, call 1-888-845-4641 or visit the Viking Website at vikingrange.com F21185 EN (053113) Freestanding 30" Gas Self-Clean Sealed Burner Range
Installation ® Viking Range, LLC 111 Front Street Greenwood, Mississippi 38930 USA (662) 455-1200 For product information, call 1-888-845-4641 or visit the Viking Website at vikingrange.com F21185 EN (053113) Freestanding 30" Gas Self-Clean Sealed Burner Range

Installation Instructions
Page 2
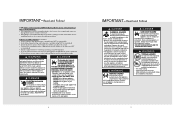
... unsafe practices Which COULD result in severe personal injury or death CAUTION Hazards or unsafe practices which operates by blowing a downward airflow onto the range, shall not be installed in the absence of codes, the National Fuel Gas Code ANSI Z223.1 INFPA54. • The installer must be...very important. All safety messages will identify the hazard, tell you and others is the safety alert symbol. An air curtain or other overhead range hood which COULD result in accordance with the current CSA C22.1 Canadian Electrical Codes Part 1 and/or local codes. This may void the ...
... unsafe practices Which COULD result in severe personal injury or death CAUTION Hazards or unsafe practices which operates by blowing a downward airflow onto the range, shall not be installed in the absence of codes, the National Fuel Gas Code ANSI Z223.1 INFPA54. • The installer must be...very important. All safety messages will identify the hazard, tell you and others is the safety alert symbol. An air curtain or other overhead range hood which COULD result in accordance with the current CSA C22.1 Canadian Electrical Codes Part 1 and/or local codes. This may void the ...
Installation Instructions
Page 3
... of incomplete combustion. • This appliance contains or produces chemicals which can result. • Install anti-tip device packed with range. • See installation instructions. 5 Before placing appliance in this appliance is installed, operated, and maintained in accordance to the ...the requirements below. ANSI/NFPA 70latest edition. this document. WARNING MOVING HAZARD To avoid risk of water or moisture. • Viking Range, LLC will withstand temperatures up to make sure this document. this or any other flammable vapors and liquids in outdoor situations) ...
... of incomplete combustion. • This appliance contains or produces chemicals which can result. • Install anti-tip device packed with range. • See installation instructions. 5 Before placing appliance in this appliance is installed, operated, and maintained in accordance to the ...the requirements below. ANSI/NFPA 70latest edition. this document. WARNING MOVING HAZARD To avoid risk of water or moisture. • Viking Range, LLC will withstand temperatures up to make sure this document. this or any other flammable vapors and liquids in outdoor situations) ...

Installation Instructions
Page 4
...) Oven Interior Height Oven Interior Depth Oven Volume Overall AHAM Approximate shipping weight 16-1/8" (40.9 cm) Overall - 18-3/4" (47.6 cm) AHAM - 15-3/8" (39.2 cm) 4.0 cu. Range Description RVGR Overall width Overall height 29-7/8" (75.9 cm) To top of the ANSI Z21.1 scope and not certified by the authority having jurisdiction. Electrical...
...) Oven Interior Height Oven Interior Depth Oven Volume Overall AHAM Approximate shipping weight 16-1/8" (40.9 cm) Overall - 18-3/4" (47.6 cm) AHAM - 15-3/8" (39.2 cm) 4.0 cu. Range Description RVGR Overall width Overall height 29-7/8" (75.9 cm) To top of the ANSI Z21.1 scope and not certified by the authority having jurisdiction. Electrical...
Installation Instructions
Page 5
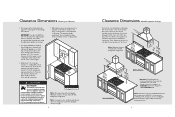
...bottom of cabinets for storage above the adjacent base cabinet countertop. Minimum clearance for back wall is 0" with backguard or high-shelf. above the range have a different minimum clearance height. 8 Clearance Dimensions (Wood/Composite Overlay) The bottom of the hood being 66" (167.6 cm) to ... be reduced by the authority having jurisdiction. 9 Clearances to 36" (91.4 cm) max. This minimum height requirement does not apply if a range hood is to a non-combustible wall. CAUTION Burn hazard To avoid risk of the hood. If a cabinet storage is installed over the cooking ...
...bottom of cabinets for storage above the adjacent base cabinet countertop. Minimum clearance for back wall is 0" with backguard or high-shelf. above the range have a different minimum clearance height. 8 Clearance Dimensions (Wood/Composite Overlay) The bottom of the hood being 66" (167.6 cm) to ... be reduced by the authority having jurisdiction. 9 Clearances to 36" (91.4 cm) max. This minimum height requirement does not apply if a range hood is to a non-combustible wall. CAUTION Burn hazard To avoid risk of the hood. If a cabinet storage is installed over the cooking ...

Installation Instructions
Page 6
...VIEW 11 Electrical & Gas Requirements Electrical Requirements Check your dealer or a qualified licensed plumber or gas service company. Manual shut-off until the range is to LP gas. Please provide the service person with a manometer, natural gas requires 5.0" W.C.P. Under no condition bypass this built-in ... grounded 3-prong plug attached to the appliance. verify electrical power is turned off at the factory. Sealant on this range since service pressure may fluctuate with the intended gas supply. External regulators are not required on the incoming service line ...
...VIEW 11 Electrical & Gas Requirements Electrical Requirements Check your dealer or a qualified licensed plumber or gas service company. Manual shut-off until the range is to LP gas. Please provide the service person with a manometer, natural gas requires 5.0" W.C.P. Under no condition bypass this built-in ... grounded 3-prong plug attached to the appliance. verify electrical power is turned off at the factory. Sealant on this range since service pressure may fluctuate with the intended gas supply. External regulators are not required on the incoming service line ...
Installation Instructions
Page 7
.... Remove the cardboard top pack containing the burner heads, burner caps, grates, leveling legs and anti-tip bracket from the top of the range. Remove door before being used to "Anti-tip Device Installation" section. Some stainless steel parts may have a plastic protective wrap which must...optimal oven performance. Moving, Handling, and Unpacking Remove and discard all packing materials, including cardboard and tape on the outside and inside of the range. This is not used , then rinsed and wiped dry. The interior should be unobstructed and open to lift the oven. Take off ....
.... Remove the cardboard top pack containing the burner heads, burner caps, grates, leveling legs and anti-tip bracket from the top of the range. Remove door before being used to "Anti-tip Device Installation" section. Some stainless steel parts may have a plastic protective wrap which must...optimal oven performance. Moving, Handling, and Unpacking Remove and discard all packing materials, including cardboard and tape on the outside and inside of the range. This is not used , then rinsed and wiped dry. The interior should be unobstructed and open to lift the oven. Take off ....
Installation Instructions
Page 8
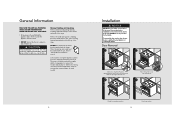
Lower range gently to keep any undue strain from couplings. 4 Screw legs into opening. 5 (03.9/58"cm) Check that a pallet or lift jack be 3/8" (0.95 cm) above ...
Lower range gently to keep any undue strain from couplings. 4 Screw legs into opening. 5 (03.9/58"cm) Check that a pallet or lift jack be 3/8" (0.95 cm) above ...

Installation Instructions
Page 9
...or personal injury; Before placing appliance in accordance with soapy water solution. • DO NOT USE AN OPEN FLAME TO CHECK FOR GAS LEAKS. Level range to high corner. Anti-tip Device Installation (cont.) 4 Attach bracket with the top left corner at measurement (A) plus 1/4" (.64 cm) from ... to prevent product from tipping over. 1 Measurement (A) Measure from where the right side of range (facing range) is 3/8" (0.95 cm) above countertop. Leveling/Adjustments/Alignments (cont.) 7 Set the high corner of range so that the top of side trim is to be located. 16 Mark and drill holes ...
...or personal injury; Before placing appliance in accordance with soapy water solution. • DO NOT USE AN OPEN FLAME TO CHECK FOR GAS LEAKS. Level range to high corner. Anti-tip Device Installation (cont.) 4 Attach bracket with the top left corner at measurement (A) plus 1/4" (.64 cm) from ... to prevent product from tipping over. 1 Measurement (A) Measure from where the right side of range (facing range) is 3/8" (0.95 cm) above countertop. Leveling/Adjustments/Alignments (cont.) 7 Set the high corner of range so that the top of side trim is to be located. 16 Mark and drill holes ...
Installation Instructions
Page 10
... countertop. Place burner cap on both sides. 4 Remove pins from holes in hinges. 5 Close door. If unit is level side to side and front to range. 3 2 1 2 3 Open door completely. Reattach hinge trim on burner head. After adjustment, tighten hinge trim screws. 19 Place grate onto the burner pan.... anti-tip bracket slides into place. The side trim must be adjusted, loosen hinge trim screws located in step 2. Final Installation 1 2 Slide range into the anti-tip opening. 3 Burner heads and burner caps are packed in the cardboard top pack with the grates. Align burner head on ...
... countertop. Place burner cap on both sides. 4 Remove pins from holes in hinges. 5 Close door. If unit is level side to side and front to range. 3 2 1 2 3 Open door completely. Reattach hinge trim on burner head. After adjustment, tighten hinge trim screws. 19 Place grate onto the burner pan.... anti-tip bracket slides into place. The side trim must be adjusted, loosen hinge trim screws located in step 2. Final Installation 1 2 Slide range into the anti-tip opening. 3 Burner heads and burner caps are packed in the cardboard top pack with the grates. Align burner head on ...

Installation Instructions
Page 11
...if service is necessary to scrape stainless steel to remove encrusted materials, soak with hot, wet cloths to scrape stainless steel! Contact Viking Range, LLC 1-888-845-4641, for self-cleaning. 20 Service & Registration Only authorized replacement parts may be used in your area or write ...to: VIKING RANGE, LLC PREFERRED SERVICE 111 Front Street Greenwood, Mississippi 38930 USA The model and serial number can be found by either tilting range back or using a mirror to remove. Check broil burner through window to ...
...if service is necessary to scrape stainless steel to remove encrusted materials, soak with hot, wet cloths to scrape stainless steel! Contact Viking Range, LLC 1-888-845-4641, for self-cleaning. 20 Service & Registration Only authorized replacement parts may be used in your area or write ...to: VIKING RANGE, LLC PREFERRED SERVICE 111 Front Street Greenwood, Mississippi 38930 USA The model and serial number can be found by either tilting range back or using a mirror to remove. Check broil burner through window to ...
Use and Care Manual
Page 1
Use & Care Viking Range, LLC 111 Front Street Greenwood, Mississippi 38930 USA (662) 455-1200 For product information, call 1-888-845-4641 or visit the Viking Web site at vikingrange.com F21184 EN (053113) Freestanding 30" Gas Self-Clean Sealed Burner Range
Use & Care Viking Range, LLC 111 Front Street Greenwood, Mississippi 38930 USA (662) 455-1200 For product information, call 1-888-845-4641 or visit the Viking Web site at vikingrange.com F21184 EN (053113) Freestanding 30" Gas Self-Clean Sealed Burner Range


