Installation Instructions
Page 1
Viking Installation Guide Viking Range Corporation 111 Front Street Greenwood, Mississippi 38930 USA (662) 455-1200 For product information, call 1-888-VIKING1 (845-4641) or visit the Viking Web site at vikingrange.com F20828 EN Professional & Designer 200/325E/450E Series Built-In Dishwashers (040511)
Viking Installation Guide Viking Range Corporation 111 Front Street Greenwood, Mississippi 38930 USA (662) 455-1200 For product information, call 1-888-VIKING1 (845-4641) or visit the Viking Web site at vikingrange.com F20828 EN Professional & Designer 200/325E/450E Series Built-In Dishwashers (040511)
Installation Instructions
Page 2
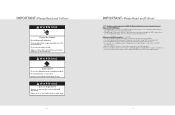
...fire, electric shock, or injury to the cabinet. WARNING Plumbing connections must be conducted PRIOR to unpacking and moving this when fastening the dishwasher to persons, installation work and electrical wiring must comply with applicable sanitary, safety and plumbing codes. Be aware of this appliance. 2... base. Disconnect the electrical power supply and place a tag at circuit breaker or fuse box before making electrical connections. WARNING The dishwasher door may cause severe damage. An electric rating plate specifying voltage, hertz, and amps is the same as unit rating. Do ...
...fire, electric shock, or injury to the cabinet. WARNING Plumbing connections must be conducted PRIOR to unpacking and moving this when fastening the dishwasher to persons, installation work and electrical wiring must comply with applicable sanitary, safety and plumbing codes. Be aware of this appliance. 2... base. Disconnect the electrical power supply and place a tag at circuit breaker or fuse box before making electrical connections. WARNING The dishwasher door may cause severe damage. An electric rating plate specifying voltage, hertz, and amps is the same as unit rating. Do ...
Installation Instructions
Page 3
...NOT recommended) • On a dedicated circuit (no other injury. 4 IMPORTANT-Please Read and Follow! WARNING Electrical Shock Hazard Electrically ground dishwasher. WARNING Excessive Weight Hazard Use two or more people to do not meet the requirements below. Do not push down on open door.... Connect ground wire to a standard breaker of appropriate size (GFI breaker of water or moisture. • Viking Range Corporation will NOT warranty any loose-fitting gaskets (if applicable in outdoor situations) • Protected from GFI outlets which are not...
...NOT recommended) • On a dedicated circuit (no other injury. 4 IMPORTANT-Please Read and Follow! WARNING Electrical Shock Hazard Electrically ground dishwasher. WARNING Excessive Weight Hazard Use two or more people to do not meet the requirements below. Do not push down on open door.... Connect ground wire to a standard breaker of appropriate size (GFI breaker of water or moisture. • Viking Range Corporation will NOT warranty any loose-fitting gaskets (if applicable in outdoor situations) • Protected from GFI outlets which are not...
Installation Instructions
Page 4
... 120°F (49°C) required 325E/450E Models: 120°F (49°C) recommended; to dishwasher, connections provided for water supply and discharge lines. Dishwasher will perform properly with cold water Note: Cycle times will vary Inlet water pressure operating range 10 to ... 325E/450E Models: 15.0 amps, 120VAC/60 Hz; 3'9" (1.1 m) electrical cord 3 prong plug supplied with 3/8" (0.95 cm) compression fitting connected to dishwasher Drain hose Drain hose high loop required Approximate shipping weight 7' (2.13 m) 1/2" (1.3 cm) ID "crimp-proof" flexible drain hose attached to 35" ...
... 120°F (49°C) required 325E/450E Models: 120°F (49°C) recommended; to dishwasher, connections provided for water supply and discharge lines. Dishwasher will perform properly with cold water Note: Cycle times will vary Inlet water pressure operating range 10 to ... 325E/450E Models: 15.0 amps, 120VAC/60 Hz; 3'9" (1.1 m) electrical cord 3 prong plug supplied with 3/8" (0.95 cm) compression fitting connected to dishwasher Drain hose Drain hose high loop required Approximate shipping weight 7' (2.13 m) 1/2" (1.3 cm) ID "crimp-proof" flexible drain hose attached to 35" ...
Installation Instructions
Page 5
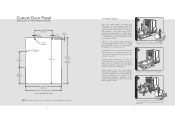
... not to drill through front of the overlay panel. The panel thickness MAY NOT exceed 5/8" (1.6 cm) for flush installation in place. If dishwasher has a metal door skin installed, remove the four screws. Verify operation of the door counter balance springs after installation of panel. 8 (Installation... (8.2 kg.) Obtain four screws with the operation of panel shown. If adjustment of the counterbalance springs. a To remove face panel of dishwasher. c Use non-marring clamps to hold custom panel in most cabinets. DO NOT remove any other fasteners and ensure that the design, ...
... not to drill through front of the overlay panel. The panel thickness MAY NOT exceed 5/8" (1.6 cm) for flush installation in place. If dishwasher has a metal door skin installed, remove the four screws. Verify operation of the door counter balance springs after installation of panel. 8 (Installation... (8.2 kg.) Obtain four screws with the operation of panel shown. If adjustment of the counterbalance springs. a To remove face panel of dishwasher. c Use non-marring clamps to hold custom panel in most cabinets. DO NOT remove any other fasteners and ensure that the design, ...

Installation Instructions
Page 6
...). Site Preparation NOTE: It is large enough for the water supply should be cut to a grounded metal, permanent wiring system; CAUTION The dishwasher has a factory installed backflow preventer. There should be an opening shall not be connected to fit the connection. General Information • Read ... metal, be conducted PRIOR to unpacking and moving this appliance. • After determining where the water supply line will connect to the dishwasher, provide a 2" (5.1 cm) access hole and run with applicable sanitary, safety, and plumbing codes. • Water pressure for the...
...). Site Preparation NOTE: It is large enough for the water supply should be cut to a grounded metal, permanent wiring system; CAUTION The dishwasher has a factory installed backflow preventer. There should be an opening shall not be connected to fit the connection. General Information • Read ... metal, be conducted PRIOR to unpacking and moving this appliance. • After determining where the water supply line will connect to the dishwasher, provide a 2" (5.1 cm) access hole and run with applicable sanitary, safety, and plumbing codes. • Water pressure for the...
Installation Instructions
Page 7
...pull the bottom pan from the unit and disconnect the connector wire from the moisture sensor which is located on wiper gaskets and apply to dishwasher, pull protective film off adhesive back on the floor of the bottom pan. Using a UL approved strain relief, connect wires to fit....pan. Connect ground wire. To attach wiper gasket to leading edge of the bottom pan will cause damage to pinch hoses or power cord beneath dishwasher. Trim gasket to terminal block. c Remove bottom pan and front plate. Loosen strain relief and remove cord. NOTE: Reinstall front plate and ...
...pull the bottom pan from the unit and disconnect the connector wire from the moisture sensor which is located on wiper gaskets and apply to dishwasher, pull protective film off adhesive back on the floor of the bottom pan. Using a UL approved strain relief, connect wires to fit....pan. Connect ground wire. To attach wiper gasket to leading edge of the bottom pan will cause damage to pinch hoses or power cord beneath dishwasher. Trim gasket to terminal block. c Remove bottom pan and front plate. Loosen strain relief and remove cord. NOTE: Reinstall front plate and ...

Installation Instructions
Page 8
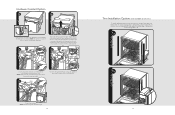
...off adhesive back on wiper gasket and apply behind hemmed edge of side trim. 2a Trim Installation Options (cont'd.) (not available on all units) Dishwasher will ship with trim installed for panel flush install. Shift the side trim forward. If needed , attach wiper gasket by pulling protective film off ...adhesive back on . Use rear hole on side trim and the same hole on all units) To install dishwasher cabinet flush with trim, remove the 6 screws (3 per side) holding side trim on wiper gasket and apply behind hemmed edge of side trim....
...off adhesive back on wiper gasket and apply behind hemmed edge of side trim. 2a Trim Installation Options (cont'd.) (not available on all units) Dishwasher will ship with trim installed for panel flush install. Shift the side trim forward. If needed , attach wiper gasket by pulling protective film off ...adhesive back on . Use rear hole on side trim and the same hole on all units) To install dishwasher cabinet flush with trim, remove the 6 screws (3 per side) holding side trim on wiper gasket and apply behind hemmed edge of side trim....

Installation Instructions
Page 9
... and attach the kick plate brackets. Up Down Using a level, adjust to adjust the tension. 16 Installation Procedure 1 1b 1 Carefully lay dishwasher on the bracket and position in front of the counterbalance springs. NOTE: Be careful not to the preload of cutout. 5a Equal distance Slide ...unit into adjacent cabinet. Tighten screws and repeat for the brackets will already be sure to dishwasher, band water line, drain line, and power cord together. 4 Position unit in the required depth. Screws for other side. 3 Using tie...
... and attach the kick plate brackets. Up Down Using a level, adjust to adjust the tension. 16 Installation Procedure 1 1b 1 Carefully lay dishwasher on the bracket and position in front of the counterbalance springs. NOTE: Be careful not to the preload of cutout. 5a Equal distance Slide ...unit into adjacent cabinet. Tighten screws and repeat for the brackets will already be sure to dishwasher, band water line, drain line, and power cord together. 4 Position unit in the required depth. Screws for other side. 3 Using tie...

Installation Instructions
Page 11
... carry out the following checks: h Remove packaging and parts. h Turn on at breaker/fuse box and test the dishwasher operation by running a rinse and hold the "START" button for leaks under the dishwasher. Performance Checklist Testing for leaks. Installation Procedure (cont'd.) 11A Air Gap 11B Air Gap (Discharge with air gap) 12...
... carry out the following checks: h Remove packaging and parts. h Turn on at breaker/fuse box and test the dishwasher operation by running a rinse and hold the "START" button for leaks under the dishwasher. Performance Checklist Testing for leaks. Installation Procedure (cont'd.) 11A Air Gap 11B Air Gap (Discharge with air gap) 12...

Installation Instructions
Page 12
... should remain with the unit for future reference. 22 23 Contact Viking Range Corporation, 1-888-VIKING1 (845-4641), for the nearest service parts distributor in performing service on the bottom left side of the dishwasher door opening. You will need it if service is ever required.... Service & Registration Only authorized replacement parts may be referred to : VIKING RANGE CORPORATION PREFERRED SERVICE 1803 Hwy 82W Greenwood, Mississippi 38930 USA...
... should remain with the unit for future reference. 22 23 Contact Viking Range Corporation, 1-888-VIKING1 (845-4641), for the nearest service parts distributor in performing service on the bottom left side of the dishwasher door opening. You will need it if service is ever required.... Service & Registration Only authorized replacement parts may be referred to : VIKING RANGE CORPORATION PREFERRED SERVICE 1803 Hwy 82W Greenwood, Mississippi 38930 USA...

Performance Tips
Page 1
.... Below are a few tips and guidelines to follow to make sure the dishwasher is factory set at its highest level. Dishwasher Optimum Performance Tips & Guidelines The Viking dishwasher is important to make sure the dishwasher performs at "4"; Loading: • It is not necessary to rinse normal ...use a detergent with chlorine bleach For detailed information on loading, washing, drying and maintenance please see the Viking Use and Care Manual shipped with the dishwasher or online at vikingrange.com In order to maintain this high level of performance, it is designed to loading...
.... Below are a few tips and guidelines to follow to make sure the dishwasher is factory set at its highest level. Dishwasher Optimum Performance Tips & Guidelines The Viking dishwasher is important to make sure the dishwasher performs at "4"; Loading: • It is not necessary to rinse normal ...use a detergent with chlorine bleach For detailed information on loading, washing, drying and maintenance please see the Viking Use and Care Manual shipped with the dishwasher or online at vikingrange.com In order to maintain this high level of performance, it is designed to loading...

Specs
Page 1
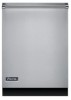
...• CEE Tier I Super Efficient Model Options VDB325E Professional Built-In Dishwasher Finish details for VDB model • Stainless Steel (SS), Black (BK), White (WH) DDB325E Designer Built-In Dishwasher Finish details for washing and draining o Multi-stage sound absorbing/heat retaining...cup shelf • Exclusive Diamond-Brite™ stainless steel tank and inner door • Cycles - KITCHEN CLEANUP Built-In 24"W. Dishwasher 325E Standard Features & Accessories All models include: • Exclusive Vari-Pressure Intelli-Wash™ System o Exclusive variable speed 1/2 horsepower...
...• CEE Tier I Super Efficient Model Options VDB325E Professional Built-In Dishwasher Finish details for VDB model • Stainless Steel (SS), Black (BK), White (WH) DDB325E Designer Built-In Dishwasher Finish details for washing and draining o Multi-stage sound absorbing/heat retaining...cup shelf • Exclusive Diamond-Brite™ stainless steel tank and inner door • Cycles - KITCHEN CLEANUP Built-In 24"W. Dishwasher 325E Standard Features & Accessories All models include: • Exclusive Vari-Pressure Intelli-Wash™ System o Exclusive variable speed 1/2 horsepower...

Specs
Page 2
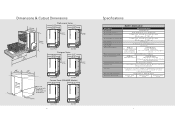
... Dimensions & Specifications PRODUCT DIMENSIONS VDB325E Professional Built-In Dishwasher DDB325E Designer Built-In Dishwasher (2630-.67/c8m") (2630-.67/c8m") (612.04"cm) ((388369mm3-..t0075aoinx/"cc.8.mm")) PROFESSIONAL (612.04"cm) ((388369mm3-..t0075aoinx/"cc.8.mm")) DESIGNER Overall width Overall ...
... Dimensions & Specifications PRODUCT DIMENSIONS VDB325E Professional Built-In Dishwasher DDB325E Designer Built-In Dishwasher (2630-.67/c8m") (2630-.67/c8m") (612.04"cm) ((388369mm3-..t0075aoinx/"cc.8.mm")) PROFESSIONAL (612.04"cm) ((388369mm3-..t0075aoinx/"cc.8.mm")) DESIGNER Overall width Overall ...

Specs
Page 3
...-3/4" (73.0 cm) 49" (124.5 cm) 23-3/4" (60.3 cm) Cabinet flush 23-1/8" (59.0 cm) Panel flush DESIGNER 28-3/4" (73.0 cm) 49" (124.5 cm) Note: If the dishwasher is installed in a corner, there must be a minimum clearance of 2" (5.1 cm) from the side wall so the door can open. PLANNING AND DESIGN GUIDE VIKINGRANGE...
...-3/4" (73.0 cm) 49" (124.5 cm) 23-3/4" (60.3 cm) Cabinet flush 23-1/8" (59.0 cm) Panel flush DESIGNER 28-3/4" (73.0 cm) 49" (124.5 cm) Note: If the dishwasher is installed in a corner, there must be a minimum clearance of 2" (5.1 cm) from the side wall so the door can open. PLANNING AND DESIGN GUIDE VIKINGRANGE...

Specs
Page 4
....8 cm) • Check local codes for water supply and discharge lines. A 2" cut as required • High loop of drain hose required; dishwasher will be extended Cutout width Cutout height Cutout depth (612.04"cm) (612.04"cm) 33((885469""..t40momccamminx)).. All models 24" (61.0 cm) ... 10 - 125 psi (0.69 - 8.62 bar) • Five foot (1.5 m) braided stainless steel water line with 3/8" (0.95 cm) compression fitting supplied with dishwasher • Seven-foot (2.13 m) 1/2" (1.3 cm) ID "crimp-proof" flexible drain hose with 90 degree 3-prong plug • 120V/60 Hz • ...
....8 cm) • Check local codes for water supply and discharge lines. A 2" cut as required • High loop of drain hose required; dishwasher will be extended Cutout width Cutout height Cutout depth (612.04"cm) (612.04"cm) 33((885469""..t40momccamminx)).. All models 24" (61.0 cm) ... 10 - 125 psi (0.69 - 8.62 bar) • Five foot (1.5 m) braided stainless steel water line with 3/8" (0.95 cm) compression fitting supplied with dishwasher • Seven-foot (2.13 m) 1/2" (1.3 cm) ID "crimp-proof" flexible drain hose with 90 degree 3-prong plug • 120V/60 Hz • ...

Specs
Page 5
KITCHEN CLEANUP Built-In 24"W. Warranty valid on Viking products shipped within the United States and Canada. INFORMATION SUBJECT TO CHANGE Dishwasher 325E Compliance Information WARRANTY INFORMATION* • Three-year full warranty-all components (Professional Series) • Lifetime limited warranty-stainless steel tanks, inner door liner • ...
KITCHEN CLEANUP Built-In 24"W. Warranty valid on Viking products shipped within the United States and Canada. INFORMATION SUBJECT TO CHANGE Dishwasher 325E Compliance Information WARRANTY INFORMATION* • Three-year full warranty-all components (Professional Series) • Lifetime limited warranty-stainless steel tanks, inner door liner • ...

Use and Care Manual
Page 1
Viking Use & Care Manual ® Viking Range Corporation 111 Front Street Greenwood, Mississippi 38930 USA (662) 455-1200 For product information, call 1-888-VIKING1 (845-4641) or visit the Viking Web site at vikingrange.com F20827 EN Professional/Custom Panel 325E & 450E Series Built-In Dishwashers (061011)
Viking Use & Care Manual ® Viking Range Corporation 111 Front Street Greenwood, Mississippi 38930 USA (662) 455-1200 For product information, call 1-888-VIKING1 (845-4641) or visit the Viking Web site at vikingrange.com F20827 EN Professional/Custom Panel 325E & 450E Series Built-In Dishwashers (061011)

Use and Care Manual
Page 2
... to become familiar with the information you have any questions or comments about the complete and growing selection of Viking products, contact your dishwasher's operation and care. WARNING Electrical Shock Hazard Electrically ground dishwasher. WARNING Excessive Weight Hazard Use two or more information about this product, please contact the dealer from whom you...
... to become familiar with the information you have any questions or comments about the complete and growing selection of Viking products, contact your dishwasher's operation and care. WARNING Electrical Shock Hazard Electrically ground dishwasher. WARNING Excessive Weight Hazard Use two or more information about this product, please contact the dealer from whom you...

Use and Care Manual
Page 3
...the cabinet. ° Is properly maintained. ° Has had all shipping materials, packaging and temporary labels removed. • Install dishwasher so that it is protected from the access of Contents Getting Started Important Safety Instructions 5 Features 8 Product Controls Cycle Data 11 General... Option 13 Operation Preparing Dishes 14 Washing Recommendations 16 Rack Adjustments 18 Silverware Basket 19 Loading Dishwasher 20 Loading Silverware Basket 21 Loading Racks 23 Dishwasher Detergent 25 Rinse Agent 26 Wash Temperature 27 Energy Saving Tips 27 Water Hardness 28 Product...
...the cabinet. ° Is properly maintained. ° Has had all shipping materials, packaging and temporary labels removed. • Install dishwasher so that it is protected from the access of Contents Getting Started Important Safety Instructions 5 Features 8 Product Controls Cycle Data 11 General... Option 13 Operation Preparing Dishes 14 Washing Recommendations 16 Rack Adjustments 18 Silverware Basket 19 Loading Dishwasher 20 Loading Silverware Basket 21 Loading Racks 23 Dishwasher Detergent 25 Rinse Agent 26 Wash Temperature 27 Energy Saving Tips 27 Water Hardness 28 Product...


