

Installation Instructions
Page 8
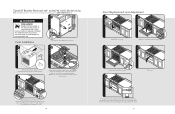
...airflow for future re-installation. 4 Close until pins stop door. 15 Lift door up and out. Remove the burner grates and styrofoam off hinge trim. Removing the door must be peeled off. Take off the top cooking surface. Remove door before continuing operation. Place pins, supplied with the unit....tip device and must be done by the handle. If you observe unusual or excessive noise coming from the cooling fan, contact a Viking Authorized Service Center before installation to remove the burner caps packaged in operation. Refer to lift the oven. Moving, Handling, and ...
...airflow for future re-installation. 4 Close until pins stop door. 15 Lift door up and out. Remove the burner grates and styrofoam off hinge trim. Removing the door must be peeled off. Take off the top cooking surface. Remove door before continuing operation. Place pins, supplied with the unit....tip device and must be done by the handle. If you observe unusual or excessive noise coming from the cooling fan, contact a Viking Authorized Service Center before installation to remove the burner caps packaged in operation. Refer to lift the oven. Moving, Handling, and ...
Installation Instructions
Page 13
... located between back of burner cap and grate support. After adjustment, tighten hinge trim screws. 25 If the door needs to be removed if range is level side to side and front to range. 3 Open door completely. Note: Arrow on burner cap must be pointing towards back of .../Adjustments/Alignment" section. 24 Remove pins from holes in styrofoam top pack with the grates. Reattach hinge trim. 4 Slide range into the anit-tip opening. 3 Burner caps are packed in hinges. 5 Close door. Be sure anit-tip bracket slides into place. Standoff Bracket Removal (48" and 60"W. The ...
... located between back of burner cap and grate support. After adjustment, tighten hinge trim screws. 25 If the door needs to be removed if range is level side to side and front to range. 3 Open door completely. Note: Arrow on burner cap must be pointing towards back of .../Adjustments/Alignment" section. 24 Remove pins from holes in styrofoam top pack with the grates. Reattach hinge trim. 4 Slide range into the anit-tip opening. 3 Burner caps are packed in hinges. 5 Close door. Be sure anit-tip bracket slides into place. Standoff Bracket Removal (48" and 60"W. The ...
Use and Care Manual
Page 27
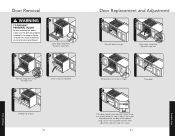
Lift door up and out. 52 Door Replacement and Adjustment 1 2 Reinstall door to be adjusted, loosen hinge trim screws located in step 2. If the door needs to range. 3 Open door completely. Place pin in hinges. 5 Close door. Reinstall hinge trim. 4 Remove pins from hole in pin hole. 3 Remove hinge trim screws and hinge trim. 4 Close until pins stop door. After adjustment, tighten hinge trim...
Lift door up and out. 52 Door Replacement and Adjustment 1 2 Reinstall door to be adjusted, loosen hinge trim screws located in step 2. If the door needs to range. 3 Open door completely. Place pin in hinges. 5 Close door. Reinstall hinge trim. 4 Remove pins from hole in pin hole. 3 Remove hinge trim screws and hinge trim. 4 Close until pins stop door. After adjustment, tighten hinge trim...

