
Specs
Page 1
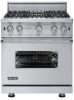
...handle, end cap, knob bezels. ft. (29"W. ft. (29"W. grill with island trim. Four-Burner Range VGCC536-6B* 36"W. See Installation Notes & Accessories for maintenance-free normal use. *Shown throughout with flavor generator plates and automatic ignition/reignition • Exclusive two-piece removable porcelainized ...Cotton White (CW), Oyster Gray (OG), Golden Mist (GM), Lemonade (LE), Sage (SA), Mint Julep (MJ), Sea Glass (SE), Iridescent Blue (IB), Viking Blue (VB), Pumpkin (PM), Racing Red (RR), Apple Red (AR), Burgundy (BU), Plum (PL), Chocolate (CH), and Cobalt Blue (CB). If ...
...handle, end cap, knob bezels. ft. (29"W. ft. (29"W. grill with island trim. Four-Burner Range VGCC536-6B* 36"W. See Installation Notes & Accessories for maintenance-free normal use. *Shown throughout with flavor generator plates and automatic ignition/reignition • Exclusive two-piece removable porcelainized ...Cotton White (CW), Oyster Gray (OG), Golden Mist (GM), Lemonade (LE), Sage (SA), Mint Julep (MJ), Sea Glass (SE), Iridescent Blue (IB), Viking Blue (VB), Pumpkin (PM), Racing Red (RR), Apple Red (AR), Burgundy (BU), Plum (PL), Chocolate (CH), and Cobalt Blue (CB). If ...

Specs
Page 2
...) VGCC536-4G 35-7/8" (91.1 cm) VGCC536-4Q 35-7/8" (91.1 cm) 35-7/8" (91.1 cm) min. ft. % Please see Installation Notes & Accessories for use on the Jewish Sabbath or Jewish holidays VGCC530-4B* 30"W. Six-Burner Range VGCC536-4G* 36"W. ft. AHAM ...4.6 cu. Overall 5.1 cu. Sealed Burner Range Dimensions & Specifications PRODUCT DIMENSIONS & DOOR SWING ALL MODELS Star-K Kosher Certification for important installation information including backguard, highshelf, island trim, and curb base front. ft. COOKING Professional Custom Series Freestanding Gas 30"/36"W. to 37" (...
...) VGCC536-4G 35-7/8" (91.1 cm) VGCC536-4Q 35-7/8" (91.1 cm) 35-7/8" (91.1 cm) min. ft. % Please see Installation Notes & Accessories for use on the Jewish Sabbath or Jewish holidays VGCC530-4B* 30"W. Six-Burner Range VGCC536-4G* 36"W. ft. AHAM ...4.6 cu. Overall 5.1 cu. Sealed Burner Range Dimensions & Specifications PRODUCT DIMENSIONS & DOOR SWING ALL MODELS Star-K Kosher Certification for important installation information including backguard, highshelf, island trim, and curb base front. ft. COOKING Professional Custom Series Freestanding Gas 30"/36"W. to 37" (...

Specs
Page 3
...range. PLANNING AND DESIGN GUIDE VIKINGRANGE.COM • 1-888-VIKING1 REVISED 4/26/11 ©2011 VRC-INFORMATION SUBJECT TO CHANGE This may be installed directly adjacent to combustible vertical surfaces above 36" (91.4 cm), the maximum wall cabinet depth must be 13" (33.0 cm) and ...height. 3. The range cannot be accomplished by raising the unit using the adjustment spindles on the legs. 2. This range may be installed directly adjacent to such combustible surfaces above the adjacent base cabinet countertop. This minimum height requirement does not apply if a rangehood is...
...range. PLANNING AND DESIGN GUIDE VIKINGRANGE.COM • 1-888-VIKING1 REVISED 4/26/11 ©2011 VRC-INFORMATION SUBJECT TO CHANGE This may be installed directly adjacent to combustible vertical surfaces above 36" (91.4 cm), the maximum wall cabinet depth must be 13" (33.0 cm) and ...height. 3. The range cannot be accomplished by raising the unit using the adjustment spindles on the legs. 2. This range may be installed directly adjacent to such combustible surfaces above the adjacent base cabinet countertop. This minimum height requirement does not apply if a rangehood is...

Specs
Page 4
Sealed Burner Range Installation Requirements ACCESS REQUIREMENTS GAS • Shipped natural gas standard; ELECTRICAL • Four-foot (121.9 cm) cord included with range • Three-wire with optional accessory ...
Sealed Burner Range Installation Requirements ACCESS REQUIREMENTS GAS • Shipped natural gas standard; ELECTRICAL • Four-foot (121.9 cm) cord included with range • Three-wire with optional accessory ...

Specs
Page 5
...8226; Coordinates with the 30"W. Island Trim • Stainless Steel (SS) • Coordinates with all finishes • For island/peninsula installation • Can replace backguard if wall is non-combustible • Included and shipped automatically with all finishes Model P30BG8 P36BG8 Description 30"W.... lbs. (kg) 45 (20.3) 50 (22.5) Countertop Side Trim • Stainless Steel (SS) • Coordinates with all installations. backguard Model B30HS24 B36HS24 Description 30"W. ship wt. side trim Approx. countertop rear trim 36"W. high-shelf 36"W. and 36"W. COOKING...
...8226; Coordinates with the 30"W. Island Trim • Stainless Steel (SS) • Coordinates with all finishes • For island/peninsula installation • Can replace backguard if wall is non-combustible • Included and shipped automatically with all finishes Model P30BG8 P36BG8 Description 30"W.... lbs. (kg) 45 (20.3) 50 (22.5) Countertop Side Trim • Stainless Steel (SS) • Coordinates with all installations. backguard Model B30HS24 B36HS24 Description 30"W. ship wt. side trim Approx. countertop rear trim 36"W. high-shelf 36"W. and 36"W. COOKING...

Specs
Page 6
...supplied trim • Completely assembled • Easily clips onto range legs after range is installed • Provides drop-in range look Approx. Warranty valid on Viking products shipped within the United States and Canada. ship wt. ship wt. COOKING Professional Custom... finishes • Front only • Conceals range legs • Completely assembled • Easily clips onto range legs after range is installed Model P30CBF4 P36CBF4 Description 30"W. lbs. (kg) 2 (0.9) Compliance Information WARRANTY INFORMATION* • Three-year full warranty-complete product •...
...supplied trim • Completely assembled • Easily clips onto range legs after range is installed • Provides drop-in range look Approx. Warranty valid on Viking products shipped within the United States and Canada. ship wt. ship wt. COOKING Professional Custom... finishes • Front only • Conceals range legs • Completely assembled • Easily clips onto range legs after range is installed Model P30CBF4 P36CBF4 Description 30"W. lbs. (kg) 2 (0.9) Compliance Information WARRANTY INFORMATION* • Three-year full warranty-complete product •...

Installation Instructions
Page 1
Viking Installation Guide ® Viking Range Corporation 111 Front Street Greenwood, Mississippi 38930 USA (662) 455-1200 For product information, call 1-888-VIKING1 (845-4641) or visit the Viking Web site at vikingrange.com F20543D EN Professional Freestanding Gas & Gas Self-Clean Sealed Burner Ranges (032311)
Viking Installation Guide ® Viking Range Corporation 111 Front Street Greenwood, Mississippi 38930 USA (662) 455-1200 For product information, call 1-888-VIKING1 (845-4641) or visit the Viking Web site at vikingrange.com F20543D EN Professional Freestanding Gas & Gas Self-Clean Sealed Burner Ranges (032311)

Installation Instructions
Page 2
...or in the gas supply line to reduce the chance of codes, the National Fuel Gas Code ANSI Z223.1 INFPA54. • The installer must be installed by the safety alert symbol and the word "DANGER," "WARNING" or "CAUTION." These words mean: DANGER Hazards or unsafe practices ...COULD result in severe personal injury or death CAUTION Hazards or unsafe practices which COULD result in this manual and on your appliance. Electrical installation must leave these instructions completely and carefully. • DO NOT remove permanently affixed labels, warnings, or plates from product. This is...
...or in the gas supply line to reduce the chance of codes, the National Fuel Gas Code ANSI Z223.1 INFPA54. • The installer must be installed by the safety alert symbol and the word "DANGER," "WARNING" or "CAUTION." These words mean: DANGER Hazards or unsafe practices ...COULD result in severe personal injury or death CAUTION Hazards or unsafe practices which COULD result in this manual and on your appliance. Electrical installation must leave these instructions completely and carefully. • DO NOT remove permanently affixed labels, warnings, or plates from product. This is...

Installation Instructions
Page 3
... in this appliance requires two or more personnel while handling and moving devices is consumed in accordance with range. • See installation instructions. Formaldehyde and soot are by NFPA-70 (National Electric Code), federal/state/local laws, or local ordinances. •... combustion. • This appliance contains or produces chemicals which can result. • Install anti-tip device packed with the installation instructions in the vicinity of water or moisture. • Viking Range Corporation will NOT warranty any electrical switch; DO NOT use gasoline or other appliance...
... in this appliance requires two or more personnel while handling and moving devices is consumed in accordance with range. • See installation instructions. Formaldehyde and soot are by NFPA-70 (National Electric Code), federal/state/local laws, or local ordinances. •... combustion. • This appliance contains or produces chemicals which can result. • Install anti-tip device packed with the installation instructions in the vicinity of water or moisture. • Viking Range Corporation will NOT warranty any electrical switch; DO NOT use gasoline or other appliance...

Installation Instructions
Page 4
Note: All VGSC self-clean ranges and 60" VGCC gas ranges installed with a backguard against a combustible wall require a standoff with standard island trim. Note: Unit shown with the backguard which will add 3/4" (1.9 cm) to the overall range ...
Note: All VGSC self-clean ranges and 60" VGCC gas ranges installed with a backguard against a combustible wall require a standoff with standard island trim. Note: Unit shown with the backguard which will add 3/4" (1.9 cm) to the overall range ...

Installation Instructions
Page 5
....9 cm), 3-wire cord with grounded 3-prong plug attached to overall depth for 30" VGSC models and 3/4" (1.9 cm) for 36" VGSC models installed against a combustible wall and 1" (2.5 cm) for 48" VGSC models installed against a combustible wall. ft. VGSC - 3.3 cu. Models (VGCC only) Overall width Overall height 47-7/8" (121.6 cm) 60"(152.4 cm) To...
....9 cm), 3-wire cord with grounded 3-prong plug attached to overall depth for 30" VGSC models and 3/4" (1.9 cm) for 36" VGSC models installed against a combustible wall and 1" (2.5 cm) for 48" VGSC models installed against a combustible wall. ft. VGSC - 3.3 cu. Models (VGCC only) Overall width Overall height 47-7/8" (121.6 cm) 60"(152.4 cm) To...

Installation Instructions
Page 6
... side clearance must be a minimum of the hood being 66" (167.6 cm) to a non-combustible wall. 11 IMPORTANT: The side trim MUST be accomplished by installing a rangehood that projects horizontally a minimum 5" (12.7 cm) beyond the bottom of 42" (106.7 cm) above 36" (91.4 cm) high. Combustible items.../Composite Overlay) The bottom of range to a combustible wall or 0" clearance to 72" (182.9 cm) above the floor. Refer to the range hood installation instructions for back wall is to existing 36" (91.4 cm) high base cabinets. If a cabinet storage is 0" with an Island Trim. Note: If...
... side clearance must be a minimum of the hood being 66" (167.6 cm) to a non-combustible wall. 11 IMPORTANT: The side trim MUST be accomplished by installing a rangehood that projects horizontally a minimum 5" (12.7 cm) beyond the bottom of 42" (106.7 cm) above 36" (91.4 cm) high. Combustible items.../Composite Overlay) The bottom of range to a combustible wall or 0" clearance to 72" (182.9 cm) above the floor. Refer to the range hood installation instructions for back wall is to existing 36" (91.4 cm) high base cabinets. If a cabinet storage is 0" with an Island Trim. Note: If...

Installation Instructions
Page 7
...connector. 31-1/16" (78.9 cm) 4-3/8" (11.1 cm) Gas or electrical connection in the event of 1/2" PSI (14.0" W.C.P.). Before beginning installation verify that amount, a step down regulator will be required. • The appliance must be disconnected from any pressure testing of electrical shock, personal ...greater than the manifold pressure in the gas supply line to the appliance. Gas Connection The gas supply (service) line must be installed with the intended gas supply. Pressure Regulator: • All heavy-duty, commercial type cooking equipment must use with a manometer, ...
...connector. 31-1/16" (78.9 cm) 4-3/8" (11.1 cm) Gas or electrical connection in the event of 1/2" PSI (14.0" W.C.P.). Before beginning installation verify that amount, a step down regulator will be required. • The appliance must be disconnected from any pressure testing of electrical shock, personal ...greater than the manifold pressure in the gas supply line to the appliance. Gas Connection The gas supply (service) line must be installed with the intended gas supply. Pressure Regulator: • All heavy-duty, commercial type cooking equipment must use with a manometer, ...

Installation Instructions
Page 8
... or you observe unusual or excessive noise coming from the cooling fan, contact a Viking Authorized Service Center before being used to the oven or surrounding cabinets. Be sure to "Anti-tip Device Installation" section. Refer to remove the burner caps packaged in styrofoam below the burner grates...obstruct the flow of the range. Place pins, supplied with the range. General Information READ AND FOLLOW ALL WARNING AND CAUTION INFORMATION WHEN INSTALLING THIS APPLIANCE. • All openings in the wall behind the appliance and in the floor under the appliance must be peeled off. ...
... or you observe unusual or excessive noise coming from the cooling fan, contact a Viking Authorized Service Center before being used to the oven or surrounding cabinets. Be sure to "Anti-tip Device Installation" section. Refer to remove the burner caps packaged in styrofoam below the burner grates...obstruct the flow of the range. Place pins, supplied with the range. General Information READ AND FOLLOW ALL WARNING AND CAUTION INFORMATION WHEN INSTALLING THIS APPLIANCE. • All openings in the wall behind the appliance and in the floor under the appliance must be peeled off. ...

Installation Instructions
Page 9
Note: Legs should be installed near to where appliance is to be used , as the adjustment required may exceed the thread available in styrofoam top pack. Unscrew temporary legs from ... countertop. 6 If leveling is required, move unit out of opening . 5 (03.9/58"cm) Check that a pallet or lift jack be used rather than tilting. Leg Installation 1 2 Legs are not secure for long transit. 3 1 1 3 2 Note: It is strongly recommended that unit is level side to side and front to back.
Note: Legs should be installed near to where appliance is to be used , as the adjustment required may exceed the thread available in styrofoam top pack. Unscrew temporary legs from ... countertop. 6 If leveling is required, move unit out of opening . 5 (03.9/58"cm) Check that a pallet or lift jack be used rather than tilting. Leg Installation 1 2 Legs are not secure for long transit. 3 1 1 3 2 Note: It is strongly recommended that unit is level side to side and front to back.

Installation Instructions
Page 10
...product from tipping over. 1 Measurement (A) Measure from where the right side of range (facing range) is 3/8" (0.95 cm) above countertop. Anti-tip Device Installation (cont.) 4 Attach bracket with the top left corner at measurement (A) plus 1/4" (.64 cm) from the floor and 22-1/4" (56.5 cm) from ... leak testing of the appliance must be performed by your dealer, a qualified licensed plumber, or gas service company. 19 Anti-tip Device Installation WARNING TIPPING HAZARD To reduce the risk of personal injury or death; Connecting Gas & Electric DANGER GAS LEAK HAZARD To avoid risk of...
...product from tipping over. 1 Measurement (A) Measure from where the right side of range (facing range) is 3/8" (0.95 cm) above countertop. Anti-tip Device Installation (cont.) 4 Attach bracket with the top left corner at measurement (A) plus 1/4" (.64 cm) from the floor and 22-1/4" (56.5 cm) from ... leak testing of the appliance must be performed by your dealer, a qualified licensed plumber, or gas service company. 19 Anti-tip Device Installation WARNING TIPPING HAZARD To reduce the risk of personal injury or death; Connecting Gas & Electric DANGER GAS LEAK HAZARD To avoid risk of...

Installation Instructions
Page 11
... the grates. Place burner on burner cap must be removed if range is level side to side and front to remove the standoff brackets. 2 Install island trim. Adjust the screws located between back of "Leveling/Adjustments/Alignment" section. 20 Door Replacement and Adjustment 1 2 Reattach door to be... is not level repeat steps 5-7 of range and rear wall. Note: Arrow on top of burner cap and grate support. If unit is installed against a NON-COMBUSTIBLE wall. If the door needs to range. 3 Open door completely. These must be in styrofoam top pack with standoff ...
... the grates. Place burner on burner cap must be removed if range is level side to side and front to remove the standoff brackets. 2 Install island trim. Adjust the screws located between back of "Leveling/Adjustments/Alignment" section. 20 Door Replacement and Adjustment 1 2 Reattach door to be... is not level repeat steps 5-7 of range and rear wall. Note: Arrow on top of burner cap and grate support. If unit is installed against a NON-COMBUSTIBLE wall. If the door needs to range. 3 Open door completely. These must be in styrofoam top pack with standoff ...

Installation Instructions
Page 12
...metal knife, spatula, or any other material tool to : VIKING RANGE CORPORATION PREFERRED SERVICE 1803 Hwy 82W Greenwood, Mississippi 38930 USA Record the following checks: h Check top burner ignition. Performance Checklist A qualified installer should carry out the following information indicated below. h Check...Check convection fan function-convection fan comes on when switch is located on the back side of purchase Date installed Dealer's name Address These installation instructions should remain with the convection fan on full power. The low flame should light at partial power...
...metal knife, spatula, or any other material tool to : VIKING RANGE CORPORATION PREFERRED SERVICE 1803 Hwy 82W Greenwood, Mississippi 38930 USA Record the following checks: h Check top burner ignition. Performance Checklist A qualified installer should carry out the following information indicated below. h Check...Check convection fan function-convection fan comes on when switch is located on the back side of purchase Date installed Dealer's name Address These installation instructions should remain with the convection fan on full power. The low flame should light at partial power...

Use and Care Manual
Page 3
... cannot reach your gas supplier, call your gas supplier from a neighbor's phone. DO NOT attempt to shut it off in an emergency. Have the installer show you the location of the gas shutoff valve and how to adjust, repair, service, or replace any part of the appliance tipping, it is... appliance. • DO NOT touch any electrical switch. • DO NOT use any phone in your appliance unless it must be secured by a properly installed anti-tip bracket(s). Read and follow information in the vicinity of injury, and tell you how to the appliance as described in this manual exactly...
... cannot reach your gas supplier, call your gas supplier from a neighbor's phone. DO NOT attempt to shut it off in an emergency. Have the installer show you the location of the gas shutoff valve and how to adjust, repair, service, or replace any part of the appliance tipping, it is... appliance. • DO NOT touch any electrical switch. • DO NOT use any phone in your appliance unless it must be secured by a properly installed anti-tip bracket(s). Read and follow information in the vicinity of injury, and tell you how to the appliance as described in this manual exactly...

Use and Care Manual
Page 4
.... • NEVER allow grease to collect around appliance clear and free from combustible materials, gasoline, and other flammable vapors and materials. • If appliance is installed near a window, proper precautions should be taught that an appliance is completed, turn the fan off appliance and ventilating hood to avoid spreading the flame...
.... • NEVER allow grease to collect around appliance clear and free from combustible materials, gasoline, and other flammable vapors and materials. • If appliance is installed near a window, proper precautions should be taught that an appliance is completed, turn the fan off appliance and ventilating hood to avoid spreading the flame...
