
Specs
Page 2
...) 85 lbs. (38.6 kg) PLANNING AND DESIGN GUIDE VIKINGRANGE.COM • 1-888-VIKING1 REVISED 4/28/11 ©2011 VRC-INFORMATION SUBJECT TO CHANGE % Please see Installation Notes and Accessories for important information, including filters. COOKING Professional & Designer Convection Microwave Hood Dimensions & Specifications PRODUCT DIMENSIONS VMOR205 Professional Microwave Hood DMOR205 Designer Microwave...
...) 85 lbs. (38.6 kg) PLANNING AND DESIGN GUIDE VIKINGRANGE.COM • 1-888-VIKING1 REVISED 4/28/11 ©2011 VRC-INFORMATION SUBJECT TO CHANGE % Please see Installation Notes and Accessories for important information, including filters. COOKING Professional & Designer Convection Microwave Hood Dimensions & Specifications PRODUCT DIMENSIONS VMOR205 Professional Microwave Hood DMOR205 Designer Microwave...

Specs
Page 4
UTILITY REQUIREMENTS COOKING Professional & Designer Convection Microwave Hood Installation Requirements ACCESS REQUIREMENTS GAS • Not applicable ELECTRICAL • 3.5-foot power cord included • 120 VAC/60 Hz • Maximum amp usage- 13.2 (1.6 kW) PLUMBING ...
UTILITY REQUIREMENTS COOKING Professional & Designer Convection Microwave Hood Installation Requirements ACCESS REQUIREMENTS GAS • Not applicable ELECTRICAL • 3.5-foot power cord included • 120 VAC/60 Hz • Maximum amp usage- 13.2 (1.6 kW) PLUMBING ...

Specs
Page 5
COOKING Professional & Designer Convection Microwave Hood % Installation Notes & Accessories Replacement Air Filter • Recommended replacement every 6 - 12 months Model CFOR1 Description Air filter for 30"W. microwave hood Approx. Warranty valid on Viking products shipped within the United States and Canada. lbs. (kg) 2 lbs (.91) Compliance Information WARRANTY INFORMATION* • Three-year full warranty...
COOKING Professional & Designer Convection Microwave Hood % Installation Notes & Accessories Replacement Air Filter • Recommended replacement every 6 - 12 months Model CFOR1 Description Air filter for 30"W. microwave hood Approx. Warranty valid on Viking products shipped within the United States and Canada. lbs. (kg) 2 lbs (.91) Compliance Information WARRANTY INFORMATION* • Three-year full warranty...

Installation Instructions
Page 1
...which would normally be completed by a flat vertical wall. This will normally be mounted against and supported by a qualified electrician before installing the Convection Microwave Hood. The unit should be located by probing the wall with standard 12-inch wall cabinets. The center of the...in the gaps. Mounting Space This Convection Microwave Hood requires a mounting space on page 2. If the wall is necessary between the edges. Viking Installation Guide IMPORTANT-Please Read and Follow! • Please read all items which locates the nails in the stud. • Use a ...
...which would normally be completed by a flat vertical wall. This will normally be mounted against and supported by a qualified electrician before installing the Convection Microwave Hood. The unit should be located by probing the wall with standard 12-inch wall cabinets. The center of the...in the gaps. Mounting Space This Convection Microwave Hood requires a mounting space on page 2. If the wall is necessary between the edges. Viking Installation Guide IMPORTANT-Please Read and Follow! • Please read all items which locates the nails in the stud. • Use a ...

Installation Instructions
Page 2
... grounding plug can accept any questions about the grounding or electrical instructions, consult a qualified electrician or serviceperson. • Neither Viking nor the dealer can result in parentheses for the electric current. When calculating the total length, add the equivalent lengths of all...; Check that is equipped with a grounding plug. Electrical Requirements The oven is properly installed and grounded in figure 2. Note: • If you have a qualified electrician or serviceman install an outlet near the appliance. When the hood is too short, have any liability for...
... grounding plug can accept any questions about the grounding or electrical instructions, consult a qualified electrician or serviceperson. • Neither Viking nor the dealer can result in parentheses for the electric current. When calculating the total length, add the equivalent lengths of all...; Check that is equipped with a grounding plug. Electrical Requirements The oven is properly installed and grounded in figure 2. Note: • If you have a qualified electrician or serviceman install an outlet near the appliance. When the hood is too short, have any liability for...

Installation Instructions
Page 3
... UL Rating 120VAC/60 Hz CSA Rating 116VAC/60 Hz Max. Tools Recommended for protection • Scissors • Measure • Pencil • Tape Installation Hardware The INSTALLATION HARDWARE (items 1 - 7) packed with the oven should contain the following: Item 1 2 3 4 5 6 7 Part Name & Code Wood Screw...kg) E3 Surround the power cord opening (if needed) • Protective Drop Cloth for product and range you may also use carton for Installation • Phillips Screwdriver • Electric Drill • 1/2", 5/8" and 3/32" Drill Bits • 1½" Wood Bit or Metal ...
... UL Rating 120VAC/60 Hz CSA Rating 116VAC/60 Hz Max. Tools Recommended for protection • Scissors • Measure • Pencil • Tape Installation Hardware The INSTALLATION HARDWARE (items 1 - 7) packed with the oven should contain the following: Item 1 2 3 4 5 6 7 Part Name & Code Wood Screw...kg) E3 Surround the power cord opening (if needed) • Protective Drop Cloth for product and range you may also use carton for Installation • Phillips Screwdriver • Electric Drill • 1/2", 5/8" and 3/32" Drill Bits • 1½" Wood Bit or Metal ...

Installation Instructions
Page 4
...bracket. non-vented, ductless. Recirculating requires the use of the Charcoal Filter, which has been installed in the oven. Follow installation procedure (B). Vertical Exhaust - Follow installation procedure (A). Be careful not to three types of hood ventilation systems. Select the type required... Hood Fan Unit HORIZONTAL EXHAUST: Withdraw hood fan unit carefully and slip wires out of wire box. outside ventilation. Follow installation procedure (C). (A) Recirculating: Non-vented, Ductless Operation • The unit is shipped assembled for recirculating. • The ...
...bracket. non-vented, ductless. Recirculating requires the use of the Charcoal Filter, which has been installed in the oven. Follow installation procedure (B). Vertical Exhaust - Follow installation procedure (A). Be careful not to three types of hood ventilation systems. Select the type required... Hood Fan Unit HORIZONTAL EXHAUST: Withdraw hood fan unit carefully and slip wires out of wire box. outside ventilation. Follow installation procedure (C). (A) Recirculating: Non-vented, Ductless Operation • The unit is shipped assembled for recirculating. • The ...
Installation Instructions
Page 5
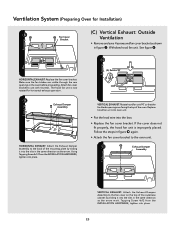
...figufriegure figure figure (A) VERTICAL EXHAUST: Attach the Exhaust Damper Assembly to the back of the oven. Tapping Screw 4x12 from the INSTALLATION HARDWARE, tighten into the slits in figure 5. figure Ventilation System (Preparing Oven for horizontal exhaust operation. figure figure figure figurfiegure ... box. • Replace the fan cover bracket. If the cover does not fit properly, the hood fan unit is now rotated for Installation) Fan Cover Bracket (C) Vertical Exhaust: Outside Ventilation • Remove and save 4 screws and fan cover bracket as the arrow. Withdraw ...
...figufriegure figure figure (A) VERTICAL EXHAUST: Attach the Exhaust Damper Assembly to the back of the oven. Tapping Screw 4x12 from the INSTALLATION HARDWARE, tighten into the slits in figure 5. figure Ventilation System (Preparing Oven for horizontal exhaust operation. figure figure figure figurfiegure ... box. • Replace the fan cover bracket. If the cover does not fit properly, the hood fan unit is now rotated for Installation) Fan Cover Bracket (C) Vertical Exhaust: Outside Ventilation • Remove and save 4 screws and fan cover bracket as the arrow. Withdraw ...
Installation Instructions
Page 6
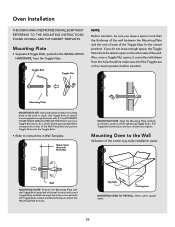
... while tightening Toggle Bolts. figure figure figure figure figure figure Oven Installation figure figure figure THIS OVEN CANNOT BE PROPERLY INSTALLED WITHOUT REFERRING TO THE MOUNTING INSTRUCTIONS FOUND ON WALL AND TOP CABINET TEMPLATES. therefore make installation easier. figure figure figure figure figure figure figure (B) Wall MOUNTING ...Separate 4 Toggle Bolts, packed in Wall Te(mA)plate. Pull Toggle Bolt toward you and turn clockwise to instructions in the INSTALLATION HARDWARE, from the hole; E6 figure figure figure figure figure figure figure figure figure
... while tightening Toggle Bolts. figure figure figure figure figure figure Oven Installation figure figure figure THIS OVEN CANNOT BE PROPERLY INSTALLED WITHOUT REFERRING TO THE MOUNTING INSTRUCTIONS FOUND ON WALL AND TOP CABINET TEMPLATES. therefore make installation easier. figure figure figure figure figure figure figure (B) Wall MOUNTING ...Separate 4 Toggle Bolts, packed in Wall Te(mA)plate. Pull Toggle Bolt toward you and turn clockwise to instructions in the INSTALLATION HARDWARE, from the hole; E6 figure figure figure figure figure figure figure figure figure
Installation Instructions
Page 7
Oven Installation (A) (A) figure ffiigguurree figurefigure ffiigguurree figure figure (B) (B) (B) MOUNTING OVEN TO THE WALL: Using cutting line around the carton, cut into two pieces (A) and (B). Align the lower ...
Oven Installation (A) (A) figure ffiigguurree figurefigure ffiigguurree figure figure (B) (B) (B) MOUNTING OVEN TO THE WALL: Using cutting line around the carton, cut into two pieces (A) and (B). Align the lower ...

Installation Instructions
Page 8
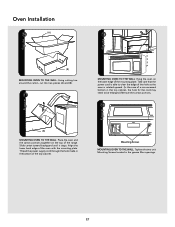
...455-1200 For product information, call 1-888-VIKING1 (845-4641) or visit the Viking Web site at vikingrange.com F20380 E8 TINSEB505MRR1 (B) Oven Installation figure figure ffiigguurree MOUNTING OVEN TO THE WALL: Install Grease Filters by fitting into place. (C) (D) Deflector MOUNTING DEFLECTOR: Secure the deflector... the power cord. • Keep the Operation Manual. Push back and up into the opening. Checklist for Installation • Make sure the unit has been installed according to the top cabinet. figure (C) (D) MOUNTING OVEN TO THE WALL: Use the two Top Cabinet Screws...
...455-1200 For product information, call 1-888-VIKING1 (845-4641) or visit the Viking Web site at vikingrange.com F20380 E8 TINSEB505MRR1 (B) Oven Installation figure figure ffiigguurree MOUNTING OVEN TO THE WALL: Install Grease Filters by fitting into place. (C) (D) Deflector MOUNTING DEFLECTOR: Secure the deflector... the power cord. • Keep the Operation Manual. Push back and up into the opening. Checklist for Installation • Make sure the unit has been installed according to the top cabinet. figure (C) (D) MOUNTING OVEN TO THE WALL: Use the two Top Cabinet Screws...
Use and Care Manual
Page 44
..., slight color variation may vary from jurisdiction to jurisdiction. This warranty excludes use of the product in all color finishes. Viking Range Corporation uses high quality processes and materials available to produce all commercial locations such as restaurants, food service locations and ... either a refund or replacement of original retail purchase or closing date for any part which may be responsible for proper installation, providing reasonable and necessary maintenance, providing proof of purchase upon request, and making the appliance reasonably accessible for service. ...
..., slight color variation may vary from jurisdiction to jurisdiction. This warranty excludes use of the product in all color finishes. Viking Range Corporation uses high quality processes and materials available to produce all commercial locations such as restaurants, food service locations and ... either a refund or replacement of original retail purchase or closing date for any part which may be responsible for proper installation, providing reasonable and necessary maintenance, providing proof of purchase upon request, and making the appliance reasonably accessible for service. ...

