
Installation Instructions
Page 1
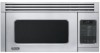
... 2" x 4" wood studding and 3/8" or more from floor Wall Construction This Convection Microwave Hood should be flat for proper installation. See 3 ELECTRICAL GROUNDING INSTRUCTIONS on a wall as shown in the top cabinet above the unit. The wall must be capable of supporting a weight of... of this product. • If a new electrical outlet is required, its installation should be mounted against and supported by probing the wall with standard 12-inch wall cabinets. Viking Installation Guide IMPORTANT-Please Read and Follow! • Please read all items which locates...
... 2" x 4" wood studding and 3/8" or more from floor Wall Construction This Convection Microwave Hood should be flat for proper installation. See 3 ELECTRICAL GROUNDING INSTRUCTIONS on a wall as shown in the top cabinet above the unit. The wall must be capable of supporting a weight of... of this product. • If a new electrical outlet is required, its installation should be mounted against and supported by probing the wall with standard 12-inch wall cabinets. Viking Installation Guide IMPORTANT-Please Read and Follow! • Please read all items which locates...

Installation Instructions
Page 2
...and ordinances. absolutely do not use of the grounding plug can accept any questions about the grounding or electrical instructions, consult a qualified electrician or serviceperson. • Neither Viking nor the dealer can result in accordance with a 3-prong grounding plug. Check that is equipped with a...total length, add the equivalent lengths of all transitions and adapters plus the length of electric shock. This oven is properly installed and grounded in a risk of all connections are equivalent to observe the correct electrical connection procedures. It must be located ...
...and ordinances. absolutely do not use of the grounding plug can accept any questions about the grounding or electrical instructions, consult a qualified electrician or serviceperson. • Neither Viking nor the dealer can result in accordance with a 3-prong grounding plug. Check that is equipped with a...total length, add the equivalent lengths of all transitions and adapters plus the length of electric shock. This oven is properly installed and grounded in a risk of all connections are equivalent to observe the correct electrical connection procedures. It must be located ...
Installation Instructions
Page 6
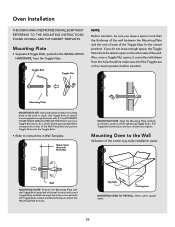
...figure figure figure figure figure Toggle Bolt Toggle Nut Note: Before insertion, be withdrawn from the Toggle Nuts. Use Toggle Bolts to instructions in the wall with the Toggle Nuts closed position). Also, once a Toggle Nut opens, it cannot be sure you leave a...end of each of the Toggles are in the INSTALLATION HARDWARE, from the hole; figure figure figure figure figure figure Oven Installation figure figure figure THIS OVEN CANNOT BE PROPERLY INSTALLED WITHOUT REFERRING TO THE MOUNTING INSTRUCTIONS FOUND ON WALL AND TOP CABINET TEMPLATES. figure figure...
...figure figure figure figure figure Toggle Bolt Toggle Nut Note: Before insertion, be withdrawn from the Toggle Nuts. Use Toggle Bolts to instructions in the wall with the Toggle Nuts closed position). Also, once a Toggle Nut opens, it cannot be sure you leave a...end of each of the Toggles are in the INSTALLATION HARDWARE, from the hole; figure figure figure figure figure figure Oven Installation figure figure figure THIS OVEN CANNOT BE PROPERLY INSTALLED WITHOUT REFERRING TO THE MOUNTING INSTRUCTIONS FOUND ON WALL AND TOP CABINET TEMPLATES. figure figure...

Installation Instructions
Page 8
...product information, call 1-888-VIKING1 (845-4641) or visit the Viking Web site at vikingrange.com F20380 E8 TINSEB505MRR1 Push back and up into the opening. (B) Oven Installation figure figure ffiigguurree MOUNTING OVEN TO THE WALL: Install Grease Filters by fitting into place. (C) (D) Deflector MOUNTING DEFLECTOR: .... figure (C) (D) MOUNTING OVEN TO THE WALL: Use the two Top Cabinet Screws (C) and two Flat Washers (D), supplied in the INSTALLATION HARDWARE, to attach the unit to all of the Installation Instructions and the Wall and Top Cabinet Templates. • Plug in the...
...product information, call 1-888-VIKING1 (845-4641) or visit the Viking Web site at vikingrange.com F20380 E8 TINSEB505MRR1 Push back and up into the opening. (B) Oven Installation figure figure ffiigguurree MOUNTING OVEN TO THE WALL: Install Grease Filters by fitting into place. (C) (D) Deflector MOUNTING DEFLECTOR: .... figure (C) (D) MOUNTING OVEN TO THE WALL: Use the two Top Cabinet Screws (C) and two Flat Washers (D), supplied in the INSTALLATION HARDWARE, to attach the unit to all of the Installation Instructions and the Wall and Top Cabinet Templates. • Plug in the...

