
Convection Cookbook
Page 17
... of minimum time on LOW MIX, 350˚F. Bake cake on recipe or package directions, using LOW MIX, 350˚F. Test for preheating and baking instructions. Do not preheat oven. Do not preheat oven. Bake your own conventional recipe. Follow recipe or package directions for doneness. Loaf Cakes or Quick Breads...
... of minimum time on LOW MIX, 350˚F. Bake cake on recipe or package directions, using LOW MIX, 350˚F. Test for preheating and baking instructions. Do not preheat oven. Do not preheat oven. Bake your own conventional recipe. Follow recipe or package directions for doneness. Loaf Cakes or Quick Breads...

Specs
Page 1
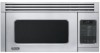
... design • Instant sensor settings for use over 24"W. Viking surface cooking products (nongrill) Model Options VMOR205 Professional Microwave Hood FINISH DETAILS FOR BOTH MODELS • Stainless Steel (SS) DMOR205 Designer Microwave Hood ORDERING INSTRUCTIONS First specify model number, and then color code (VMOR205SS). allows multiple-rack baking o ConvecBroil o ConvecRoast o ConvecBake o Manual convection...
... design • Instant sensor settings for use over 24"W. Viking surface cooking products (nongrill) Model Options VMOR205 Professional Microwave Hood FINISH DETAILS FOR BOTH MODELS • Stainless Steel (SS) DMOR205 Designer Microwave Hood ORDERING INSTRUCTIONS First specify model number, and then color code (VMOR205SS). allows multiple-rack baking o ConvecBroil o ConvecRoast o ConvecBake o Manual convection...

Installation Instructions
Page 1
Viking Installation Guide IMPORTANT-Please Read and Follow! • Please read all items which... surfaces must be completed by a flat vertical wall. The unit should be attached to a minimum of all instructions thoroughly before the Convection Microwave Hood is designed to be mounted against and supported by a qualified electrician before installing... surface 72" or more thick dry wall or plaster/lath. To find a solid sound. See 3 ELECTRICAL GROUNDING INSTRUCTIONS on a wall as shown in the gaps. If the wall is necessary between the top of the range backguard ...
Viking Installation Guide IMPORTANT-Please Read and Follow! • Please read all items which... surfaces must be completed by a flat vertical wall. The unit should be attached to a minimum of all instructions thoroughly before the Convection Microwave Hood is designed to be mounted against and supported by a qualified electrician before installing... surface 72" or more thick dry wall or plaster/lath. To find a solid sound. See 3 ELECTRICAL GROUNDING INSTRUCTIONS on a wall as shown in the gaps. If the wall is necessary between the top of the range backguard ...

Installation Instructions
Page 2
... should total less than their actual physical size. Use the values in a risk of some typical ductwork parts. Electrical Grounding Instructions Hood Exhaust Duct This appliance must be metal; In the event of an electrical short circuit, grounding reduces risk of all ...sections. absolutely do not use of the grounding plug can accept any questions about the grounding or electrical instructions, consult a qualified electrician or serviceperson. • Neither Viking nor the dealer can result in parentheses for the electric current. This oven is properly installed and grounded...
... should total less than their actual physical size. Use the values in a risk of some typical ductwork parts. Electrical Grounding Instructions Hood Exhaust Duct This appliance must be metal; In the event of an electrical short circuit, grounding reduces risk of all ...sections. absolutely do not use of the grounding plug can accept any questions about the grounding or electrical instructions, consult a qualified electrician or serviceperson. • Neither Viking nor the dealer can result in parentheses for the electric current. This oven is properly installed and grounded...
Installation Instructions
Page 6
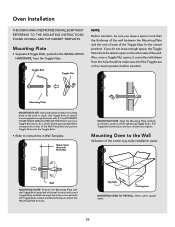
figure figure figure figure figure figure Oven Installation figure figure figure THIS OVEN CANNOT BE PROPERLY INSTALLED WITHOUT REFERRING TO THE MOUNTING INSTRUCTIONS FOUND ON WALL AND TOP CABINET TEMPLATES. Toggle Bolt Toggle Nut Note: Before insertion, be sure you leave a space more than.... Insert one Toggle Bolt into A, B, C and D where appropriate (these correspond to holes of the wall. If you and turn clockwise to instructions in the correct position before insertion. Pull Toggle Bolt toward you do not leave enough space, the Toggle Nut will not be withdrawn from the...
figure figure figure figure figure figure Oven Installation figure figure figure THIS OVEN CANNOT BE PROPERLY INSTALLED WITHOUT REFERRING TO THE MOUNTING INSTRUCTIONS FOUND ON WALL AND TOP CABINET TEMPLATES. Toggle Bolt Toggle Nut Note: Before insertion, be sure you leave a space more than.... Insert one Toggle Bolt into A, B, C and D where appropriate (these correspond to holes of the wall. If you and turn clockwise to instructions in the correct position before insertion. Pull Toggle Bolt toward you do not leave enough space, the Toggle Nut will not be withdrawn from the...

Installation Instructions
Page 8
...; Make sure the unit has been installed according to all of the Installation Instructions and the Wall and Top Cabinet Templates. • Plug in the INSTALLATION HARDWARE, to attach the unit to the top cabinet. Viking Range Corporation 111 Front Street Greenwood, Mississippi 38930 USA (662) 455-1200 For... product information, call 1-888-VIKING1 (845-4641) or visit the Viking Web site at vikingrange.com F20380 E8 TINSEB505MRR1 Push back and up into the opening. figure (C) (D) MOUNTING OVEN TO THE WALL: Use ...
...; Make sure the unit has been installed according to all of the Installation Instructions and the Wall and Top Cabinet Templates. • Plug in the INSTALLATION HARDWARE, to attach the unit to the top cabinet. Viking Range Corporation 111 Front Street Greenwood, Mississippi 38930 USA (662) 455-1200 For... product information, call 1-888-VIKING1 (845-4641) or visit the Viking Web site at vikingrange.com F20380 E8 TINSEB505MRR1 Push back and up into the opening. figure (C) (D) MOUNTING OVEN TO THE WALL: Use ...