
Camera Manual
Page 1
Windows and the Windows logo are the property of Microsoft Corporation. All other trademarks are registered trademarks of their respective companies. All rights reserved. ViviCam F332 Digital Camera User Manual © 2010 Sakar International, Inc.
Windows and the Windows logo are the property of Microsoft Corporation. All other trademarks are registered trademarks of their respective companies. All rights reserved. ViviCam F332 Digital Camera User Manual © 2010 Sakar International, Inc.
Camera Manual
Page 2
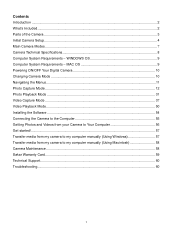
... and Videos from your Camera to Your Computer 56 Get started!...57 Transfer media from my camera to my computer manually (Using Windows 57 Transfer media from my camera to my computer manually (Using Macintosh 58 Camera Maintenance ...58 Sakar Warranty Card...59 Technical Support...60 Troubleshooting...60 1 WINDOWS OS 9 Computer System...
... and Videos from your Camera to Your Computer 56 Get started!...57 Transfer media from my camera to my computer manually (Using Windows 57 Transfer media from my camera to my computer manually (Using Macintosh 58 Camera Maintenance ...58 Sakar Warranty Card...59 Technical Support...60 Troubleshooting...60 1 WINDOWS OS 9 Computer System...
Camera Manual
Page 3
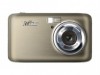
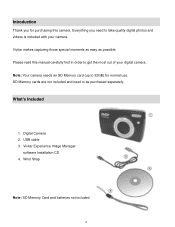
... Manager software Installation CD 4. Vivitar makes capturing those special moments as easy as possible. Digital Camera 2. Please read this manual carefully first in order to 32GB) for purchasing this camera. Everything you for normal use. What's Included 1. Note: Your camera needs an SD Memory card (...
... Manager software Installation CD 4. Vivitar makes capturing those special moments as easy as possible. Digital Camera 2. Please read this manual carefully first in order to 32GB) for purchasing this camera. Everything you for normal use. What's Included 1. Note: Your camera needs an SD Memory card (...

Camera Manual
Page 6
... Camera Setup?" Setting the Date and Time The next step in the camera. Setting the Camera Language 1) You will first be adjusted at any time manually through the initial camera setup. Powering the Camera ON 1) Make sure the batteries have been inserted properly into your choice by pressing the UP and...
... Camera Setup?" Setting the Date and Time The next step in the camera. Setting the Camera Language 1) You will first be adjusted at any time manually through the initial camera setup. Powering the Camera ON 1) Make sure the batteries have been inserted properly into your choice by pressing the UP and...

Camera Manual
Page 17
... option icon will be saved by default the camera switches off the FLASH automatically (if it and manually turn ON the Flash - NOTE: When selecting the HIGH SENSITIVITY Option, by your camera until you manually change the setting or restore the camera‟s default factory settings. Scene Menu The Scene Menu allows...
... option icon will be saved by default the camera switches off the FLASH automatically (if it and manually turn ON the Flash - NOTE: When selecting the HIGH SENSITIVITY Option, by your camera until you manually change the setting or restore the camera‟s default factory settings. Scene Menu The Scene Menu allows...

Camera Manual
Page 18
...mode. 8) An icon reflecting your selection will display on the LCD screen. 9) Remember that this setting will be saved by your camera until you manually change the setting or restore the camera‟s default factory settings. Just set a delay between the time that the camera‟s Shutter button is...that images with a higher image quality level will also take the picture but would also like to be saved by your camera until you manually change the setting or restore the camera‟s default factory settings. Image Quality Menu The Image Quality menu allows you to set the ...
...mode. 8) An icon reflecting your selection will display on the LCD screen. 9) Remember that this setting will be saved by your camera until you manually change the setting or restore the camera‟s default factory settings. Just set a delay between the time that the camera‟s Shutter button is...that images with a higher image quality level will also take the picture but would also like to be saved by your camera until you manually change the setting or restore the camera‟s default factory settings. Image Quality Menu The Image Quality menu allows you to set the ...

Camera Manual
Page 19
... previous mode. 8) An icon reflecting your selection will display on the LCD screen. 9) Remember that this setting will be saved by your camera until you manually change the setting or restore the camera‟s default factory settings. 18 4) Press the SET button to select and save the desired option. 5) A selected option... previous mode. 8) An icon reflecting your selection will display on the LCD screen. 9) Remember that this setting will be saved by your camera until you manually change the setting or restore the camera‟s default factory settings.
... previous mode. 8) An icon reflecting your selection will display on the LCD screen. 9) Remember that this setting will be saved by your camera until you manually change the setting or restore the camera‟s default factory settings. 18 4) Press the SET button to select and save the desired option. 5) A selected option... previous mode. 8) An icon reflecting your selection will display on the LCD screen. 9) Remember that this setting will be saved by your camera until you manually change the setting or restore the camera‟s default factory settings.

Camera Manual
Page 20
... pictures will be consistently sharp and high-quality. The face of the picture as the basis for at least 20% (1 / 5th) of the subject(s) you manually change the setting or restore the camera‟s default factory settings. 19
... pictures will be consistently sharp and high-quality. The face of the picture as the basis for at least 20% (1 / 5th) of the subject(s) you manually change the setting or restore the camera‟s default factory settings. 19

Camera Manual
Page 21
...‟ by default when you start using your camera and assists you start using your camera. Anti-Shake - The face of the subject(s) you manually change the setting or restore the camera‟s default factory settings. 20 The subject‟s face must hold the pose for the current mode. 2) Press...
...‟ by default when you start using your camera and assists you start using your camera. Anti-Shake - The face of the subject(s) you manually change the setting or restore the camera‟s default factory settings. 20 The subject‟s face must hold the pose for the current mode. 2) Press...

Camera Manual
Page 22
..., Face Detect and Smile Capture. To turn Macro mode off, select the Macro „Off‟ option. Macro Menu With the Macro feature you manually change the setting or restore the camera‟s default factory settings. To enable the Macro mode, select „On‟. When Macro mode is off...
..., Face Detect and Smile Capture. To turn Macro mode off, select the Macro „Off‟ option. Macro Menu With the Macro feature you manually change the setting or restore the camera‟s default factory settings. To enable the Macro mode, select „On‟. When Macro mode is off...

Camera Manual
Page 23
... trying to capture a particular moment in a row with a single click of the shutter button. Multi SnapShots Menu When enabled, the Multi SnapShots feature allows you manually change the setting or restore the camera‟s default factory settings. 3) Press the UP or DOWN direction control buttons to scroll through the menu options... setting will be saved by your camera until you to take five rapid snapshots in a sporting event or other scenes with your camera until you manually change the setting or restore the camera‟s default factory settings.
... trying to capture a particular moment in a row with a single click of the shutter button. Multi SnapShots Menu When enabled, the Multi SnapShots feature allows you manually change the setting or restore the camera‟s default factory settings. 3) Press the UP or DOWN direction control buttons to scroll through the menu options... setting will be saved by your camera until you to take five rapid snapshots in a sporting event or other scenes with your camera until you manually change the setting or restore the camera‟s default factory settings.

Camera Manual
Page 24
... previous mode. 8) An icon reflecting your selection will display on the LCD screen 9) Remember that this setting will be saved by your camera until you manually change the setting or restore the camera‟s default factory settings. The sharpness level dictates if the edges of sharpness in the image are more... previous mode. 8) An icon reflecting your selection will display on the LCD screen 9) Remember that this setting will be saved by your camera until you manually change the setting or restore the camera‟s default factory settings. 23
... previous mode. 8) An icon reflecting your selection will display on the LCD screen 9) Remember that this setting will be saved by your camera until you manually change the setting or restore the camera‟s default factory settings. The sharpness level dictates if the edges of sharpness in the image are more... previous mode. 8) An icon reflecting your selection will display on the LCD screen 9) Remember that this setting will be saved by your camera until you manually change the setting or restore the camera‟s default factory settings. 23
Camera Manual
Page 25
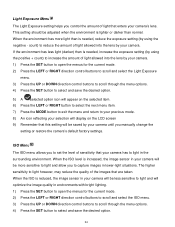
... using the positive + count) to increase the amount of light allowed into the lens by using the negative - ISO Menu The ISO menu allows you manually change the setting or restore the camera‟s default factory settings. The higher sensitivity to light however, may reduce the quality of light that enters...
... using the positive + count) to increase the amount of light allowed into the lens by using the negative - ISO Menu The ISO menu allows you manually change the setting or restore the camera‟s default factory settings. The higher sensitivity to light however, may reduce the quality of light that enters...

Camera Manual
Page 26
... 8) An icon reflecting your selection will display on the LCD screen. 9) Remember that this setting will be saved by your camera until you manually change the setting or restore the camera‟s default factory settings. 5) A selected option icon will appear on the selected item. 6) Press ...An icon reflecting your selection will display on the LCD screen 9) Remember that this setting will be saved by your camera until you manually change the setting or restore the camera‟s default factory settings. 25 Metering Menu The Metering setting will affect how your camera focuses...
... 8) An icon reflecting your selection will display on the LCD screen. 9) Remember that this setting will be saved by your camera until you manually change the setting or restore the camera‟s default factory settings. 5) A selected option icon will appear on the selected item. 6) Press ...An icon reflecting your selection will display on the LCD screen 9) Remember that this setting will be saved by your camera until you manually change the setting or restore the camera‟s default factory settings. 25 Metering Menu The Metering setting will affect how your camera focuses...

Camera Manual
Page 27
... desired. Language Menu You can also disable the timestamp for future images that this setting will be saved by your camera until you manually change the setting or restore the camera‟s default factory settings. The date stamp will not appear on photos taken To Enable/Disable... option icon will appear on photos taken Off - The timestamp will include a time stamp with your camera. The Date/Time menu allows you manually change the setting or restore the camera‟s default factory settings. 26 Date/Time Menu When you capture an image with your camera, the image...
... desired. Language Menu You can also disable the timestamp for future images that this setting will be saved by your camera until you manually change the setting or restore the camera‟s default factory settings. The date stamp will not appear on photos taken To Enable/Disable... option icon will appear on photos taken Off - The timestamp will include a time stamp with your camera. The Date/Time menu allows you manually change the setting or restore the camera‟s default factory settings. 26 Date/Time Menu When you capture an image with your camera, the image...

Camera Manual
Page 28
... the previous mode. 8) Press the MODE button to exit the menu without saving your settings and return to set the date and time. 7) When you manually change the setting or restore the camera‟s default factory settings. 27
... the previous mode. 8) Press the MODE button to exit the menu without saving your settings and return to set the date and time. 7) When you manually change the setting or restore the camera‟s default factory settings. 27

Camera Manual
Page 29
... menu item. 28 When the camera sits idle for the designated period of the electrical current in fluorescent lighting sources in order to conserve you manually change the setting or restore the camera‟s default factory settings. If your camera is set to a frequency that this setting will be saved by...
... menu item. 28 When the camera sits idle for the designated period of the electrical current in fluorescent lighting sources in order to conserve you manually change the setting or restore the camera‟s default factory settings. If your camera is set to a frequency that this setting will be saved by...

Camera Manual
Page 30
... delete all of the content on your camera's memory card. This option will be asked to confirm the resetting to begin the format. If you manually change the setting or restore the camera‟s default factory settings.
... delete all of the content on your camera's memory card. This option will be asked to confirm the resetting to begin the format. If you manually change the setting or restore the camera‟s default factory settings.

Camera Manual
Page 35
...RIGHT button to select the next menu item. 10) Press the MODE button to exit the menu and return to a photo or video if you manually set it from this menu to rotate the pictures that the ViviLink feature is deactivated by default. Rotate Menu Use this menu or from the... ViviLink technology allows you to quickly and easily upload your camera‟s photos and videos to the social networks of your choice with the accompanying Vivitar Experience Image Manager application. 1) Press the SET button to open the menus for the current mode. 2) Press the LEFT or RIGHT direction control buttons to...
...RIGHT button to select the next menu item. 10) Press the MODE button to exit the menu and return to a photo or video if you manually set it from this menu to rotate the pictures that the ViviLink feature is deactivated by default. Rotate Menu Use this menu or from the... ViviLink technology allows you to quickly and easily upload your camera‟s photos and videos to the social networks of your choice with the accompanying Vivitar Experience Image Manager application. 1) Press the SET button to open the menus for the current mode. 2) Press the LEFT or RIGHT direction control buttons to...

Camera Manual
Page 41
... mode. 8) An icon reflecting your selection will display on the LCD screen. 9) Remember that this setting will be saved by your camera until you manually change the setting or restore the camera‟s default factory settings. Keep in mind that images with a larger size will also take up more of... the images taken by your camera until you manually change the setting or restore the camera‟s default factory settings. 40 Image Size Menu The Image Size menu allows you to choose the desired...
... mode. 8) An icon reflecting your selection will display on the LCD screen. 9) Remember that this setting will be saved by your camera until you manually change the setting or restore the camera‟s default factory settings. Keep in mind that images with a larger size will also take up more of... the images taken by your camera until you manually change the setting or restore the camera‟s default factory settings. 40 Image Size Menu The Image Size menu allows you to choose the desired...


