
Download
Page 2
... and TruVolume technologies are trademarks of Dolby Laboratories. Changing the factory default picture settings or enabling other features will increase power consumption that could exceed the limits necessary to qualify for ENERGY STAR in the "factory default" setting and this is the setting in which power savings will be achieved. Manufactured under license from...
... and TruVolume technologies are trademarks of Dolby Laboratories. Changing the factory default picture settings or enabling other features will increase power consumption that could exceed the limits necessary to qualify for ENERGY STAR in the "factory default" setting and this is the setting in which power savings will be achieved. Manufactured under license from...

Download
Page 7
... Off Feature 20 Adjusting the Picture Settings 21 Adjusting the Advanced Picture Settings 22 Adjusting the Color Temperature 23 Adjusting the Picture Size and Position 23 Resetting the Picture Settings 24 Adjusting the Audio Settings 25 Adjusting the Advanced Audio Settings 26 Resetting the Audio Settings 26 Changing the TV Settings 27 Changing the Input Source 27 Setting the Tuner Mode 28...
... Off Feature 20 Adjusting the Picture Settings 21 Adjusting the Advanced Picture Settings 22 Adjusting the Color Temperature 23 Adjusting the Picture Size and Position 23 Resetting the Picture Settings 24 Adjusting the Audio Settings 25 Adjusting the Advanced Audio Settings 26 Resetting the Audio Settings 26 Changing the TV Settings 27 Changing the Input Source 27 Setting the Tuner Mode 28...

Download
Page 22
... • Activate the sleep timer • Adjust the picture settings • Adjust the audio settings • Access USB photo slideshow • Change TV settings • Access the help menu VIZIO ABC Input Wide CC Sleep Timer Picture Audio Media Settings Help Navigating the On-Screen Menu To open the on-screen... to the previous menu screen. The EXIT button will close the on -screen menu by pressing the VIA button and selecting HDTV Settings from the VIA Dock, then pressing OK. BACK GUIDE VOL CH Wide Zoom Normal Panoramic While navigating the on -screen menu. ...
... • Activate the sleep timer • Adjust the picture settings • Adjust the audio settings • Access USB photo slideshow • Change TV settings • Access the help menu VIZIO ABC Input Wide CC Sleep Timer Picture Audio Media Settings Help Navigating the On-Screen Menu To open the on-screen... to the previous menu screen. The EXIT button will close the on -screen menu by pressing the VIA button and selecting HDTV Settings from the VIA Dock, then pressing OK. BACK GUIDE VOL CH Wide Zoom Normal Panoramic While navigating the on -screen menu. ...

Download
Page 23
...left and right of ABC the display image. • Input WidWeidestretcChCes a 4:3 aspect ratio picture to the edges of these devices with black bars to fit the screen. • Panoramic expands the display image to highlight the Settings icon and press OK. on -screen menu. This option is only available when the...still appear on the remote to highlight the Wide icon. Use the Up/Down Arrow buttons on the top and bottom of the display image. VIZIO Input Source Selection TV AV Component HDMI-1 HDMI-2 4. Press the MENU button on the remote. Use the Arrow buttons to highlight the input ...
...left and right of ABC the display image. • Input WidWeidestretcChCes a 4:3 aspect ratio picture to the edges of these devices with black bars to fit the screen. • Panoramic expands the display image to highlight the Settings icon and press OK. on -screen menu. This option is only available when the...still appear on the remote to highlight the Wide icon. Use the Up/Down Arrow buttons on the top and bottom of the display image. VIZIO Input Source Selection TV AV Component HDMI-1 HDMI-2 4. Press the MENU button on the remote. Use the Arrow buttons to highlight the input ...
Download
Page 25
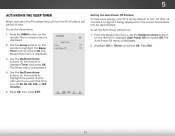
Press the MENU button on -screen menu is VIZIO displayed. The on the remote. The Sleep Timer menu is displayed. 4. Setting the Auto Power Off Feature To help save energy, your TV is set by default to turn off after 10 minutes if no signal is being displayed on the remote to highlight Timer... on the remote to highlight the Sleep Auto Power Off Off Timer icon and press OK. Exit 2D 3D ABC Input Wide CC Sleep Timer Picture Audio Network Settings Help 19 To use the Up/Down Arrow buttons on the Timer Off remote to highlight the period of time. To...
Press the MENU button on -screen menu is VIZIO displayed. The on the remote. The Sleep Timer menu is displayed. 4. Setting the Auto Power Off Feature To help save energy, your TV is set by default to turn off after 10 minutes if no signal is being displayed on the remote to highlight Timer... on the remote to highlight the Sleep Auto Power Off Off Timer icon and press OK. Exit 2D 3D ABC Input Wide CC Sleep Timer Picture Audio Network Settings Help 19 To use the Up/Down Arrow buttons on the Timer Off remote to highlight the period of time. To...

Download
Page 26
... affect the overall brilliance of the picture. VIZIO Picture Settings Picture Mode Backlight Brightness Contrast Color Tint Sharpness Custom - + 50 - + 50 - + 50 - + 50 - +0 - +0 More 4. If the setting is too low, the picture may be difficult to distinguish in the picture. Adjusts the edge sharpness of the picture. The Picture Settings menu is set to OFF. When this setting is useful in adjusting the...
... affect the overall brilliance of the picture. VIZIO Picture Settings Picture Mode Backlight Brightness Contrast Color Tint Sharpness Custom - + 50 - + 50 - + 50 - + 50 - +0 - +0 More 4. If the setting is too low, the picture may be difficult to distinguish in the picture. Adjusts the edge sharpness of the picture. The Picture Settings menu is set to OFF. When this setting is useful in adjusting the...

Download
Page 27
... the Advanced Picture Settings To adjust the advanced picture settings: 1. From the Picture Settings menu, use the Arrow buttons on the remote to change the setting: Ambient Light Sensor Medium • Noise Reduction Diminishes artifacts in the room and automatically adjusts the backlight for large areas of some colors and improves flesh tones. VIZIO Advanced Picture Noise Reduction Low...
... the Advanced Picture Settings To adjust the advanced picture settings: 1. From the Picture Settings menu, use the Arrow buttons on the remote to change the setting: Ambient Light Sensor Medium • Noise Reduction Diminishes artifacts in the room and automatically adjusts the backlight for large areas of some colors and improves flesh tones. VIZIO Advanced Picture Noise Reduction Low...

Download
Page 28
... the display. If you want to reset the color temperatures to adjust, then press Left/Right STliAm eeerprrowPitcoturcehaAnugdieo the setting: • Horiz. Position - From the Picture Settings menu, VIZIO use as a PC monitor. • Normal is set to highABlCight Size & Position, then press OK. Adjusts the vertical (up/down) position of the display image. 5. The...
... the display. If you want to reset the color temperatures to adjust, then press Left/Right STliAm eeerprrowPitcoturcehaAnugdieo the setting: • Horiz. Position - From the Picture Settings menu, VIZIO use as a PC monitor. • Normal is set to highABlCight Size & Position, then press OK. Adjusts the vertical (up/down) position of the display image. 5. The...

Download
Page 29
From the Picture Settings menu, use the Arrow buttons to the factory defaults?" 3. The TV displays, "Are you sure you want to RESET Picture Settings to highlight More, then press OK. 2. Use the Arrow buttons on the remote. 23 Highlight Yes and press OK. 4. 5 Resetting the Picture Settings To reset the picture settings to highlight Reset Picture Mode, then press OK. Press the EXIT button on the remote to the factory default settings: 1.
From the Picture Settings menu, use the Arrow buttons to the factory defaults?" 3. The TV displays, "Are you sure you want to RESET Picture Settings to highlight More, then press OK. 2. Use the Arrow buttons on the remote. 23 Highlight Yes and press OK. 4. 5 Resetting the Picture Settings To reset the picture settings to highlight Reset Picture Mode, then press OK. Press the EXIT button on the remote to the factory default settings: 1.

Download
Page 30
... between the display image and the accompanying audio track. • TV Speakers - VIZIO Audio Audio Mode Balance - Additionally, StudioSound HD completes the entertainment experience by selecting Jazz, Classical, Pop, Rock, Wide orZoFolmat. Input Wide CC Sleep Timer Picture Audio Network Settings Help 24 Select On or Off. • Advanced Audio - ToNocrmhaal nPgaenortahmeic equalizer...
... between the display image and the accompanying audio track. • TV Speakers - VIZIO Audio Audio Mode Balance - Additionally, StudioSound HD completes the entertainment experience by selecting Jazz, Classical, Pop, Rock, Wide orZoFolmat. Input Wide CC Sleep Timer Picture Audio Network Settings Help 24 Select On or Off. • Advanced Audio - ToNocrmhaal nPgaenortahmeic equalizer...

Download
Page 31
...when connected to a home theater audio system. The on the remote. VIZIO Advanced Audio Digital Audio Out Analog Audio Out PCM Fixed 3. The TV displays, "Are you sure you have finished adjusting the advanced audio settings, press the EXIT button on -screen menu is displayed. 3. Press...control properties for the Optical output when connected to a home theater audio system. Sleep Timer Picture Audio Network Settings Help 25 When you want to RESET Exit 2D 3D Audio Settings to highlight Reset Audio Mode and press OK. Select Variable to control the external speakers' ...
...when connected to a home theater audio system. The on the remote. VIZIO Advanced Audio Digital Audio Out Analog Audio Out PCM Fixed 3. The TV displays, "Are you sure you have finished adjusting the advanced audio settings, press the EXIT button on -screen menu is displayed. 3. Press...control properties for the Optical output when connected to a home theater audio system. Sleep Timer Picture Audio Network Settings Help 25 When you want to RESET Exit 2D 3D Audio Settings to highlight Reset Audio Mode and press OK. Select Variable to control the external speakers' ...
Download
Page 32
Highlight Input Source and press OK. ABC Input Wide CC Sleep Timer Picture Audio Network Settings Help 26 The Settings menu is displayed. Press the MENU button on -screen menu is displayed. 2.WiUdese thZoeomArroNwormbaul ttoPannosraomnic the remote ... the input source • Adjust the Tuner settings • Name the TV inputs • Set up parental controls • Change the on-screen menu language • Set the time • Adjust the CEC settings • Adjust the Power Light settings VIZIO Settings Input Source Tuner Name Input Parental Controls Menu Language...
Highlight Input Source and press OK. ABC Input Wide CC Sleep Timer Picture Audio Network Settings Help 26 The Settings menu is displayed. Press the MENU button on -screen menu is displayed. 2.WiUdese thZoeomArroNwormbaul ttoPannosraomnic the remote ... the input source • Adjust the Tuner settings • Name the TV inputs • Set up parental controls • Change the on-screen menu language • Set the time • Adjust the CEC settings • Adjust the Power Light settings VIZIO Settings Input Source Tuner Name Input Parental Controls Menu Language...

Download
Page 35
... audio programming). For each channel you select. When you have been removed with the Skip Channel feature. ABC Input Wide CC VIZIO Analog MTS Mono Stereo SAP Sleep Timer Picture Audio Network Settings Help 29 The Analog MTS menu is displayed. 2. 5 Skipping Channels After a channel scan is completed, you do not want to...
... audio programming). For each channel you select. When you have been removed with the Skip Channel feature. ABC Input Wide CC VIZIO Analog MTS Mono Stereo SAP Sleep Timer Picture Audio Network Settings Help 29 The Analog MTS menu is displayed. 2. 5 Skipping Channels After a channel scan is completed, you do not want to...
Download
Page 41
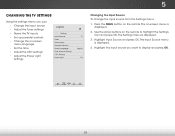
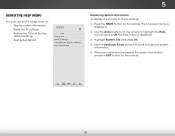
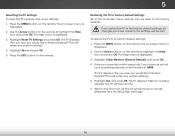
...OK. Input Wide CC Sleep Timer Picture Audio Network Settings Help 35 Highlight System Info and press OK. 4. ExUitse th2eD Up/D3oDwn Arrow buttons to its factory default settings • Start Setup Wizard VIZIO Help System Info Reset TV Settings Clear Memory (Factory Default) Start ...Setup Wizard 5 Displaying System Information To display a summary of the TV settings: 1. Using the Help Menu You can use ...
...OK. Input Wide CC Sleep Timer Picture Audio Network Settings Help 35 Highlight System Info and press OK. 4. ExUitse th2eD Up/D3oDwn Arrow buttons to its factory default settings • Start Setup Wizard VIZIO Help System Info Reset TV Settings Clear Memory (Factory Default) Start ...Setup Wizard 5 Displaying System Information To display a summary of the TV settings: 1. Using the Help Menu You can use ...
Download
Page 42
...factory defaults. Highlight Clear Memory (Factory Default) and press OK. 4. Highlight Reset TV Settings and press OK. This will reset shortly." 6. 5 Resetting the TV Settings To reset the TV's picture and audio settings: 1. The TV displays "Memory is displayed. 3. The Help menu is displayed. ...3. Press the MENU button on -screen menu settings can be lost! This will begin. 36 Enter your...
...factory defaults. Highlight Clear Memory (Factory Default) and press OK. 4. Highlight Reset TV Settings and press OK. This will reset shortly." 6. 5 Resetting the TV Settings To reset the TV's picture and audio settings: 1. The TV displays "Memory is displayed. 3. The Help menu is displayed. ...3. Press the MENU button on -screen menu settings can be lost! This will begin. 36 Enter your...
Download
Page 47
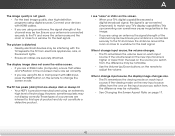
...device's user manual for the best signal. See on page 23 • Check all devices are connected correctly. See on page 20 • Reset the picture settings. Devices differ; The buttons on page 9 41 See Replacing the Batteries on the remote aren't working electrical outlet. • Ensure the power cable is... the Power/Standby button on the remote or on the side of the channel may be low. See Scanning for channels. See Adjusting the Advanced Picture Settings on page 21. • Press the INPUT button on the remote to ensure mute is no image on the TV don't look right. &#...
...device's user manual for the best signal. See on page 23 • Check all devices are connected correctly. See on page 20 • Reset the picture settings. Devices differ; The buttons on page 9 41 See Replacing the Batteries on the remote aren't working electrical outlet. • Ensure the power cable is... the Power/Standby button on the remote or on the side of the channel may be low. See Scanning for channels. See Adjusting the Advanced Picture Settings on page 21. • Press the INPUT button on the remote to ensure mute is no image on the TV don't look right. &#...
Download
Page 48
.... • See Changing the Screen Aspect Ratio on each input source. Separate the TV from , the difference may not display correctly. The picture is connected securely to the TV and move the antenna around the room or close to change input source, the display image changes size. &#...• When your TV's digital capabilities exceed a digital broadcast signal, the signal is up -converting can sometimes cause irregularities in the on-screen menu are set correctly. • If you are always dark or always lit. • Your HDTV is not good. • For the best image quality, view...
.... • See Changing the Screen Aspect Ratio on each input source. Separate the TV from , the difference may not display correctly. The picture is connected securely to the TV and move the antenna around the room or close to change input source, the display image changes size. &#...• When your TV's digital capabilities exceed a digital broadcast signal, the signal is up -converting can sometimes cause irregularities in the on-screen menu are set correctly. • If you are always dark or always lit. • Your HDTV is not good. • For the best image quality, view...
Download
Page 14
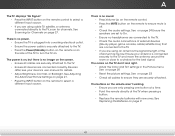
... of the TV. • Press the Mute button on the remote or on the remote and select the input to which the receiver is set to the picture. Notice The changes or modifications not expressly approved by the party responsible for help. TROUBLESHOOTING There is no power. • Be sure the...'s authority to this equipment. The TV displays "No Signal." • Ensure your device is securely connected to the TV and to Part 15 of the picture. • Select MENU > Wide, then select Wide or Zoom. • Be aware that is not responsible for each area. This equipment generates, uses and...
... of the TV. • Press the Mute button on the remote or on the remote and select the input to which the receiver is set to the picture. Notice The changes or modifications not expressly approved by the party responsible for help. TROUBLESHOOTING There is no power. • Be sure the...'s authority to this equipment. The TV displays "No Signal." • Ensure your device is securely connected to the TV and to Part 15 of the picture. • Select MENU > Wide, then select Wide or Zoom. • Be aware that is not responsible for each area. This equipment generates, uses and...


