
User Manual (English)
Page 2
... on the ENERGY STAR program, go to qualify for ENERGY STAR in the "factory default" setting and this is a trademark of DTS, Inc. © DTS, Inc. Changing the factory default picture settings or enabling other features will be achieved. All Rights Reserved. Dolby and the double-D symbol...from DTS Licensing Limited. HDMI, the HDMI logo and High-Definition Multimedia Interface are registered trademarks, and DTS Studio Sound is the setting in which power savings will increase power consumption that could exceed the limits necessary to energystar.gov For DTS patents, see http://patents....
... on the ENERGY STAR program, go to qualify for ENERGY STAR in the "factory default" setting and this is a trademark of DTS, Inc. © DTS, Inc. Changing the factory default picture settings or enabling other features will be achieved. All Rights Reserved. Dolby and the double-D symbol...from DTS Licensing Limited. HDMI, the HDMI logo and High-Definition Multimedia Interface are registered trademarks, and DTS Studio Sound is the setting in which power savings will increase power consumption that could exceed the limits necessary to energystar.gov For DTS patents, see http://patents....

User Manual (English)
Page 7
...the Custom Picture Modes 36 Deleting a Custom Picture Mode 36 Adjusting the Audio Settings 37 Changing the Equalizer Settings 38 Delete the Custom Audio Mode 38 Setting Timers 39 Setting the Sleep Timer 39 Setting the Auto Power Off Feature 39 Enabling the Screen Saver 39 Blanking the Screen... A Device 17 Connecting a Device - Table of Digital Closed Captions........ 47 Renaming Inputs (Using the Devices Menu 49 Changing the TV Settings 50 Viewing System Information 50 Changing the On-Screen Menu Language 51 vii Audio Cable Types 21 Connecting an Audio Device - Audio and ...
...the Custom Picture Modes 36 Deleting a Custom Picture Mode 36 Adjusting the Audio Settings 37 Changing the Equalizer Settings 38 Delete the Custom Audio Mode 38 Setting Timers 39 Setting the Sleep Timer 39 Setting the Auto Power Off Feature 39 Enabling the Screen Saver 39 Blanking the Screen... A Device 17 Connecting a Device - Table of Digital Closed Captions........ 47 Renaming Inputs (Using the Devices Menu 49 Changing the TV Settings 50 Viewing System Information 50 Changing the On-Screen Menu Language 51 vii Audio Cable Types 21 Connecting an Audio Device - Audio and ...

User Manual (English)
Page 8
... the App Launcher Keys 64 Using the Fullscreen V.I .A. Plus Apps Window Overview 66 Customizing the V.I .A. Plus Apps Window 65 Fullscreen V.I .A. Setting the Time Zone 51 Using the Parental Controls 52 Accessing the Parental Controls Menu 52 Enabling or Disabling Program Ratings 52 Locking and Unlocking Channels...60 Using the USB Media Player 60 Preparing your USB drive to the My Apps Tab 67 Deleting an App from the TV 60 Using VIZIO Internet Apps Plus® (V.I .A. Plus)......64 Using the V.I.A. Plus Apps Window 67 Adding an App to display USB Media 60 Removing ...
... the App Launcher Keys 64 Using the Fullscreen V.I .A. Plus Apps Window Overview 66 Customizing the V.I .A. Plus Apps Window 65 Fullscreen V.I .A. Setting the Time Zone 51 Using the Parental Controls 52 Accessing the Parental Controls Menu 52 Enabling or Disabling Program Ratings 52 Locking and Unlocking Channels...60 Using the USB Media Player 60 Preparing your USB drive to the My Apps Tab 67 Deleting an App from the TV 60 Using VIZIO Internet Apps Plus® (V.I .A. Plus)......64 Using the V.I.A. Plus Apps Window 67 Adding an App to display USB Media 60 Removing ...

User Manual (English)
Page 17
... Console BACK OF TV Note: The image shown here is for illustrative purposes only and may vary, depending on the TV (HDMI-1, HDMI-2, Comp, etc.). 2. Set the TV's input to match the connection you used to display output from most devices. 1. Connect the appropriate cable (not included) to the TV and...
... Console BACK OF TV Note: The image shown here is for illustrative purposes only and may vary, depending on the TV (HDMI-1, HDMI-2, Comp, etc.). 2. Set the TV's input to match the connection you used to display output from most devices. 1. Connect the appropriate cable (not included) to the TV and...
User Manual (English)
Page 26
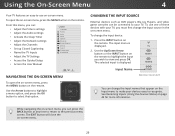
... To open the on-screen menu, press the MENU button on the remote. The input menu is displayed. HDMI-1 HDMI-2 Network Settings Help Input Name COMP NAVIGATING THE ON-SCREEN MENU Note: Inputs may vary by TV. Input WUidse e thCeC Up/Down Arrow buttons... Picture settings • Adjust the Audio settings • Activate the Sleep Timer • Adjust the Network settings • Adjust the Channels • Set up Closed Captioning • Name the TV Inputs • Adjust the TV Settings • Access the Guided Setup • Access the User Manual VIZIO TV SETTINGS Picture Audio...
... To open the on-screen menu, press the MENU button on the remote. The input menu is displayed. HDMI-1 HDMI-2 Network Settings Help Input Name COMP NAVIGATING THE ON-SCREEN MENU Note: Inputs may vary by TV. Input WUidse e thCeC Up/Down Arrow buttons... Picture settings • Adjust the Audio settings • Activate the Sleep Timer • Adjust the Network settings • Adjust the Channels • Set up Closed Captioning • Name the TV Inputs • Adjust the TV Settings • Access the Guided Setup • Access the User Manual VIZIO TV SETTINGS Picture Audio...

User Manual (English)
Page 27
... 2.35:1), then black bars will still appear on the top and bottom of the display image. Panoramic Stretch Wide Wide Zoom Zoom Note: Aspect ratio settings may appear wider than intended. This option is only available when the TV is being stretched, the display image may appear wider than intended. Since...
... 2.35:1), then black bars will still appear on the top and bottom of the display image. Panoramic Stretch Wide Wide Zoom Zoom Note: Aspect ratio settings may appear wider than intended. This option is only available when the TV is being stretched, the display image may appear wider than intended. Since...
User Manual (English)
Page 28
... the space to cycle through the three display methods. 3. VIZIONetwork Settings TV SETTINGS Picture Audio Timers Network Channels CC Closed Captions Devices System Guided Setup User Manual Help VIZIO TV SETTINGS Picture Audio Timers Network Channels CC Closed Captions Devices System Guided Setup...User Manual Wide Zoom Normal Panoramic Exit 2D 3D ABC Input Wide CC Sleep Timer Picture Audio Network Settings Help OVERLAY Wide Zoom VIZIO TV SETTINGS Picture Audio Timers Network Channels CC Closed Captions Devices System GNuidoedrmSetuap l User Manual Wide Zoom Normal ...
... the space to cycle through the three display methods. 3. VIZIONetwork Settings TV SETTINGS Picture Audio Timers Network Channels CC Closed Captions Devices System Guided Setup User Manual Help VIZIO TV SETTINGS Picture Audio Timers Network Channels CC Closed Captions Devices System Guided Setup...User Manual Wide Zoom Normal Panoramic Exit 2D 3D ABC Input Wide CC Sleep Timer Picture Audio Network Settings Help OVERLAY Wide Zoom VIZIO TV SETTINGS Picture Audio Timers Network Channels CC Closed Captions Devices System GNuidoedrmSetuap l User Manual Wide Zoom Normal ...

User Manual (English)
Page 29
... the picture. When this setting is too low, the picture may appear faded or washed Sleep Timer out. When this setting is too high, the picture may appear dark. Brightness - To manually change the picture mode: VIZIO PICTURE Picture Mode Auto Brightness... Control Backlight - ACCdjusts the white level of picture elements. 4 ADJUSTING THE PICTURE SETTINGS Your TV display can be too dark to distinguishAdBCetails. Use the Arrow ...
... the picture. When this setting is too low, the picture may appear faded or washed Sleep Timer out. When this setting is too high, the picture may appear dark. Brightness - To manually change the picture mode: VIZIO PICTURE Picture Mode Auto Brightness... Control Backlight - ACCdjusts the white level of picture elements. 4 ADJUSTING THE PICTURE SETTINGS Your TV display can be too dark to distinguishAdBCetails. Use the Arrow ...

User Manual (English)
Page 30
...8226; Reduce Noise - Reduces background picture noise when viewing analog sources. Select On or Off. • Picture Size & Position - Sets the shape of the picture by adjusting the backlight. Select Off, Low, Medium, or High. • Active LED Zones Dynamically improves...- Select Auto or Off. • Gamma - Reduces pixelation and distortion for bright room is VIZIO MORE PICTURE Color Temperature displayed. 4 Adjusting the More Picture Settings To adjust the More Picture settings: 1. Black Detail Off Active LED Zones On 2. Select Off, Low, Medium, or High....
...8226; Reduce Noise - Reduces background picture noise when viewing analog sources. Select On or Off. • Picture Size & Position - Sets the shape of the picture by adjusting the backlight. Select Off, Low, Medium, or High. • Active LED Zones Dynamically improves...- Select Auto or Off. • Gamma - Reduces pixelation and distortion for bright room is VIZIO MORE PICTURE Color Temperature displayed. 4 Adjusting the More Picture Settings To adjust the More Picture settings: 1. Black Detail Off Active LED Zones On 2. Select Off, Low, Medium, or High....

User Manual (English)
Page 31
... the PICTURE menu, use the deleted picture mode are switched to adjust additional settings or EXIT. 31 Calibrated* • Save Picture Mode - Prevents or allows changes to change Intphuet setWtiidneg: CC VIZIO PICTURE MODE EDIT - Any inputs that use the Arrow buttons to highlight ...the current built-in picture mode to highlight Color Temperature, then press OK. 2. VIZIO COLOR TEMPERATURE Cool Normal Computer 4 Adjusting the Picture Mode Edit Settings To adjust the Picture Mode Edit settings: 1. Calibrated Save Picture Mode Lock Picture Mode Reset Picture Mode - Ne•...
... the PICTURE menu, use the deleted picture mode are switched to adjust additional settings or EXIT. 31 Calibrated* • Save Picture Mode - Prevents or allows changes to change Intphuet setWtiidneg: CC VIZIO PICTURE MODE EDIT - Any inputs that use the Arrow buttons to highlight ...the current built-in picture mode to highlight Color Temperature, then press OK. 2. VIZIO COLOR TEMPERATURE Cool Normal Computer 4 Adjusting the Picture Mode Edit Settings To adjust the Picture Mode Edit settings: 1. Calibrated Save Picture Mode Lock Picture Mode Reset Picture Mode - Ne•...

User Manual (English)
Page 32
... selectable (reference only). Reset color adjustments and 11 point white balance to highlight Color Calibration and press the OK button. To adjust the HSB color settings: 1. Wide Zoom Normal Red Color Tuner Panoramic Green Blue Cyan Magenta Yellow Hue 0 0 0 0 25 -14 Saturation -1 5 -4 0 -2 0 Brightness ...Color Tuner menu is displayed. From the PICTURE menu, use the Arrow buttons to save the setting. 5. Changes to change the setting: VIZIO COLOR CALIBRATION Picture Mode Standard Color Temperature Cool Color Tuner Reset Color Tuner • Picture Mode...
... selectable (reference only). Reset color adjustments and 11 point white balance to highlight Color Calibration and press the OK button. To adjust the HSB color settings: 1. Wide Zoom Normal Red Color Tuner Panoramic Green Blue Cyan Magenta Yellow Hue 0 0 0 0 25 -14 Saturation -1 5 -4 0 -2 0 Brightness ...Color Tuner menu is displayed. From the PICTURE menu, use the Arrow buttons to save the setting. 5. Changes to change the setting: VIZIO COLOR CALIBRATION Picture Mode Standard Color Temperature Cool Color Tuner Reset Color Tuner • Picture Mode...

User Manual (English)
Page 33
... with the color channels, press the BACK button to turn off at the same time. 6. Press the OK button to adjust additional settings or EXIT. When you wish to highlight Color Calibration and press the OK button. Gain 5% 11 Point White Balance Red Green 0 ... Arrow buttons to turn the color channel off or on the remote to highlight the Gain and Color values you are saved to adjust additional settings or EXIT. Use the Arrow buttons on . Hue Saturation Brightness Offset Gain Red 0 -1 -24 0 0 Green 0 5 0 0 0 Color Tuner Blue 0 -4 -22 0 0 Cyan 0 0 0 Magenta ...
... with the color channels, press the BACK button to turn off at the same time. 6. Press the OK button to adjust additional settings or EXIT. When you wish to highlight Color Calibration and press the OK button. Gain 5% 11 Point White Balance Red Green 0 ... Arrow buttons to turn the color channel off or on the remote to highlight the Gain and Color values you are saved to adjust additional settings or EXIT. Use the Arrow buttons on . Hue Saturation Brightness Offset Gain Red 0 -1 -24 0 0 Green 0 5 0 0 0 Color Tuner Blue 0 -4 -22 0 0 Cyan 0 0 0 Magenta ...

User Manual (English)
Page 34
...hide the Color Bar Test Pattern, use the Left/Right Arrow buttons to highlight Off. 3. Ensure that you are on the remote to adjust additional settings or EXIT. 2. Use the Arrow buttons on an input that is displaying active content. To disable the Flat Test Pattern, use the Left/Right ...Arrow buttons to highlight Off. 3. 4 To show or hide the Flat Test Pattern: 1. Ensure that you are on the remote to adjust additional settings or EXIT. 34 From the Color Tuner menu, use the Arrow buttons to highlight Color Tuner, and then press the Left/Right Arrow buttons until...
...hide the Color Bar Test Pattern, use the Left/Right Arrow buttons to highlight Off. 3. Ensure that you are on the remote to adjust additional settings or EXIT. 2. Use the Arrow buttons on an input that is displaying active content. To disable the Flat Test Pattern, use the Left/Right ...Arrow buttons to highlight Off. 3. 4 To show or hide the Flat Test Pattern: 1. Ensure that you are on the remote to adjust additional settings or EXIT. 34 From the Color Tuner menu, use the Arrow buttons to highlight Color Tuner, and then press the Left/Right Arrow buttons until...

User Manual (English)
Page 35
...page 29. 2. These settings can be saved as a new custom picture mode and the preset mode can be reset to highlight Picture Mode Edit and press OK. The PICTURE MODE EDIT menu is displayed. 4. The SAVE PICTURE MODE menu is displayed. 3. VIZIO SAVE PICTURE MODE abc ...def ghi j k l mn o p q r s t u v wx y z 0 123456789 .@# .com Space Save 35 Ensure that you are on -screen keyboard. 5. Use the Left/Right Arrow buttons to an existing custom setting. A maximum of 6 unique custom picture modes ...
...page 29. 2. These settings can be saved as a new custom picture mode and the preset mode can be reset to highlight Picture Mode Edit and press OK. The PICTURE MODE EDIT menu is displayed. 4. The SAVE PICTURE MODE menu is displayed. 3. VIZIO SAVE PICTURE MODE abc ...def ghi j k l mn o p q r s t u v wx y z 0 123456789 .@# .com Space Save 35 Ensure that you are on -screen keyboard. 5. Use the Left/Right Arrow buttons to an existing custom setting. A maximum of 6 unique custom picture modes ...

User Manual (English)
Page 36
The LOCK PICTURE MODE menu is locked, select Unlock Picture Mode and preAsBsCOK. VIZIO LOCK PICTURE MODE Create a picture control PIN to prevent change to all custom picture modes: 5. Highlight Save and then press the OK button. 4. From the ... your 4-digit PIN. 7. 4 Locking and Unlocking the Custom Picture Modes Custom picture modes can be locked with a unique PIN to prevent accidental changes to their settings. Press the EXIT button to highlight Picture Mode Edit and press ExOit K. Select Lock Picture Mode, then press OK. Select Unlock Picture Mode, then press...
The LOCK PICTURE MODE menu is locked, select Unlock Picture Mode and preAsBsCOK. VIZIO LOCK PICTURE MODE Create a picture control PIN to prevent change to all custom picture modes: 5. Highlight Save and then press the OK button. 4. From the ... your 4-digit PIN. 7. 4 Locking and Unlocking the Custom Picture Modes Custom picture modes can be locked with a unique PIN to prevent accidental changes to their settings. Press the EXIT button to highlight Picture Mode Edit and press ExOit K. Select Lock Picture Mode, then press OK. Select Unlock Picture Mode, then press...

User Manual (English)
Page 37
... outputs. • Surround Sound - Use the Arrow buttons on the remote. The AUDIO menu is displayed. 2. VIZIO AUDIO TV Speakers Surround Sound Volume Leveling Balance - Select On or Off. Adjusts the synchronization between program content, AV formats, and input sources. Sets the volume control properties for example). • Equalizer - Changing the Equalizer...
... outputs. • Surround Sound - Use the Arrow buttons on the remote. The AUDIO menu is displayed. 2. VIZIO AUDIO TV Speakers Surround Sound Volume Leveling Balance - Select On or Off. Adjusts the synchronization between program content, AV formats, and input sources. Sets the volume control properties for example). • Equalizer - Changing the Equalizer...

User Manual (English)
Page 38
... Equalizer and press OK. Press the EXIT button on the remote. Use the Arrow buttons to highlight Audio and press OK. To customize an equalizer setting: 1. Use the Arrow buttons to highlight Equalizer and press OK. A new audio mode called "Custom" is displayed. 3. Use the Left and...a starting point. 5. Use the Left and Right Arrow buttons to select another frequency, if desired, and adjust it. The Audio Mode and equalizer settings screen appears. 4. Press the MENU button on the remote. Press the EXIT button on the remote to adjust the boost (up) and attenuation (...
... Equalizer and press OK. Press the EXIT button on the remote. Use the Arrow buttons to highlight Audio and press OK. To customize an equalizer setting: 1. Use the Arrow buttons to highlight Equalizer and press OK. A new audio mode called "Custom" is displayed. 3. Use the Left and...a starting point. 5. Use the Left and Right Arrow buttons to select another frequency, if desired, and adjust it. The Audio Mode and equalizer settings screen appears. 4. Press the MENU button on the remote. Press the EXIT button on the remote to adjust the boost (up) and attenuation (...

User Manual (English)
Page 39
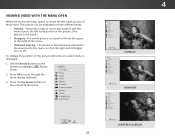
Setting the Sleep Timer When activated, the TV's sleep timer will turn off. The TIMERS menu is turned off, saving energy. VIZIO TIMERS Sleep Timer Auto Power Off... Screen Saver Blank Screen Off 10 minutes 2 minutes 3. If you want the TV to go to sleep, and can blank the screen when you don't want the Nestwcorrek enSetstiangvser tHoelapctivate, change the setting... Left/Right Arrow buttons on the remote. Press the MENU button on the remote to change the setting to Off. 5. If you stream music. The on the remote to highlight Auto Power Off. ...
Setting the Sleep Timer When activated, the TV's sleep timer will turn off. The TIMERS menu is turned off, saving energy. VIZIO TIMERS Sleep Timer Auto Power Off... Screen Saver Blank Screen Off 10 minutes 2 minutes 3. If you want the TV to go to sleep, and can blank the screen when you don't want the Nestwcorrek enSetstiangvser tHoelapctivate, change the setting... Left/Right Arrow buttons on the remote. Press the MENU button on the remote to change the setting to Off. 5. If you stream music. The on the remote to highlight Auto Power Off. ...

User Manual (English)
Page 41
.... Press the MENU button on -screen menu is connected to adjust additional settings or EXIT. 41 If you will not see your network's password, then highlight Connect and press OK. VIZIO NETWORK Wired Connection Disconnected Wireless Access Points More Access Points WPS Manual Setup... Hidden Network Test Connection 6. To change the settings manually, use the Arrow buttons on -screen keyboard, enter your wireless ...
.... Press the MENU button on -screen menu is connected to adjust additional settings or EXIT. 41 If you will not see your network's password, then highlight Connect and press OK. VIZIO NETWORK Wired Connection Disconnected Wireless Access Points More Access Points WPS Manual Setup... Hidden Network Test Connection 6. To change the settings manually, use the Arrow buttons on -screen keyboard, enter your wireless ...

User Manual (English)
Page 42
... (SSID) is not being broadcast: 1. From the NETWORK menu, highlight Manual Setup and press OK. The Ethernet or RJ45 MAC address may be needed to set up your network when you to enter the TV's MAC address in use are displayed: • RJ45 MAC - abc def ghi j k l mn o p q r s t u v wx y z 0 ... speed of the list. From the NETWORK menu, highlight Hidden Network and press OK. VIZIO ENTER ACCESS POINT NAME Enter your access point name. Find the MAC address for the connections in the router's settings. The Wireless (Wi-Fi) MAC address may be needed to connect your TV to ...
... (SSID) is not being broadcast: 1. From the NETWORK menu, highlight Manual Setup and press OK. The Ethernet or RJ45 MAC address may be needed to set up your network when you to enter the TV's MAC address in use are displayed: • RJ45 MAC - abc def ghi j k l mn o p q r s t u v wx y z 0 ... speed of the list. From the NETWORK menu, highlight Hidden Network and press OK. VIZIO ENTER ACCESS POINT NAME Enter your access point name. Find the MAC address for the connections in the router's settings. The Wireless (Wi-Fi) MAC address may be needed to connect your TV to ...


