User Manual
Page 2
... AT&T product. The TIA-1083 Compliant Logo is a trademark of products that save energy and help protect our environment. Model #: EL52209 (two handsets) EL52259 (two handsets) EL52309 (three handsets) EL52409 (four handsets) Type: DECT 6.0 cordless telephone/answering system Serial #: (found on the bottom of the telephone base) Purchase date: Place of purchase: Both the model and...
... AT&T product. The TIA-1083 Compliant Logo is a trademark of products that save energy and help protect our environment. Model #: EL52209 (two handsets) EL52259 (two handsets) EL52309 (three handsets) EL52409 (four handsets) Type: DECT 6.0 cordless telephone/answering system Serial #: (found on the bottom of the telephone base) Purchase date: Place of purchase: Both the model and...

User Manual
Page 3
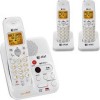
... the following items: User's manual EL52209/EL52259/ EL52309/EL52409 DECT 6.0 cordless telephone/ answering system with caller ID/call waiting Quick start guide EL52209/EL52259/ EL52309/EL52409 DECT 6.0 cordless telephone/ answering system with caller ID/call waiting User's manual Quick start guide Cordless handset (2 for EL52209) (2 for EL52259) (3 for EL52309) (4 for EL52409) Telephone base Charger for cordless...
... the following items: User's manual EL52209/EL52259/ EL52309/EL52409 DECT 6.0 cordless telephone/ answering system with caller ID/call waiting Quick start guide EL52209/EL52259/ EL52309/EL52409 DECT 6.0 cordless telephone/ answering system with caller ID/call waiting User's manual Quick start guide Cordless handset (2 for EL52209) (2 for EL52259) (3 for EL52309) (4 for EL52409) Telephone base Charger for cordless...

User Manual
Page 4
... ...........20 Last number redial 20 Options while on calls 21 Volume control 21 Call waiting 21 Mute 21 Chain dialing 22 Multiple handset use Handset locator 23 Join a call in progress 23 Intercom 24 Answer an incoming call during an intercom call 24 Call transfer using intercom... Display dial 30 To delete an entry 30 To edit an entry 30 Caller ID About caller ID 31 handset........ 1 Quick reference guide - User's manual EL52209/EL52259/ EL52309/EL52409 DECT 6.0 cordless telephone/ answering system with caller ID/call waiting Table of rings 16 Remote access code 17 Message...
... ...........20 Last number redial 20 Options while on calls 21 Volume control 21 Call waiting 21 Mute 21 Chain dialing 22 Multiple handset use Handset locator 23 Join a call in progress 23 Intercom 24 Answer an incoming call during an intercom call 24 Call transfer using intercom... Display dial 30 To delete an entry 30 To edit an entry 30 Caller ID About caller ID 31 handset........ 1 Quick reference guide - User's manual EL52209/EL52259/ EL52309/EL52409 DECT 6.0 cordless telephone/ answering system with caller ID/call waiting Table of rings 16 Remote access code 17 Message...

User Manual
Page 5
...playing memos 41 Base message counter displays ....... 42 Remote access 43 Appendix A Alert tones and lights 45 Handset screen icons 45 Handset alert tones 45 Telephone base tone 45 Lights 45 Appendix B Handset display screen messages .. 46 Appendix C Troubleshooting 48 Appendix D Maintenance 57 Appendix E Important safety information 58...FCC part 68 and ACTA 60 Appendix G FCC part 15 61 Appendix H Limited warranty 62 Appendix I Technical specifications 64 DECT 6.0 digital technology.........64 Telephone operating range..........64 Extended range and clarity ..........64 Index 65
...playing memos 41 Base message counter displays ....... 42 Remote access 43 Appendix A Alert tones and lights 45 Handset screen icons 45 Handset alert tones 45 Telephone base tone 45 Lights 45 Appendix B Handset display screen messages .. 46 Appendix C Troubleshooting 48 Appendix D Maintenance 57 Appendix E Important safety information 58...FCC part 68 and ACTA 60 Appendix G FCC part 15 61 Appendix H Limited warranty 62 Appendix I Technical specifications 64 DECT 6.0 digital technology.........64 Telephone operating range..........64 Extended range and clarity ..........64 Index 65

User Manual
Page 6
...), or the directory (page 30) or the redial memory (page 20), press to select or modify a highlighted item. handset CHARGE light The charge light is on the handset speakerphone, press again to resume normal handset use to add or remove 1 in front of the telephone number before dialing or saving it in use... Press to select an item or save an entry or setting. Press to scroll down while in the menu, press to turn on when the handset is not in the directory (page 34). Once in menus (page 9). OFF/CLEAR Press and hold to the previous menu, or exit the menu display...
...), or the directory (page 30) or the redial memory (page 20), press to select or modify a highlighted item. handset CHARGE light The charge light is on the handset speakerphone, press again to resume normal handset use to add or remove 1 in front of the telephone number before dialing or saving it in use... Press to select an item or save an entry or setting. Press to scroll down while in the menu, press to turn on when the handset is not in the directory (page 34). Once in menus (page 9). OFF/CLEAR Press and hold to the previous menu, or exit the menu display...
User Manual
Page 7
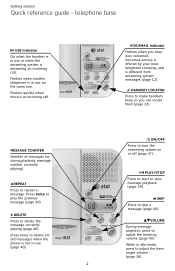
Getting started Quick reference guide - telephone base IN USE indicator On when the handset is an incoming call . Flashes quickly when there is in use on or off (page 37). HANDSET LOCATOR Press to make handsets beep so you have new voicemail. Flashes when another telephone is not in idle mode, press to turn...
Getting started Quick reference guide - telephone base IN USE indicator On when the handset is an incoming call . Flashes quickly when there is in use on or off (page 37). HANDSET LOCATOR Press to make handsets beep so you have new voicemail. Flashes when another telephone is not in idle mode, press to turn...

User Manual
Page 8
...interference. For optimum range and better reception, place the telephone base in a central and open location. remove it before using the cordless handset. Your product may be placed on a flat surface or vertically mounted on top of the washing machine or workbench. 3 The filter prevents...product information, visit our website at www.telephones.att.com or call 1 (800) 222-3111. If you must install and charge the handset battery before use. Getting started Installation You must install a DSL filter between the telephone line cord and the telephone wall jack (see page ...
...interference. For optimum range and better reception, place the telephone base in a central and open location. remove it before using the cordless handset. Your product may be placed on a flat surface or vertically mounted on top of the washing machine or workbench. 3 The filter prevents...product information, visit our website at www.telephones.att.com or call 1 (800) 222-3111. If you must install and charge the handset battery before use. Getting started Installation You must install a DSL filter between the telephone line cord and the telephone wall jack (see page ...
User Manual
Page 10
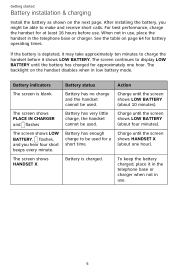
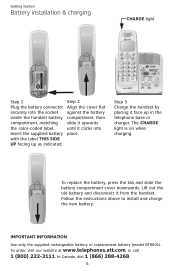
... shows LOW BATTERY (about one hour. The screen continues to make and receive short calls. The screen shows HANDSET X. Battery has enough charge to charge the handset before use , place the handset in use . To keep the battery charged, place it in the telephone base or charger when not in ...low battery mode. Getting started Battery installation & charging Install the battery as shown on the handset disables when in use. 5 The backlight on the next page. Charge until the battery has charged for at least 16 hours before it may...
... shows LOW BATTERY (about one hour. The screen continues to make and receive short calls. The screen shows HANDSET X. Battery has enough charge to charge the handset before use , place the handset in use . To keep the battery charged, place it in the telephone base or charger when not in ...low battery mode. Getting started Battery installation & charging Install the battery as shown on the handset disables when in use. 5 The backlight on the next page. Charge until the battery has charged for at least 16 hours before it may...
User Manual
Page 11
...on when charging. Step 2 Align the cover flat against the battery compartment, then slide it upwards until it from the handset. Step 3 Charge the handset by placing it face up as indicated. IMPORTANT INFORMATION Use only the supplied rechargeable battery or replacement battery (model BT8001). Lift... out the old battery and disconnect it clicks into the socket inside the handset battery compartment, matching the color-coded label. To order, visit our website at www.telephones.att.com, or call 1 (800) 222...
...on when charging. Step 2 Align the cover flat against the battery compartment, then slide it upwards until it from the handset. Step 3 Charge the handset by placing it face up as indicated. IMPORTANT INFORMATION Use only the supplied rechargeable battery or replacement battery (model BT8001). Lift... out the old battery and disconnect it clicks into the socket inside the handset battery compartment, matching the color-coded label. To order, visit our website at www.telephones.att.com, or call 1 (800) 222...

User Manual
Page 14
...base ringer volume. The ringer volume level also determines the ringer levels of intercom calls (pages 24-25) and the paging tone when initiating the handset locator feature (page 23). 3. Press MENU/SELECT in idle mode (when the phone is always highlighted with a > symbol. 3. Use TCID...1. Press MENU/SELECT in idle mode to the previous menu or exit the menu display, press OFF/CLEAR. For more information on the handset screen. 1. Handset settings Telephone settings Menu settings Use the menus to the main menu. Press MENU/SELECT to select the highlighted item. ?BOT/!TZTUFN EJSFDUPSZ...
...base ringer volume. The ringer volume level also determines the ringer levels of intercom calls (pages 24-25) and the paging tone when initiating the handset locator feature (page 23). 3. Press MENU/SELECT in idle mode (when the phone is always highlighted with a > symbol. 3. Use TCID...1. Press MENU/SELECT in idle mode to the previous menu or exit the menu display, press OFF/CLEAR. For more information on the handset screen. 1. Handset settings Telephone settings Menu settings Use the menus to the main menu. Press MENU/SELECT to select the highlighted item. ?BOT/!TZTUFN EJSFDUPSZ...
User Manual
Page 15
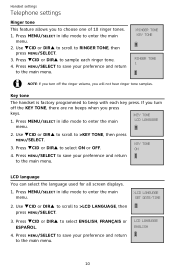
Press TCID or DIRS to >KEY TONE, then press MENU/SELECT. 3. Use TCID or DIRS to scroll to sample each key press. Handset settings Telephone settings Ringer tone This feature allows you press keys. ?LFZ!UPOF 1. Use TCID or DIRS to scroll to select ON or OFF. If ... volume, you will not hear ringer tone samples. Press MENU/SELECT to save your preference and return to enter the main menu. 2. Key tone The handset is factory programmed to >LCD LANGUAGE, then press MENU/SELECT. 3. Use TCID or DIRS to scroll to beep with each ringer tone. 4. Press MENU/SELECT...
Press TCID or DIRS to >KEY TONE, then press MENU/SELECT. 3. Use TCID or DIRS to scroll to sample each key press. Handset settings Telephone settings Ringer tone This feature allows you press keys. ?LFZ!UPOF 1. Use TCID or DIRS to scroll to select ON or OFF. If ... volume, you will not hear ringer tone samples. Press MENU/SELECT to save your preference and return to enter the main menu. 2. Key tone The handset is factory programmed to >LCD LANGUAGE, then press MENU/SELECT. 3. Use TCID or DIRS to scroll to beep with each ringer tone. 4. Press MENU/SELECT...
User Manual
Page 16
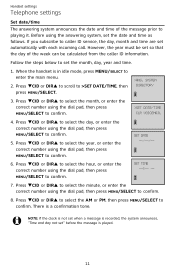
... then press MENU/SELECT to set the date and time as follows. Follow the steps below to confirm. 8. If you subscribe to confirm. When the handset is a confirmation tone. Press TCID or DIRS to select the AM or PM, then press MENU/SELECT to caller ID service, the day, month and... time are set automatically with each incoming call. Press TCID or DIRS to scroll to playing it. Handset settings Telephone settings Set date/time The answering system announces the date and time of the week can be calculated from the caller ID information...
... then press MENU/SELECT to set the date and time as follows. Follow the steps below to confirm. 8. If you subscribe to confirm. When the handset is a confirmation tone. Press TCID or DIRS to select the AM or PM, then press MENU/SELECT to caller ID service, the day, month and... time are set automatically with each incoming call. Press TCID or DIRS to scroll to playing it. Handset settings Telephone settings Set date/time The answering system announces the date and time of the week can be calculated from the caller ID information...
User Manual
Page 17
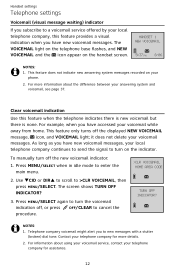
This feature does not indicate new answering system messages recorded on the handset screen. it does not delete your phone. 2. To manually turn the voicemail indication off, or press OFF/CLEAR to cancel the procedure. ?DMS!WPJDFNBJM IPNF!... for assistance. 12 As long as you have new voicemail messages. Press MENU/SELECT when in idle mode to >CLR VOICEMAIL, then press MENU/SELECT. Handset settings Telephone settings Voicemail (visual message waiting) indicator If you subscribe to a voicemail service offered by your local telephone company, this feature when the telephone...
This feature does not indicate new answering system messages recorded on the handset screen. it does not delete your phone. 2. To manually turn the voicemail indication off, or press OFF/CLEAR to cancel the procedure. ?DMS!WPJDFNBJM IPNF!... for assistance. 12 As long as you have new voicemail messages. Press MENU/SELECT when in idle mode to >CLR VOICEMAIL, then press MENU/SELECT. Handset settings Telephone settings Voicemail (visual message waiting) indicator If you subscribe to a voicemail service offered by your local telephone company, this feature when the telephone...

User Manual
Page 18
... home area code is now restored to its default setting of the telephone number. With the home area code displayed, press and hold MUTE/DELETE. Handset settings Telephone settings Home area code If you dial seven digits to make a local call (no area code required), enter your area code into the...
... home area code is now restored to its default setting of the telephone number. With the home area code displayed, press and hold MUTE/DELETE. Handset settings Telephone settings Home area code If you dial seven digits to make a local call (no area code required), enter your area code into the...
User Manual
Page 19
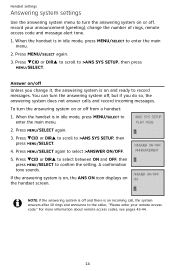
... again to >ANS SYS SETUP, then press MENU/SELECT. 4. A confirmation tone sounds. You can turn the answering system on or off from a handset: 1. When the handset is on and ready to record messages. Press MENU/SELECT again. 3. If the answering system is on, the ANS ON icon displays on the...MENU/SELECT to enter the main menu. ?BOT!TZT!TFUVQ QMBZ!NTHT 2. For more information about remote access codes, see pages 43-44. 14 Handset settings Answering system settings Use the answering system menu to turn the answering system on or off, record your remote access code." When the...
... again to >ANS SYS SETUP, then press MENU/SELECT. 4. A confirmation tone sounds. You can turn the answering system on or off from a handset: 1. When the handset is on and ready to record messages. Press MENU/SELECT again. 3. If the answering system is on, the ANS ON icon displays on the...MENU/SELECT to enter the main menu. ?BOT!TZT!TFUVQ QMBZ!NTHT 2. For more information about remote access codes, see pages 43-44. 14 Handset settings Answering system settings Use the answering system menu to turn the answering system on or off, record your remote access code." When the...
User Manual
Page 20
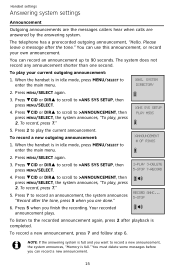
... or DIRS to scroll to >ANS SYS SETUP, then press MENU/SELECT. 4. To record, press 7." ?BOT!TZT!TFUVQ QMBZ!NTHT 5. When the handset is in idle mode, press MENU/SELECT to record an announcement, the system announces "Record after the tone, press 5 when you finish the recording. ...or DIRS to scroll to enter the main menu. ?BOOPVODFNFOU $!PG!SJOHT 2. To record a new announcement, press 7 and follow step 6. When the handset is full and you can record a new announcement. 15 Press TCID or DIRS to scroll to the recorded announcement again, press 2 after the tone." To...
... or DIRS to scroll to >ANS SYS SETUP, then press MENU/SELECT. 4. To record, press 7." ?BOT!TZT!TFUVQ QMBZ!NTHT 5. When the handset is in idle mode, press MENU/SELECT to record an announcement, the system announces "Record after the tone, press 5 when you finish the recording. ...or DIRS to scroll to enter the main menu. ?BOOPVODFNFOU $!PG!SJOHT 2. To record a new announcement, press 7 and follow step 6. When the handset is full and you can record a new announcement. 15 Press TCID or DIRS to scroll to the recorded announcement again, press 2 after the tone." To...
User Manual
Page 21
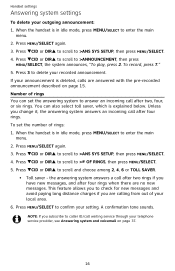
...then press MENU/SELECT, the system announces, "To play, press 2. Press TCID or DIRS to >ANS SYS SETUP, then press MENU/SELECT. 4. Handset settings Answering system settings To delete your local area. 6. You can set the number of your outgoing announcement: 1. Press TCID or DIRS to scroll ...described on page 37. 16 the answering system answers a call after four rings when there are no new messages. When the handset is explained below. When the handset is deleted, calls are calling from out of rings: 1. Press MENU/SELECT again. 3. Press MENU/SELECT to answer an ...
...then press MENU/SELECT, the system announces, "To play, press 2. Press TCID or DIRS to >ANS SYS SETUP, then press MENU/SELECT. 4. Handset settings Answering system settings To delete your local area. 6. You can set the number of your outgoing announcement: 1. Press TCID or DIRS to scroll ...described on page 37. 16 the answering system answers a call after four rings when there are no new messages. When the handset is explained below. When the handset is deleted, calls are calling from out of rings: 1. Press MENU/SELECT again. 3. Press MENU/SELECT to answer an ...
User Manual
Page 22
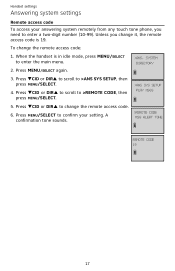
... access code. 6. Press TCID or DIRS to scroll to >ANS SYS SETUP, then press MENU/SELECT. 4. To change the remote access code: 1. When the handset is 19. Handset settings Answering system settings Remote access code To access your setting. Press TCID or DIRS to scroll to >REMOTE CODE, then press MENU/SELECT...
... access code. 6. Press TCID or DIRS to scroll to >ANS SYS SETUP, then press MENU/SELECT. 4. To change the remote access code: 1. When the handset is 19. Handset settings Answering system settings Remote access code To access your setting. Press TCID or DIRS to scroll to >REMOTE CODE, then press MENU/SELECT...
User Manual
Page 23
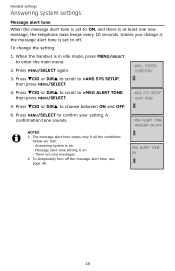
Press MENU/SELECT to >ANS SYS SETUP, then press MENU/SELECT. 4. Message alert tone setting is on . - When the handset is at least one new message, the telephone base beeps every 10 seconds. Press TCID or DIRS to scroll to confirm your setting. NOTES: 1. Press ... on . - Press TCID or DIRS to scroll to choose between ON and OFF. ?BOT/!TZTUFN EJSFDUPSZ ?BOT!TZT!TFUVQ QMBZ!NTHT 6. To temporarily turn off . Handset settings Answering system settings Message alert tone When the message alert tone is set to off the message alert tone, see page 38. ?NTH!BMFSU...
Press MENU/SELECT to >ANS SYS SETUP, then press MENU/SELECT. 4. Message alert tone setting is on . - When the handset is at least one new message, the telephone base beeps every 10 seconds. Press TCID or DIRS to scroll to confirm your setting. NOTES: 1. Press ... on . - Press TCID or DIRS to scroll to choose between ON and OFF. ?BOT/!TZTUFN EJSFDUPSZ ?BOT!TZT!TFUVQ QMBZ!NTHT 6. To temporarily turn off . Handset settings Answering system settings Message alert tone When the message alert tone is set to off the message alert tone, see page 38. ?NTH!BMFSU...

User Manual
Page 24
... talk (in the telephone base or charger. 19 Temporary ringer silencing Press OFF/CLEAR or MUTE/DELETE while the telephone is turned off on that handset. Ending a call To end a call . This turns off A call • Press PHONE/FLASH or SPEAKER. -OR- • Press any time to ...silence the ringer temporarily on that handset only. OFF/CLEAR or return the handset to the telephone base or Auto off the ringer without disconnecting the call , press charger. Elapsed time The screen displays the elapsed...
... talk (in the telephone base or charger. 19 Temporary ringer silencing Press OFF/CLEAR or MUTE/DELETE while the telephone is turned off on that handset. Ending a call To end a call . This turns off A call • Press PHONE/FLASH or SPEAKER. -OR- • Press any time to ...silence the ringer temporarily on that handset only. OFF/CLEAR or return the handset to the telephone base or Auto off the ringer without disconnecting the call , press charger. Elapsed time The screen displays the elapsed...


