
User Manual
Page 3
... 5 Handset layout 6 Telephone base layout 7 Telephone settings 8 Ringer volume 8 Ringer tone 9 Key tone 10 Language 10 Clear voicemail 11 Telephone operation 12 Make a call 12 Answer a call 12 End a call 12 Mute 12 Ringer mute 13 Call waiting 13 Volume 13 Find handset 13 Chain dialing 14 Directory 15 Store a directory entry 16 Character chart...
... 5 Handset layout 6 Telephone base layout 7 Telephone settings 8 Ringer volume 8 Ringer tone 9 Key tone 10 Language 10 Clear voicemail 11 Telephone operation 12 Make a call 12 Answer a call 12 End a call 12 Mute 12 Ringer mute 13 Call waiting 13 Volume 13 Find handset 13 Chain dialing 14 Directory 15 Store a directory entry 16 Character chart...
User Manual
Page 8
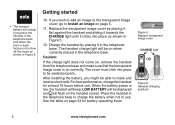
... you place the handset in the telephone base with either the front or back facing out to show off the insert as shown in Figure 5. 12. After installing the battery, you wish to add an image to the transparent image cover, go to Install an image on correctly. When the battery...
... you place the handset in the telephone base with either the front or back facing out to show off the insert as shown in Figure 5. 12. After installing the battery, you wish to add an image to the transparent image cover, go to Install an image on correctly. When the battery...
User Manual
Page 16
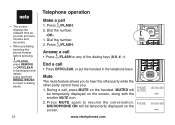
... ON will be temporarily displayed on the screen, along with the smaller MUTE icon. 2. Dial the number. -OR1. Press MUTE again to insert a dialing pause. 12 Telephone operation Make a call • Press /FLASH or any of the dialing keys (0-9, #, *). During a call • Press OFF/CLEAR, or put the handset in hours...
... ON will be temporarily displayed on the screen, along with the smaller MUTE icon. 2. Dial the number. -OR1. Press MUTE again to insert a dialing pause. 12 Telephone operation Make a call • Press /FLASH or any of the dialing keys (0-9, #, *). During a call • Press OFF/CLEAR, or put the handset in hours...
User Manual
Page 38
... following conditions: A. Follow all instructions. 2. Never spill liquid of fire, electric shock and injury, including the following: 1. Do not overload wall outlets and extension cords. 12. Adjust only those controls that are not designed to normal operation. F. Incorrect reassembling can cause electric shock when the product is damaged or frayed. Unplug...
... following conditions: A. Follow all instructions. 2. Never spill liquid of fire, electric shock and injury, including the following: 1. Do not overload wall outlets and extension cords. 12. Adjust only those controls that are not designed to normal operation. F. Incorrect reassembling can cause electric shock when the product is damaged or frayed. Unplug...
User Manual
Page 55
...Dial a call log entry 24 Dial a directory entry 18 Dial a redial entry 28 Directory 15 DSL filter 2 E Edit a directory entry 19 End a call 12 F FCC, ACTA and IC regulations 48 Find handset 13 H Handset indicators 31 Handset display screen messages 29 I Install an image 5 K Key tone 10 L... Language 10 M Maintenance 44 Make a call 12 Make a call log entry ready to dial 24 Missed calls indicator 23 Mute 12 O Operating range 44 P Parts checklist 1 www.vtechphones.com R RBRC® seal 45 Redial list 28 Review the...
...Dial a call log entry 24 Dial a directory entry 18 Dial a redial entry 28 Directory 15 DSL filter 2 E Edit a directory entry 19 End a call 12 F FCC, ACTA and IC regulations 48 Find handset 13 H Handset indicators 31 Handset display screen messages 29 I Install an image 5 K Key tone 10 L... Language 10 M Maintenance 44 Make a call 12 Make a call log entry ready to dial 24 Missed calls indicator 23 Mute 12 O Operating range 44 P Parts checklist 1 www.vtechphones.com R RBRC® seal 45 Redial list 28 Review the...

